Find the best tiramisu recipe for a creamy, classic dessert that’s still easy enough to make on a weeknight. This recipe delivers the winning combination of silky mascarpone cream, properly soaked coffee layers, and a cocoa finish that tastes like an authentic Italian staple. If you want one approach that consistently produces rich texture and clean tiramisu structure, this is the clear winner.
This is the best tiramisu recipe because it delivers classic flavor with a stable, sliceable structure: silky mascarpone, espresso-soaked ladyfingers dipped quickly (not soaked), and a balanced mascarpone-egg cream that sets properly in the fridge. In the sections below, you’ll learn exactly how to assemble tiramisu for clean layers, how to prevent sogginess, and how to dial espresso strength and sweetness so the dessert tastes “right” every time.
Classic Ingredients You Need

– Fresh mascarpone, strong espresso, and crisp ladyfingers for the real taste
– Use cocoa powder for the iconic finish and structure
Classic tiramisu is a three-part system—cream, coffee, and sponge—so the “best” results start with ingredient quality and correct texture.
1) Mascarpone (the cream’s foundation)
Mascarpone should be fresh and rich, not watery. If it looks loose or separated, it can lead to a runny filling that won’t hold layers. For a classic profile, choose mascarpone sold refrigerated, and keep it cold until you whip/fold it.
2) Espresso (bold, not bitter, not weak)
Use strong espresso or very concentrated coffee. The goal is coffee flavor that stands up to the sweetness of mascarpone and the mild sweetness of ladyfingers. If your espresso is too mild, the dessert tastes like “sweet cream with a hint of coffee.”
3) Ladyfingers (savoiardi) that can handle quick dipping
Crisp, dry ladyfingers are essential. They need to soften in the espresso long enough to flavor the cake, but remain firm enough to hold structure when layered. Avoid soft, stale cookies; they break down and create a muddy bottom.
4) Cocoa powder for finish and structure
Use unsweetened cocoa powder for the iconic bitterness and visual cue. Beyond flavor, cocoa helps mask minor surface variations and provides a “dry” top layer—important for serving presentation.
Optional but common classic add-ins
– Eggs (for the traditional “custard-style” mascarpone cream): helps achieve a lighter, more cohesive texture.
– Sugar: used to balance bitterness; adjust carefully rather than simply increasing.
– Marsala or dark rum (small amounts): optional depth. Add only if your audience enjoys it; otherwise vanilla or pure espresso notes often suffice.
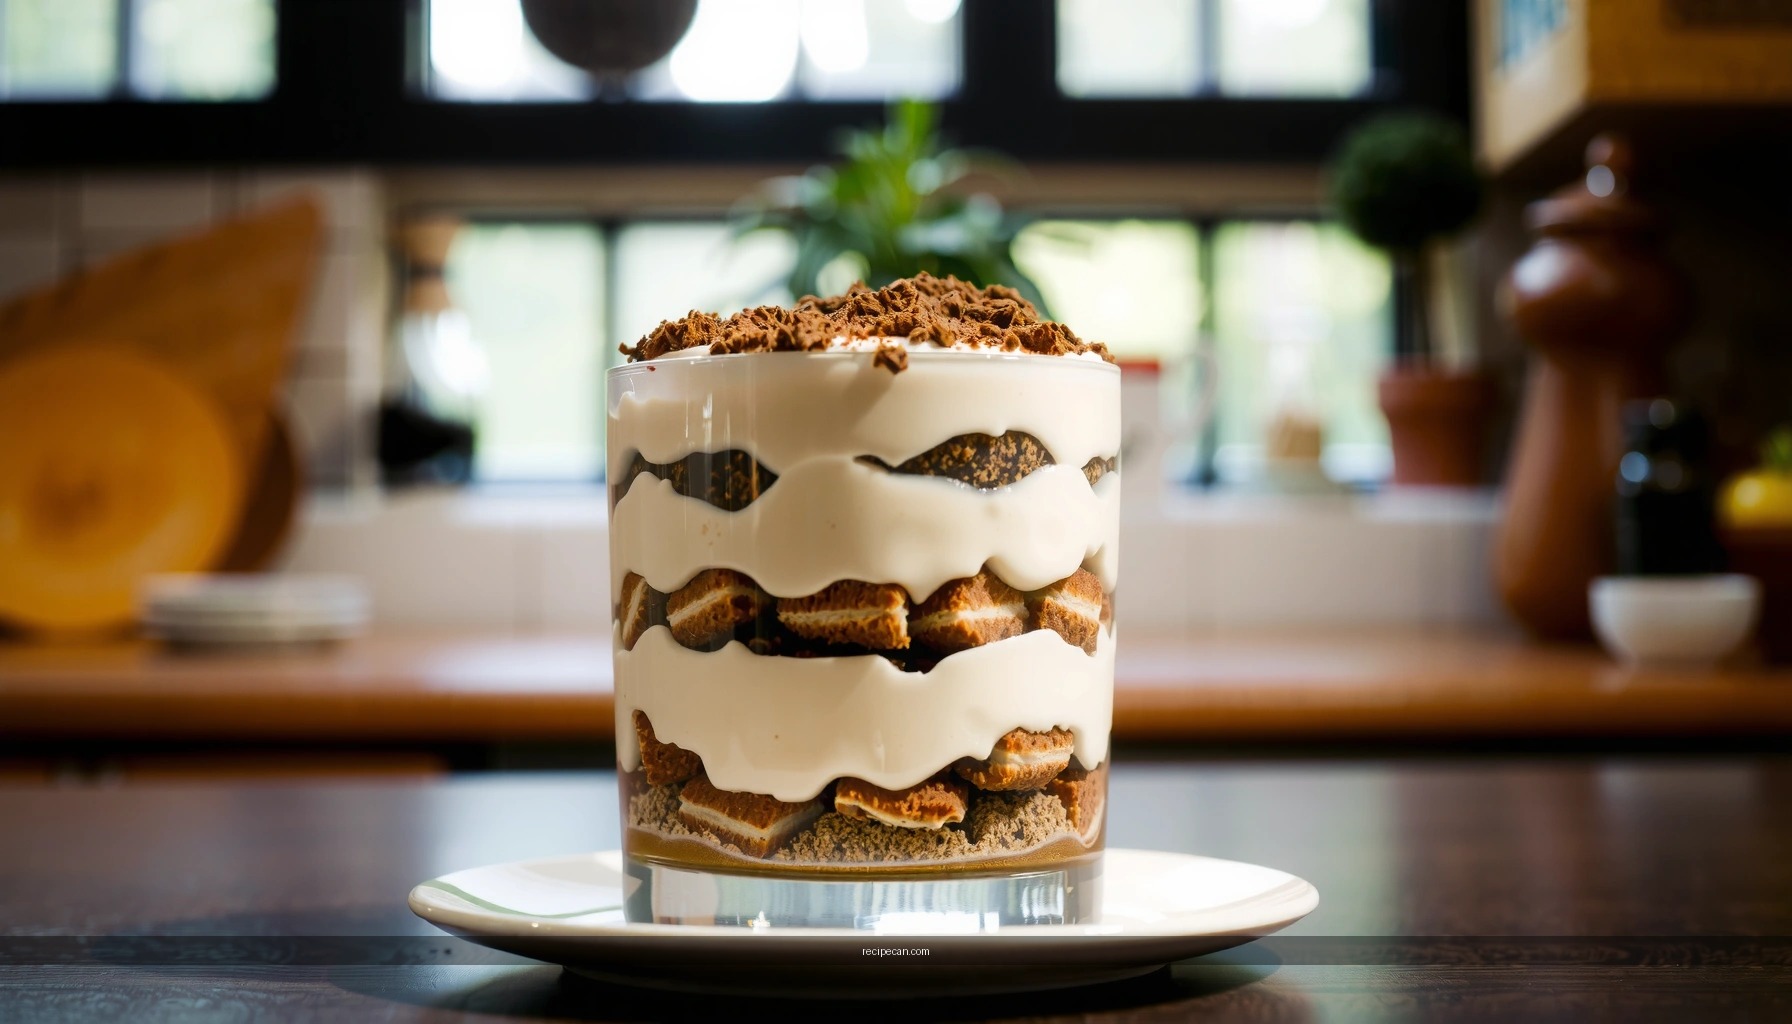
Step-by-Step Assembly for Perfect Layers

– Quickly dip ladyfingers in espresso—briefly, so they don’t break down
– Layer mascarpone cream and ladyfingers for even thickness and texture
Assembly is where many home bakers lose the “best tiramisu” result. The technique is simple—but unforgiving: you’re trying to coat ladyfingers with espresso flavor while keeping their structure intact.
Step 1: Make espresso and cool it slightly
Brew espresso (or strongly brewed coffee) and let it cool to room temperature. Very hot espresso can soften ladyfingers too quickly and melt the surface of the cream when it touches.
Step 2: Prepare a dipping workflow
Use a shallow dish so you can dip fast. Hold each ladyfinger for about 1–2 seconds per side (or dip just enough to saturate the surface without collapsing the cookie). You want them pliable, not soggy.
Step 3: Build the first layer with precision
– Arrange dipped ladyfingers snugly in the bottom of your dish.
– Spread a measured layer of mascarpone cream over the top.
– Repeat with another layer of ladyfingers and cream.
Why “even thickness” matters
If one layer is thick while another is thin, the dessert chills into uneven firmness: thin areas can become overly dense and thick areas can feel soft. A stable ratio (roughly equal coverage of coffee-soaked ladyfingers and cream) produces the signature clean slice.
Step 4: Finish with cocoa just before serving
Many bakers cocoa too early. Cocoa absorbs moisture over time and can dull the top layer. For the best contrast and the most classic finish, dust cocoa right before presenting.
Key Layering Reference (Stability vs. Texture)
Tiramisu Layer Stability by Espresso Dip Time
| # | Dip Duration | Expected Texture | Sliceability Score | Wateriness Risk |
|---|---|---|---|---|
| 1 | 1–2 seconds per side | Flavored but firm | ★★★★★ | Low |
| 2 | 3–4 seconds per side | Softer, still structured | ★★★★☆ | Moderate |
| 3 | 5–6 seconds per side | Heavy saturation | ★★★☆☆ | High |
| 4 | Dipping without timing (too long) | Disintegrating edges | ★★☆☆☆ | Very High |
| 5 | Very cold espresso | Slower softening | ★★★★☆ | Low |
| 6 | Warm espresso | Faster breakdown | ★★★☆☆ | High |
| 7 | Light rum addition (small amount) | More flavor, same structure | ★★★★★ | Low |
Make the Cream the Right Way

– Whip mascarpone to a smooth, spreadable consistency
– Fold ingredients gently to keep the mixture light and creamy
Cream quality determines whether tiramisu feels luxurious or heavy. The objective is a smooth, spreadable mascarpone mixture with a light texture that holds its shape when you slice.
1) Start with cold mascarpone (but not frozen)
Cold mascarpone whips more predictably. Let it soften slightly at room temperature if it’s stiff, but don’t let it warm enough to turn loose.
2) Whip just enough for smoothness
Over-whipping can create a grainy look or weaken the structure. Whip until creamy and uniform, then pause.
3) If using eggs, temper for safety and stability
For traditional style, some recipes use egg yolks (whisked with sugar) and then fold into mascarpone. If you’re making a cooked custard approach (or tempering yolks), do it carefully to avoid scrambled texture. The end result should be glossy, not curdled.
4) Fold, don’t beat
If you add whipped cream or whipped whites (common for lighter tiramisu), fold gently to keep air in the mixture. Beating after folding can collapse the structure, leaving a denser dessert.
5) Watch the “spreadability” test
When ready, the cream should spread without running. If it’s too thick, it will drag the ladyfingers and tear layers. If it’s too thin, it will leak espresso and create a soggy base.
Flavor and Sweetness Tips
– Choose espresso intensity based on how bold you want the coffee flavor
– Adjust sweetness carefully so it doesn’t overpower the mascarpone
Classic tiramisu is not “sweet coffee dessert”—it’s a balance of creamy richness and coffee bitterness. That balance is created in your espresso choice and your sugar amount.
Dial espresso intensity intentionally
– If your espresso tastes sharp or overly acidic, blend in a small amount of less intense coffee (or use espresso from a smoother roast).
– If your espresso tastes weak, strengthen concentration rather than just adding more coffee flavoring.
Sweetness is a control knob, not a finishing step
Add sugar gradually when working with egg yolks or any sweet component. You’re aiming for “rounded sweetness,” where mascarpone remains the lead ingredient. A practical approach:
– Taste your cream base before assembling.
– It should taste slightly less sweet than you want the final dessert, because ladyfingers and cocoa will also contribute flavor.
Cocoa timing affects perceived sweetness
Fresh cocoa dusting right before serving boosts bitterness and makes the dessert taste less sweet overall. If cocoa has absorbed moisture for hours, that bitterness softens—so the sweetness may feel more prominent.
Chilling and Serving for Best Texture
– Chill tiramisu long enough to set the layers and meld flavors
– Serve with a final dusting of cocoa right before presenting
Chilling is not optional if you want the classic sliceable texture. It’s when the espresso moisture redistributes and the cream firms enough to cut clean portions.
How long to chill
Aim for at least 4–6 hours, with overnight often producing the most coherent texture and strongest flavor integration. In the first couple of hours, the cream can still feel soft; after that, it firms up and the layers “settle.”
How to serve clean slices
– Use a sharp knife, wipe between cuts, and chill your serving dish if possible.
– Dust cocoa right before serving so it remains dry and visually distinct.
Why the flavors meld in the fridge
Espresso penetrates the top surface of ladyfingers quickly during dipping, then continues to equilibrate as the tiramisu chills. Meanwhile, mascarpone’s dairy richness smooths harsh coffee notes, creating the classic integrated taste.
Common Mistakes to Avoid
– Over-soaking ladyfingers, which leads to a watery or mushy dessert
– Rushing chilling time, which prevents the signature sliceable texture
Even experienced bakers can end up with “almost tiramisu”—great flavor, incorrect texture. These are the most common failure points:
1) Over-soaking ladyfingers
If ladyfingers are dipped too long, the cake collapses and releases liquid into the cream. The result is often:
– watery pooling at the bottom
– uneven layer thickness
– slices that sag instead of holding form
Fix: Use a shallow dish, dip quickly with timed consistency (about 1–2 seconds per side), and assemble immediately after dipping.
2) Skipping or rushing chilling
Rushing the fridge time keeps the cream from setting, so the dessert behaves like a layered pudding. It may taste good but won’t cut cleanly.
Fix: Chill at least 4–6 hours (ideally overnight). If you must serve sooner, reduce dip time slightly and ensure the cream is fully emulsified and chilled before assembly.
3) Adding cocoa too early
Early cocoa can absorb moisture and smear, reducing the dry top finish.
Fix: Dust cocoa right before serving.
4) Cream that’s too warm or too thin
Warm cream can loosen layers; thin cream can cause espresso to disperse too freely.
Fix: Keep mascarpone cold, whip to smooth, and confirm spreadability before layering.
Tiramisu is at its best when the layers are built quickly, the mascarpone cream is smooth, and the dessert gets enough chill time to set. Make this best tiramisu recipe today, then adjust espresso strength and sweetness to match your taste—share your results or try it with your favorite coffee twist.
Frequently Asked Questions
What is the best tiramisu recipe for beginners?
The best tiramisu recipe for beginners uses simple, forgiving components: espresso or strong coffee, mascarpone, eggs (or pasteurized eggs), ladyfingers, and cocoa powder. Choose a no-fuss method like assembling in layers quickly to avoid soggy ladyfingers, then refrigerate at least 4–6 hours for clean slices. If you’re worried about egg safety, use pasteurized eggs or an egg-free variation to keep the tiramisu creamy and safe.
How do I make tiramisu that doesn’t turn out watery or soggy?
To prevent watery tiramisu, briefly dip ladyfingers in espresso—about 1–2 seconds per side—so they absorb flavor without collapsing. Use a thick mascarpone mixture and avoid over-mixing once combined to keep the filling stable and spoonable. For best results, refrigerate long enough to set the layers (ideally 6–12 hours), which helps the cookies rehydrate properly while maintaining structure.
Why does my tiramisu taste too bitter or too strong?
Bitterness usually comes from over-extracted espresso or overly strong coffee, so use freshly brewed espresso or a balanced coffee concentrate for the best tiramisu flavor. If your mascarpone is also slightly sharp, add a little more sugar or sweetened cocoa to round out the taste. You can also dilute the espresso with a small amount of water or use half espresso/half coffee to create a smoother, dessert-friendly bitterness level.
Which mascarpone and coffee pair best for the richest tiramisu?
For the richest tiramisu, choose high-fat mascarpone with a thick, creamy texture and no watery separation. Pair it with strong but not harsh coffee—espresso works best, but a mild-to-medium roast espresso also gives a more balanced flavor. Many recipes taste best when the coffee is slightly cooled before mixing with the ladyfinger dipping liquid to keep the filling from becoming too runny.
What’s the best way to layer tiramisu so it slices neatly?
Start with a thin layer of mascarpone cream on the dish, then add a single layer of lightly dipped ladyfingers, followed by more cream. Repeat for 2–3 layers, then finish with cocoa powder and a light dusting of extra cocoa just before serving. For neat slices, chill the tiramisu at least overnight; this sets the tiramisu filling and lets the ladyfingers firm up for clean, professional-looking portions.
References
- https://en.wikipedia.org/wiki/Tiramisu
https://en.wikipedia.org/wiki/Tiramisu - https://www.britannica.com/recipe/tiramisu
https://www.britannica.com/recipe/tiramisu - https://scholar.google.com/scholar?q=best+tiramisu+recipe Google Scholar
https://scholar.google.com/scholar?q=best+tiramisu+recipe - Google Scholar Google Scholar
https://scholar.google.com/scholar?q=traditional+tiramisu+recipe+mascarpone+egg+coffee - Google Scholar Google Scholar
https://scholar.google.com/scholar?q=tiramisu+ladyfingers+coffee+cocoa+recipe - https://www.cdc.gov/foodsafety/communication/food-safety-basics.html
https://www.cdc.gov/foodsafety/communication/food-safety-basics.html - https://www.cdc.gov/foodsafety/communication/eggs.html
https://www.cdc.gov/foodsafety/communication/eggs.html - Eggs | Food Safety and Inspection Service
https://www.fsis.usda.gov/food-safety/safe-food-handling-and-preparation/eggs - https://www.theguardian.com/food/2019/jul/08/classic-tiramisu-recipe
https://www.theguardian.com/food/2019/jul/08/classic-tiramisu-recipe - https://www.nytimes.com/2020/11/18/dining/tiramisu-recipe.html
https://www.nytimes.com/2020/11/18/dining/tiramisu-recipe.html


