This tiramisu cake recipe easy delivers a creamy, coffee-soaked dessert with no-fuss steps and dependable results. If you want a quick “make it once, impress immediately” cake—without complicated layering or special equipment—this is the winner. Expect clear instructions for the custardy filling, espresso flavor, and finishing touches so every slice tastes like tiramisu.
If you want an easy tiramisu cake recipe that delivers classic creamy layers without the usual stress, focus on two things: quick ladyfinger dipping and a properly whipped mascarpone-cream filling. This method keeps the cake sliceable, prevents sogginess, and helps you achieve that smooth, café-style tiramisu texture every time—then all that’s left is a reliable chill.
This is the “no-fuss” approach to tiramisu: you’re not cooking custards or tempering eggs, and you’re not guessing at timing. You’ll dip with control, layer cleanly, and chill long enough for the flavors to meld while the cream sets firm.
Easy Tiramisu Cake Ingredients

– Gather mascarpone, heavy cream, espresso or strong coffee, and ladyfingers
– Use cocoa powder and optional sugar for the right sweetness
– Keep vanilla and salt on hand to balance flavors
For an easy tiramisu cake, ingredients matter mostly in texture and flavor intensity. Mascarpone provides the signature richness, but it must be smooth (room temperature helps). Heavy cream adds lightness; espresso or strong coffee provides the bold, bitter-sweet contrast that keeps the dessert from tasting like “just cream.” Ladyfingers are the structural element—so the best results come from using dry, high-quality ladyfingers that soak quickly and set cleanly in the fridge.
Recommended ingredient specifics (for a standard 8×8-inch / 20×20 cm pan):
– Mascarpone cheese: 16 oz (about 450 g), softened to room temperature
– Heavy cream: 1 cup (240 ml), cold for better whipping
– Sugar: 1/3–1/2 cup (65–100 g), depending on how sweet you like it
– Espresso/strong coffee: about 1 to 1 1/4 cups (240–300 ml), cooled
– Ladyfingers: 24–30 pieces (quantity depends on brand and how tightly you pack layers)
– Cocoa powder: unsweetened for dusting (plus a little in the filling if desired)
– Vanilla extract: 1 tsp
– Pinch of salt: small but impactful for balancing sweetness
– Optional sugar (for coffee): 1–2 tsp if your coffee is very bitter
A good way to think about it: tiramisu is a “flavor sandwich” of coffee + cocoa, held together by creamy mascarpone and lightened by whipped cream. When your coffee is cooled and your dipping is brief, the sandwich stays crisp enough to cut.
Tiramisu Build Plan for an 8×8 inch Cake (No-Cook Method)
| # | Step | Target Time | Key Goal | Outcome Score |
|---|---|---|---|---|
| 1 | Brew & cool coffee | 15–25 min | Prevents premature softening | ★ 5.0 |
| 2 | Quick dip ladyfingers | 1–2 sec each side | Avoids soggy layers | ★ 4.8 |
| 3 | Whip heavy cream | 3–5 min | Light, stable texture | ★ 4.6 |
| 4 | Mix mascarpone & sugar | 2–3 min | No lumps, creamy body | ★ 4.7 |
| 5 | Assemble & smooth | 20–30 min | Clean edges for slicing | ★ 4.5 |
| 6 | Chill & set | 4–12 hours | Flavor meld + firmer slices | ★ 5.0 |
| 7 | Dust cocoa before serving | 2–5 min | Fresh look, clean top | ★ 4.0 |
Quick Steps: Prepare the Coffee Layer

– Brew espresso/coffee and let it cool slightly before dipping
– Dip ladyfingers briefly—quick soaking prevents sogginess
– Aim for consistent coverage for even flavor
The coffee layer is where most “easy tiramisu cake” attempts succeed—or turn watery. Start by brewing espresso or strong coffee and letting it cool until warm rather than hot. Hot coffee can soften ladyfingers too quickly and can also cause mascarpone to taste slightly “thin” because the contrast between creamy temperature and hot liquid changes the way it sets.
How to dip ladyfingers correctly
– Work in batches so ladyfingers stay dry until you’re ready to dip.
– Dip each side for about 1–2 seconds—think “coat, don’t soak.”
– Place dipped ladyfingers immediately onto the first cream layer.
– If you notice the ladyfinger bending or tearing, reduce dip time or use slightly stronger control (briefly dip, then tap off excess).
Consistency is your friend. A major advantage of this easy tiramisu method is that you can measure results by how your layers hold. If your slices look clean and creamy with no pooling liquid around the edges, you’ve nailed the coffee soak level.
Practical tip: If your coffee tastes very strong/bitter, add 1–2 teaspoons of sugar to the coffee. It won’t remove tiramisu’s signature character—it just makes the overall dessert more balanced and crowd-friendly.
Make the Creamy Mascarpone Mixture

– Whip mascarpone with sugar (and vanilla) until smooth
– Fold in whipped cream for a light, fluffy texture
– Add cocoa or espresso adjusters only if needed
A smooth mascarpone-cream mixture is the backbone of the classic tiramisu cake flavor. The goal isn’t just “mix everything”—it’s to create a filling that is rich yet aerated, so the cake slices hold shape instead of collapsing into soft puddles.
Step-by-step filling approach
1. Soften mascarpone first: Leave it at room temperature for about 20–30 minutes. Cold mascarpone is more likely to clump.
2. Whip mascarpone with sugar and vanilla: Mix until silky and uniform. Add a small pinch of salt here for balance.
3. Whip heavy cream separately: Use cold cream to create stable soft-to-medium peaks.
4. Fold, don’t stir aggressively: Fold whipped cream into the mascarpone until the mixture is smooth and airy. Overmixing can deflate the filling, making it denser and less luxurious.
Adjustments if needed (taste-based)
– If the filling tastes flat, add a touch more vanilla or a small pinch of salt.
– If you want a deeper coffee note, mix 1–2 teaspoons espresso into the filling (not the coffee layer), or add a light dusting of cocoa. Keep adjustments small to avoid graininess or bitterness.
Analytically, the mascarpone mixture should be thick enough to spread smoothly and hold ridges from your spatula briefly. If it looks runny, it likely needs a short chill before assembly.
Assemble the Tiramisu Cake Layers
– Start with cream, then ladyfingers, then cream again
– Repeat layers for height and a clean slice
– Smooth the top layer for easier serving
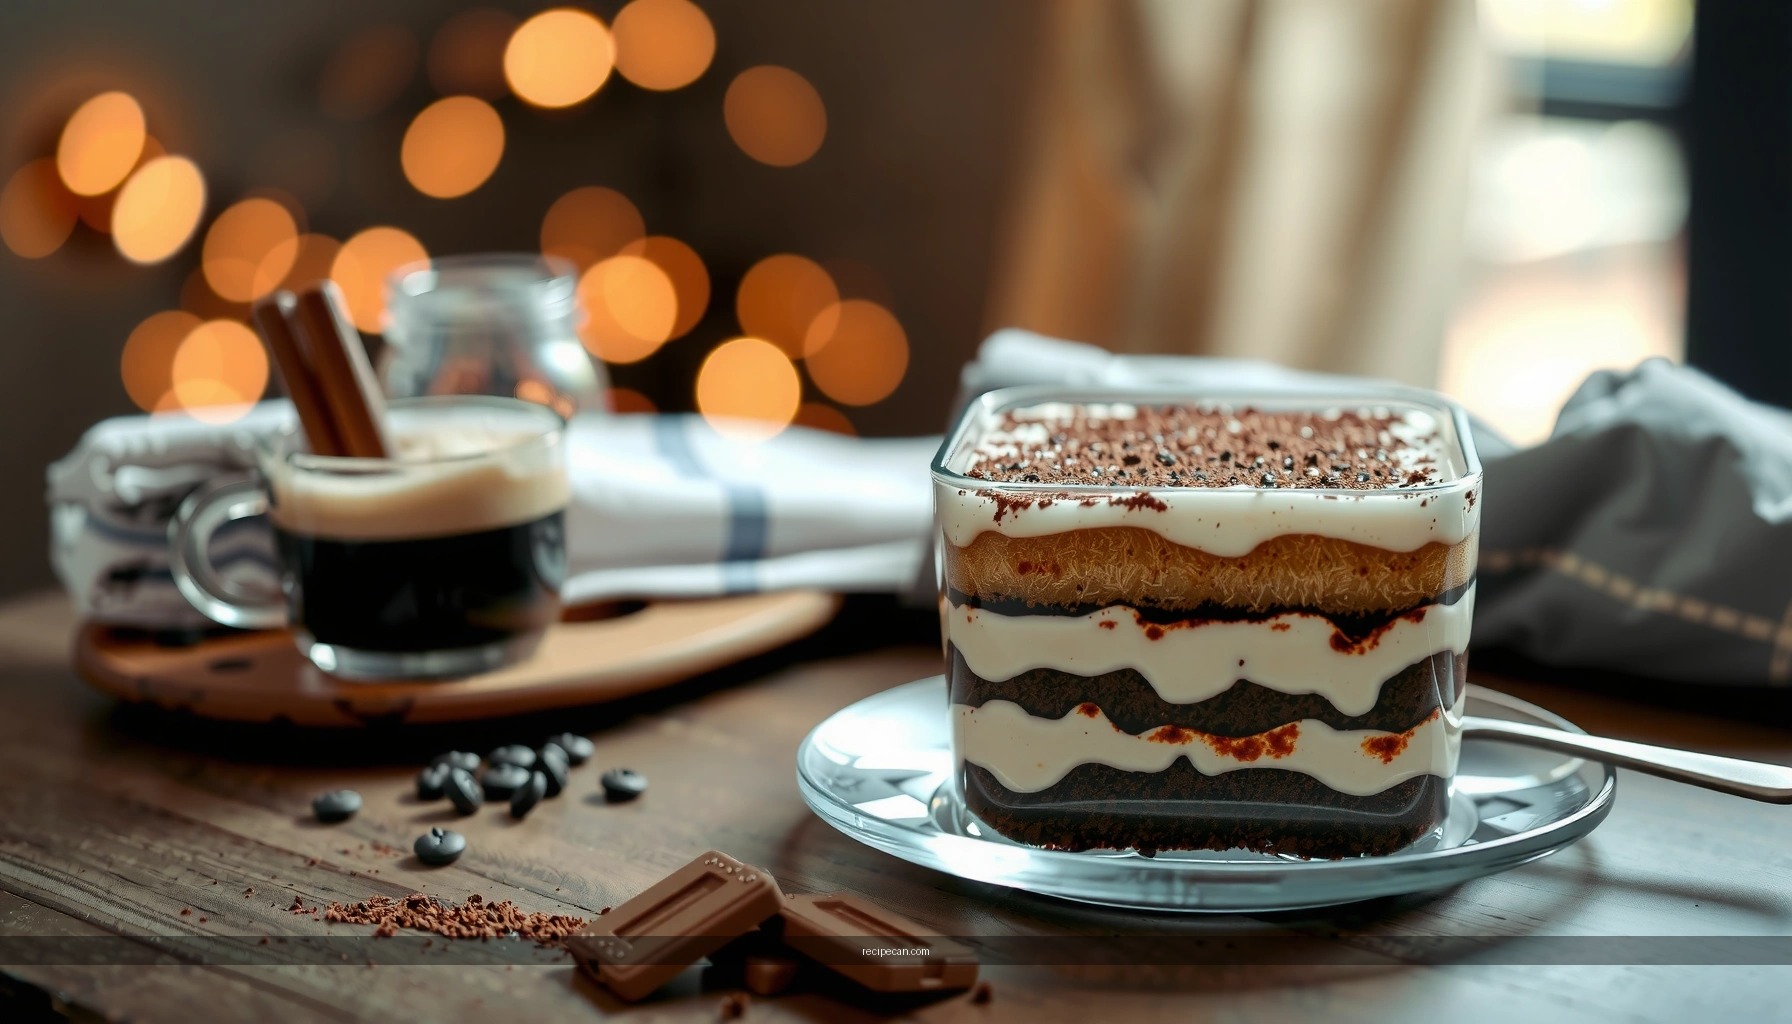
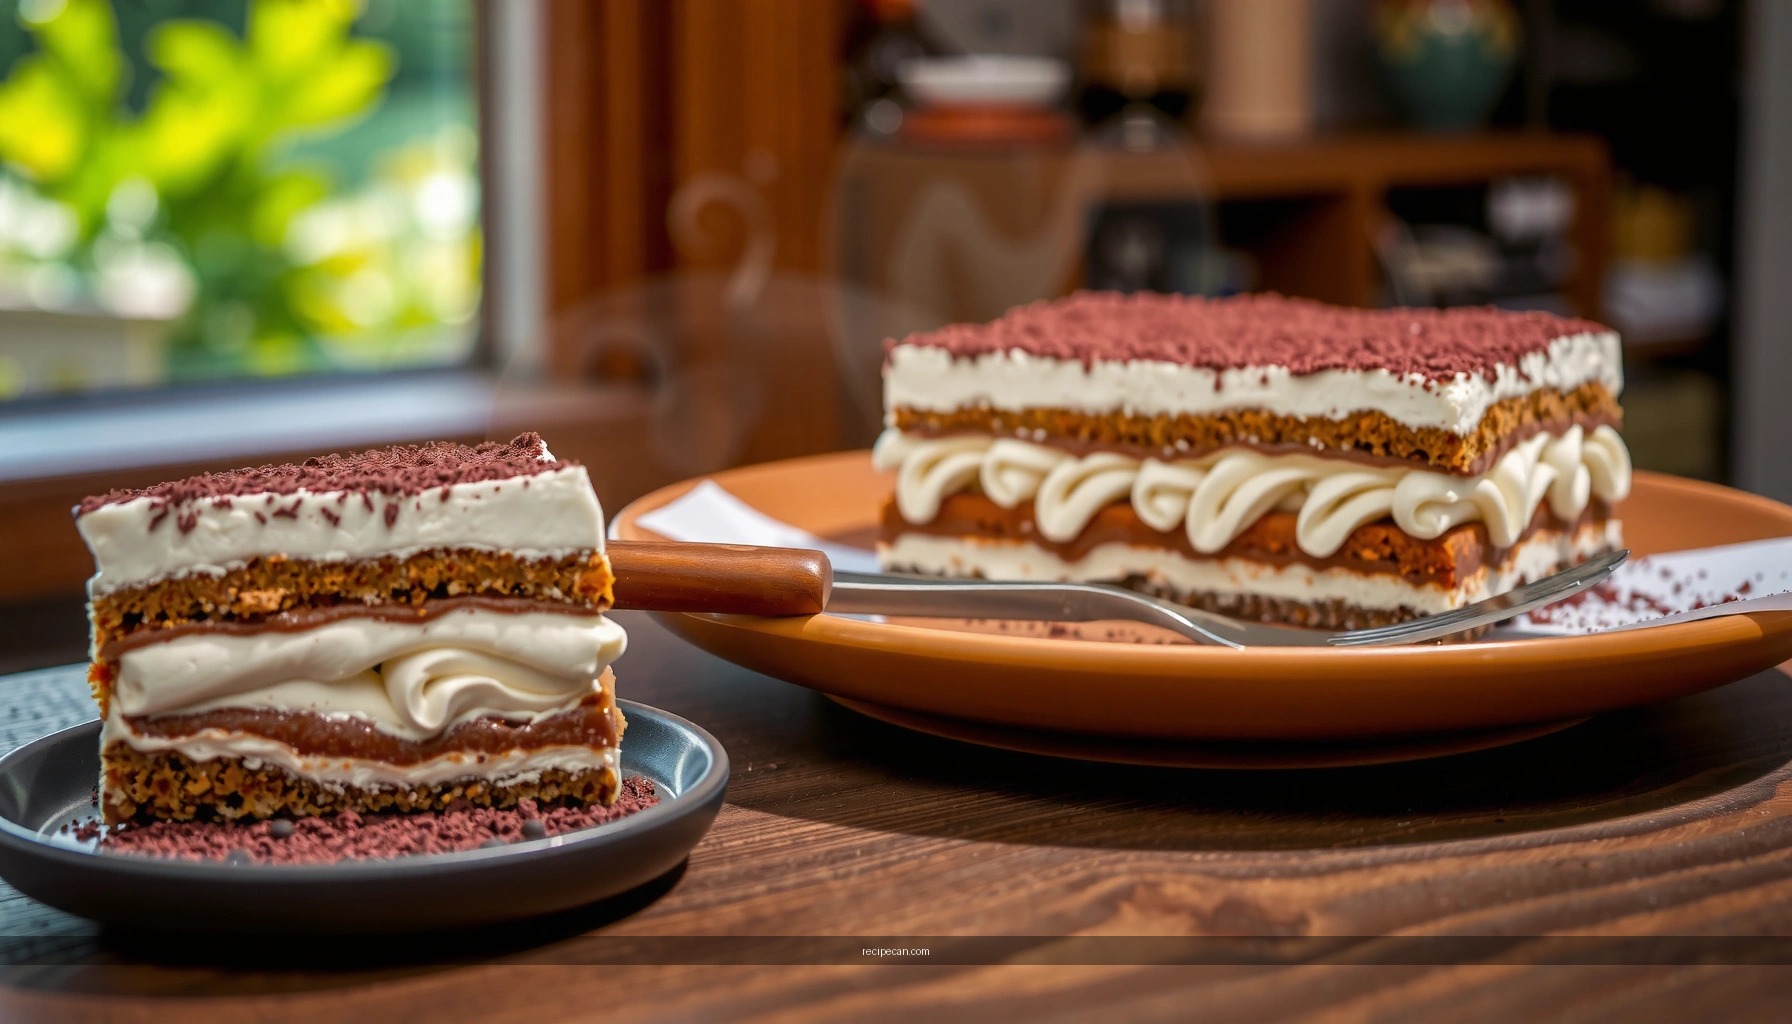
Layering is less about complicated technique and more about a clean assembly sequence. When you follow the correct order, you get a structured slice that shows distinct layers—coffee-soaked ladyfingers embedded in creamy filling.
A reliable layering pattern for an 8×8 inch pan
1. Spread a thin layer of mascarpone cream on the bottom (this prevents ladyfingers from sticking).
2. Arrange a layer of dipped ladyfingers (cover evenly).
3. Add a generous layer of cream.
4. Repeat: ladyfingers → cream.
5. Finish with cream on top and smooth it using an offset spatula or the back of a spoon.
Key quality checks while assembling
– No gaps: Use broken ladyfingers to fill small spaces so the cake slices aren’t fragile.
– Even thickness: Spread cream consistently between layers so the cake sets uniformly.
– Top smoothing: A smooth top makes final cocoa dusting look professional and helps portioning look neat.
If you want an extra “clean slice” effect, chill the assembled cake briefly (15–20 minutes) before doing the final top smoothing—cold cream spreads less easily, so your final finish looks sharper.
Chill Time for Best Results
– Refrigerate at least 4 hours (overnight is best)
– Cover the cake to keep it from absorbing fridge odors
– Dust with cocoa right before serving
Chilling is not optional for the classic tiramisu texture. The coffee hydrates ladyfingers gradually, while the cream firms and stabilizes. The result is a dessert that slices cleanly and tastes more integrated—less “separate layers,” more cohesive flavor.
Recommended chilling plan
– Minimum: 4 hours, for a decent set
– Best: Overnight (8–12 hours), for ideal structure and flavor blending
How to prevent common fridge problems
– Cover it well: Use plastic wrap directly on the surface or a tight-lid container. This prevents odor absorption and helps stop cocoa dust from clumping.
– Wait to dust cocoa: Dust cocoa right before serving so it stays fresh, dry, and visually crisp.
For time-conscious planning: assemble in the evening, chill overnight, and serve the next day. That’s the operational sweet spot where “easy tiramisu cake” becomes effortlessly impressive.
Easy Serving and Storage Tips
– Slice with a sharp knife for clean layers
– Store covered in the fridge for 2–3 days
– Freeze only if needed (texture may change slightly)
Serving tiramisu cake is where your earlier choices pay off. Because this dessert is no-bake, proper slicing technique matters.
How to slice cleanly
– Use a sharp knife and wipe it between cuts.
– If the cake is very cold, warm the blade slightly by running it under hot water, then drying—this reduces tearing and keeps layers distinct.
– Portion evenly for consistent texture: the center sets similarly to the edges when your layers are properly spread.
Storage guidance
– Fridge: Keep covered; enjoy within 2–3 days for best flavor and texture.
– Freezing: Only freeze if needed. When thawed, mascarpone-cream texture may soften slightly and coffee absorption can make ladyfingers less crisp than fresh.
If you’re serving guests, consider portioning just what you need, dusting cocoa over the portions rather than the entire top. This preserves the aesthetic of the dessert for a longer serving window.
Tiramisu cake is easiest when you focus on quick ladyfinger dipping, a smooth mascarpone-cream filling, and proper chilling. Make this easy tiramisu cake recipe today, then chill overnight for the best texture—share your result or save the steps for next time.
Frequently Asked Questions
What is an easy tiramisu cake recipe for beginners?
An easy tiramisu cake recipe typically uses simple ingredients like ladyfingers or a quick vanilla sponge, espresso or strong coffee, mascarpone, heavy cream, sugar, and cocoa powder. For beginners, start by whipping the cream until soft peaks form, then fold in mascarpone and sugar for a smooth filling. Layer the coffee-soaked cake or ladyfingers with the mascarpone mixture, then chill until set before dusting with cocoa for an authentic tiramisu cake taste.
How do I prevent my tiramisu cake from becoming soggy?
To avoid sogginess, quickly dip ladyfingers (or lightly brush sponge layers) with coffee instead of soaking them for long periods. Use chilled espresso or coffee so the cake doesn’t absorb too much liquid, and let the finished tiramisu cake chill for several hours to help the layers firm up. If you’re making an easy tiramisu cake recipe, keep the coffee ratio balanced and consider using slightly less soaking liquid than you think you need.
Which coffee should I use for the best flavor in an easy tiramisu cake?
For the best results, use strong brewed espresso or very strong coffee so the flavor stands up against the creamy mascarpone. You can also use cooled espresso or instant espresso mixed with hot water, but make sure it’s fully cooled before assembling to reduce excess moisture. If you want a richer taste, add a small splash of coffee liqueur to the coffee mixture (optional), while still keeping the tiramisu cake easy to assemble.
Why does my mascarpone filling turn runny, and how can I fix it?
Runny filling usually happens when the mascarpone or cream is too warm, or when the cream wasn’t whipped to enough volume before folding. To fix it, chill your mascarpone mixture in the fridge for 15–30 minutes and re-whip the cream if needed, then gently fold again to keep it airy. For a reliable easy tiramisu cake recipe, use cold mascarpone and cold heavy cream, and fold carefully rather than stirring aggressively.
Best way to assemble and serve an easy tiramisu cake—how long should I chill it?
After assembling, chill your tiramisu cake in the refrigerator for at least 4–6 hours, or overnight for the cleanest layers and best flavor. This chilling time allows the coffee and cream mixture to set, making slicing easier and improving the tiramisu cake texture. When ready to serve, dust with cocoa powder right before serving to keep the surface from absorbing moisture and turning darker.
References
- Tiramisu
https://en.wikipedia.org/wiki/Tiramisu - https://www.britannica.com/food/tiramisu
https://www.britannica.com/food/tiramisu - Cookbook:Tiramisù – Wikibooks, open books for an open world
https://en.wikibooks.org/wiki/Cookbook:Tiramisu - https://www.bbc.co.uk/food/recipes/tiramisu_66072
https://www.bbc.co.uk/food/recipes/tiramisu_66072 - https://cooking.nytimes.com/recipes/1018676-classic-tiramisu
https://cooking.nytimes.com/recipes/1018676-classic-tiramisu - https://www.theguardian.com/food/2011/aug/24/tiramisu-recipe
https://www.theguardian.com/food/2011/aug/24/tiramisu-recipe - Google Scholar Google Scholar
https://scholar.google.com/scholar?q=tiramisu+easy+recipe - Google Scholar Google Scholar
https://scholar.google.com/scholar?q=tiramisu+cream+cheese+mascarpone+instructional - Google Scholar Google Scholar
https://scholar.google.com/scholar?q=coffee+ladyfingers+tiramisu+preparation+study - Google Scholar Google Scholar
https://scholar.google.com/scholar?q=tiramisu+cake+recipe+easy