Get a ninja slushi milkshake recipe that delivers a thick, creamy blended treat in minutes—no guesswork, no icy failure. This step-by-step method shows the exact ingredient mix and blending technique to turn slushi texture into milkshake richness. If you want the quickest path to a restaurant-style Ninja Slushi Milkshake at home, this recipe is the clear winner.
You can make a thick, creamy Ninja slushi milkshake by blending crushed ice with milk, sweet syrup, and your flavor mix until it reaches a spoonable “slushi” texture. Use a reliable ice-to-liquid balance, blend with liquid-first for smoother results, and fine-tune thickness with small additions so you get the same cold, blended treat every time—even without a trip to a shop.
For most home cooks, the biggest challenge isn’t flavor—it’s texture. A slushi milkshake has to be cold enough to keep its body, blended enough to be smooth, and sweet enough to taste like a milkshake rather than a flavored milk drink. The good news: with your Ninja blender and a repeatable method, you can get consistent results from batch to batch.
Best Flavor-Syrup Choices for a Ninja Slushi Milkshake (Flavor Strength & Notes)
| # | Syrup / Flavor Base | Recommended Use | Blend Smoothness | Overall Rating |
|---|---|---|---|---|
| 1 | Vanilla Bean | Classic base for milk + ice | ★ ★ ★ ★ ★ | 4.8 |
| 2 | Chocolate Syrup | Best for “milkshake” mouthfeel | ★ ★ ★ ★ ★ | 4.7 |
| 3 | Strawberry Syrup | Bright, candy-fruit flavor | ★ ★ ★ ★ ☆ | 4.5 |
| 4 | Mango / Tropical Syrup | Takes well to extra ice for thickness | ★ ★ ★ ★ ☆ | 4.4 |
| 5 | Caramel Sauce | Rich flavor; use slightly less | ★ ★ ★ ★ ☆ | 4.6 |
| 6 | Coconut Syrup | Pairs well with vanilla or tropical mixes | ★ ★ ★ ★ ★ | 4.3 |
| 7 | Fruit Purée (thinner than syrup) | Use extra ice to keep body | ★ ★ ★ ☆ ☆ | 4.1 |
What You Need for a Ninja Slushi Milkshake

To nail a Ninja slushi milkshake, assemble ingredients that blend smoothly and hold their texture when you chill and serve. Think in terms of three functions: cold volume (crushed ice), creamy base (milk), and flavor sweetness (syrup or mix-ins).
– Milk (creamy base): Whole milk delivers the classic milkshake texture. If you want slightly lighter results, 2% works well; for dairy-free, use an unsweetened oat milk or creamy almond milk and consider adding a touch more sweetener for balance.
– Crushed ice (cold structure): Slushi texture depends on the ice particle size. Crushed ice creates the thick, drinkable body without turning into gritty chunks.
– Sweet syrup (flavor + mouthfeel): Choose a flavor syrup that dissolves easily—vanilla, chocolate, caramel, strawberry, or tropical blends. Syrup not only sweetens; it also helps create a cohesive “milkshake” flavor while the ice thickens the mixture.
– Flavor mix-in (optional): Vanilla extract, cocoa powder, fruit purée, or a spoonful of cookie crumbles can all work—just use them in controlled amounts so the blender can still move the mixture.
Optional add-ins are where you can personalize the drink without breaking the slushi consistency:
– Whipped topping (adds dessert-like aroma and a lighter finish)
– Chocolate drizzle or caramel (great for presentation)
– Fruit pieces (best when finely chopped and used sparingly so you don’t end up with uneven blending)
Practical tip: if you’re using thicker mix-ins like caramel sauce or cocoa powder, slightly reduce the amount of ice at first and then add more after the initial blend if needed.
Ninja Slushi Setup & Best Blending Settings

Your goal is to create a vortex that pulls in ice, disperses syrup, and turns everything into a uniform, thick slushi. That’s why the order of operations matters.
– Add liquids first, then ice: Start with milk and syrup (and vanilla extract if using). Then add crushed ice. This helps the blades catch and blend the ice quickly instead of grinding dry chunks.
– Start on a lower speed, then pulse/blend: Use low speed for 10–20 seconds, then pulse in short bursts to thicken. Short pulses reduce the risk of heating or creating icy pockets.
– Scrape down the sides if needed: If you see syrup or flavor clinging to the walls, pause and scrape. A quick stir/scrape prevents uneven sweetness and keeps the texture consistent.
Texture target: a good Ninja slushi milkshake should be thick enough to hold a spoon ridge for a moment, but fluid enough to drink through a straw.
A helpful approach for consistency:
1. Blend to “liquid-smooth” first (about 15–25 seconds).
2. Then thicken with 1–2 short pulses (5–10 seconds each).
3. Check thickness; adjust with small increments (a splash of milk or a handful more crushed ice).
Base Recipe (Classic Creamy Flavor)

This is the foundation for any Ninja slushi milkshake. Once you master the classic creamy version, switching flavors is simply swapping syrup and adjusting sweetness.
Classic creamy base (1 serving):
– Milk: 1/2 to 2/3 cup
– Sweet syrup: 2 to 3 tablespoons (start lower and increase to taste)
– Crushed ice: 2 to 3 cups (depending on your Ninja model capacity and how thick you like it)
– Vanilla flavor (optional): 1/2 teaspoon vanilla extract
Steps:
1. Add milk and syrup to the blender first. If you’re using vanilla extract, add it now.
2. Add crushed ice last. Fill so the blades have coverage but don’t overload.
3. Blend on low for 10–20 seconds until the mixture starts to move as a cohesive slurry.
4. Pulse/blend briefly in 5–10 second bursts until the texture is thick and smooth.
5. Adjust thickness:
– Too thick? Add 1–2 tablespoons of milk, blend briefly.
– Too runny? Add a small handful of crushed ice, pulse again.
Why this works (analytical view): Milk and syrup create a lubricating liquid phase that carries ice particles into the blades. Crushed ice provides the frozen solids that create body. When the blend is thick, it’s because the ice particles are uniformly distributed—not because you used “more ice” alone. Small adjustments after blending help you reach the exact slushi viscosity you want.
Flavor Variations to Try

Flavor variations are where you can make this recipe your own. The key is to keep your additions compatible with blending: syrups generally blend more consistently than chunky purées, while cocoa powder should be used in modest amounts to prevent dryness.
– Chocolate Ninja slushi milkshake
– Use chocolate syrup for easiest blending.
– Optional upgrade: add 1–2 teaspoons cocoa powder plus a tablespoon of extra syrup if you want deeper chocolate flavor.
– Strawberry Ninja slushi milkshake
– Use strawberry syrup for a smooth, “classic” slushi.
– For more authentic fruit flavor, use a small amount of strawberry purée (reduce ice slightly to maintain blending flow).
– Mango or tropical Ninja slushi milkshake
– Use a mango or tropical fruit syrup for a brighter taste.
– If using real fruit, blend the fruit into the milk first (smooth base), then add ice for slushi thickness.
Pro pairing ideas (works across flavors):
– Add a pinch of salt to amplify sweetness (especially with chocolate and caramel).
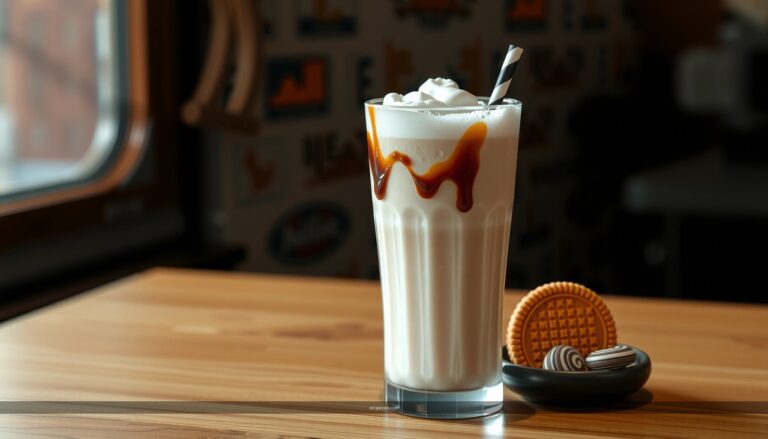
– For “dessert shop” vibes, finish with a drizzle—chocolate, strawberry, or caramel—right before serving.
Troubleshooting Common Slushi Texture Issues
Even with a strong base ratio, texture can vary due to ice quality, milk fat content, and syrup thickness. Use these targeted fixes rather than redoing the whole batch.
– Too runny?
– Add more crushed ice (a small handful at a time).
– Blend/pulse for 10–20 seconds after each addition to re-integrate.
– Too thick (overly slushy or hard to drink)?
– Add a splash of milk (start with 1–2 tablespoons).
– Blend briefly until smooth and evenly fluid.
– Not blending well (ice pockets or gritty texture)?
– Use smaller ice pieces next time (crush to a more granular consistency).
– Blend in short pulses instead of continuous blending, and ensure liquids are fully at the bottom before ice is added.
– Flavor seems uneven or weak?
– Scrape down the sides and blend again for 5–10 seconds.
– If needed, add an extra 1 tablespoon of syrup, then blend briefly to distribute.
The most common mistake is adding too much ice before the liquid phase is blended enough to carry it. Liquid-first helps prevent that, and quick scraping prevents trapped syrup streaks.
Serving Tips & Make-It-Ahead Ideas
A Ninja slushi milkshake is best enjoyed fresh because the ice starts melting immediately after blending. Still, you can plan ahead for convenience.
– Serve immediately for best slushi consistency: Once blended, the texture is at its peak—thick, cold, and smooth.
– Top with whipped cream or crushed candy: These add visual appeal and a dessert-like finish without changing the base texture much.
– For later (make-it-ahead):
– Prep ingredients separately: measure milk, syrup, and crush ice.
– Blend fresh when ready so you preserve the slushi body and avoid a watery drink.
If you must hold it briefly: store in an insulated container for a short time, then stir or re-pulse with a small handful of ice to restore thickness. For best results, keep the hold time minimal.
A simple workflow for faster service:
1. Measure milk + syrup into the blender.
2. Keep crushed ice ready nearby.
3. Blend once you’re ready to pour, then garnish right away.
If you follow the base ratio (milk + sweetener + crushed ice) and adjust thickness with small add-ins, you’ll get a perfect ninja slushi milkshake texture fast. Pick one flavor variation, blend it using the ice-last or liquid-first method, and share your favorite combo—try it today and tweak one ingredient to make it your own.
In summary, making a Ninja slushi milkshake comes down to three controllable variables: ingredient balance, blending order, and texture tuning. Start with a classic creamy base, use crushed ice for body, blend liquid-first for smoother results, and fine-tune thickness with small milk or ice adjustments. Once you master that method, swapping in chocolate, strawberry, or tropical flavors becomes an easy, reliable way to create a consistently thick, cold, blended treat at home.
References
- Milkshake
https://en.wikipedia.org/wiki/Milkshake - Slush
https://en.wikipedia.org/wiki/Slush - Smoothie
https://en.wikipedia.org/wiki/Smoothie - Frozen dessert
https://en.wikipedia.org/wiki/Frozen_dessert - https://en.wikipedia.org/wiki/Blender_(appliance
https://en.wikipedia.org/wiki/Blender_(appliance - https://www.britannica.com/topic/milkshake
https://www.britannica.com/topic/milkshake - Food Safety | Food Safety | CDC
https://www.cdc.gov/foodsafety/index.html - Google Scholar Google Scholar
https://scholar.google.com/scholar?q=ninja+slushi+milkshake+recipe - Google Scholar Google Scholar
https://scholar.google.com/scholar?q=slush+milkshake+blender+recipe+frozen+drink - Google Scholar Google Scholar
https://scholar.google.com/scholar?q=food+safety+frozen+desserts+dairy+handling