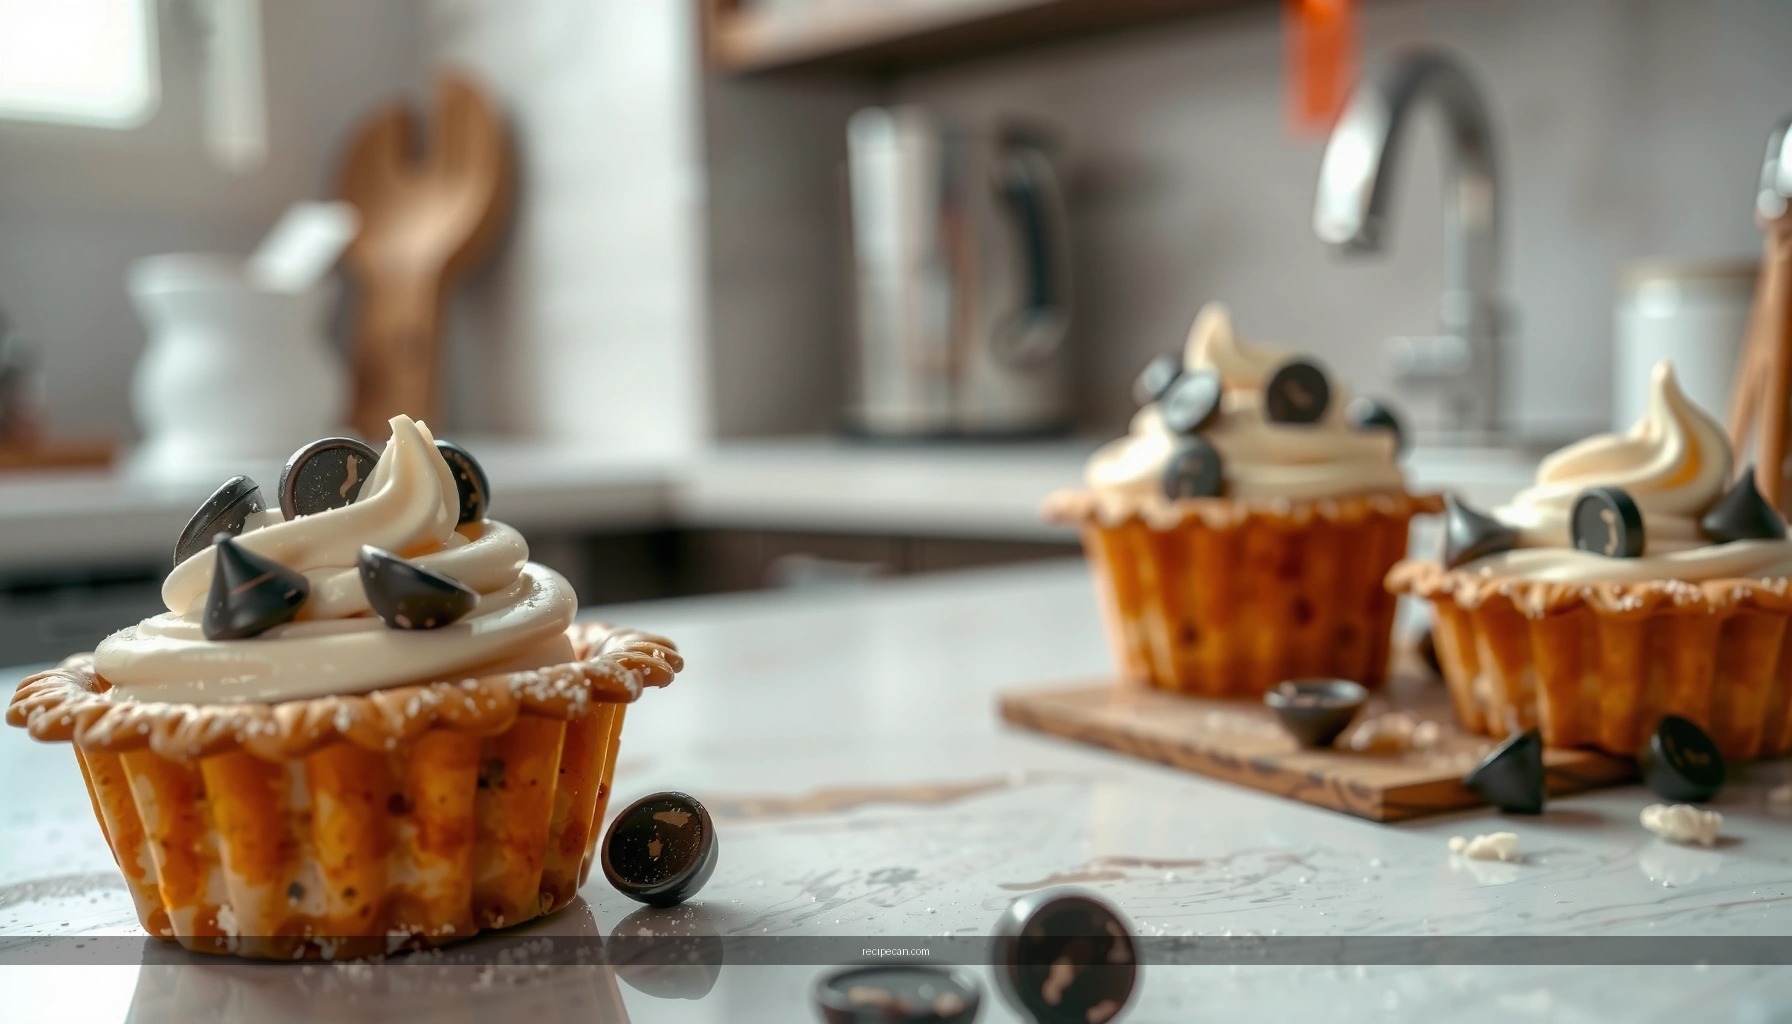
This cannoli cookie cups recipe delivers the crispiest cookie shells and the creamiest filling, so you can stop guessing and start serving a confident cannoli-style dessert. If you want crunchy, hold-their-shape cups that don’t collapse into sogginess, this method shows the exact bake and fill approach. Expect a straightforward, reliable result: crisp shells around a smooth ricotta filling with classic cannoli flavor.
Make cannoli cookie cups by baking sweet cookie dough into crisp muffin-tin shells, then filling them with a freshly mixed ricotta cannoli-style mixture right before serving. This timing is the difference between “great” and “restaurant-quality” crunch, and the steps below walk you through the dough, bake process, and classic cannoli flavor in a handheld form.
Gather Ingredients for Cannoli Cookie Cups

– Use refrigerated or homemade cookie dough as the base for quick cups
– For filling, you’ll need ricotta, powdered sugar, and vanilla (plus mini chocolate chips)
A cannoli cookie cup is built on two components with different “best moments”: (1) crisp baked shells and (2) a creamy ricotta filling that can soften cookie texture over time. That’s why your ingredient list should support both performance and flavor—cookies that bake into sturdy cups, and ricotta that stays thick enough to hold its shape.
Cookie shells: what to look for
Most recipes use simple sweet dough (store-bought works extremely well). When shopping for refrigerated dough, choose varieties labeled as “sugar cookie” or “cookie dough” (often butter-forward and not overly cakey). If you’re making from scratch, look for a dough that’s not too dry but also not overly sticky—your goal is a dough that presses cleanly into the muffin tin without tearing.
Ricotta filling: thickness matters
Ricotta consistency is the main variable in cannoli-style desserts. Whole-milk ricotta tends to be creamier but can be wetter; part-skim can be slightly firmer. Regardless of brand, you’ll improve results by draining for a short time, then whipping until smooth.
Practical cannoli filling target: a mixture thick enough to pipe or mound without running, but soft enough to bite easily with the cookie.
Suggested ingredient blueprint (for about 12–16 cups)
– Cookie dough: 1–1.5 lb (enough to fill a standard muffin tin comfortably, depending on cup size)
– Ricotta cheese: ~15 oz (about 1 1/2 cups)
– Powdered sugar: 1/2 to 3/4 cup (to taste)
– Vanilla extract: 1–2 tsp
– Mini chocolate chips: 1/3 to 1/2 cup
– Optional (brightening): orange zest (from 1 orange) or a pinch of cinnamon
– Optional (classic cannoli texture): 1–2 tbsp mini candied fruit, chopped fine
Why mini chocolate chips?
Mini chips distribute more evenly, so every bite has a chocolate “pop.” Larger chips can work, but they tend to cluster and may tear through the cookie when you bite.
Cannoli Cookie Cup Shells: Typical Bake Performance Targets
| # | Shell Factor | Goal Value | Why It Matters | Result Direction |
|---|---|---|---|---|
| 1 | Oven temperature | 350°F (177°C) | Even browning + structure | Higher crispness |
| 2 | Bake time | 10–14 minutes | Light gold without over-drying | More stable cups |
| 3 | Shell color at pull | Light golden edges | Crisp top, not burnt | Better crunch |
| 4 | Rest before unmolding | 5 minutes | Prevents breakage | Fewer cracks |
| 5 | Muffin tin greasing | Light, even coating | Release + clean shell walls | Better release |
| 6 | Cup wall thickness | ~3–5 mm | Holds cream without sogginess | More structural integrity |
| 7 | Filling timing after baking | Within 60 minutes | Maximizes crunch-to-cream contrast | Delayed filling softens shells |
Bake Perfect Cookie Cups

– Press dough into a greased muffin tin to form even “shells”
– Bake until lightly golden, then cool slightly before loosening to keep crisp edges
Baking cannoli cookie cups is less about strict precision and more about form and doneness. Your muffin tin turns dough into a cup shape, but only if you (a) press with consistent pressure and (b) bake long enough to set the shell structure.
Step-by-step shell technique
1. Preheat oven to 350°F (177°C). Consistency matters—cookie dough thickness changes bake time, and temperature stability helps.
2. Grease the muffin tin lightly. This reduces sticking and helps the cup walls stay intact when you remove them.
3. Portion dough evenly. Use a spoon or cookie scoop so each cup is roughly the same size; uneven cups lead to uneven crispness.
4. Press into the wells. Flatten dough into a disc, then press up the sides. Aim for even wall thickness (thin walls can collapse; thick walls stay soft).
5. Bake 10–14 minutes. You’re looking for light golden edges. Centers may look slightly underdone, but they finish as the shells cool.
6. Cool 5 minutes, then loosen. Letting them rest briefly firms the crumb so the shell doesn’t break.
Removing shells without breakage
If you yank too soon, the cookie cups can crack. Wait for the short rest period, then gently run a small knife around the edges. Lift carefully with a spatula or the back of a spoon.
Quality check: “dry to the touch”
A well-baked shell feels dry and firm on the surface. If shells still feel doughy, bake 1–2 minutes longer. If they’re too dark, you may have trapped bitterness and a harder bite that overwhelms the ricotta.
Make the Creamy Cannoli Filling

– Drain ricotta if needed to prevent a runny filling
– Mix in powdered sugar and vanilla, then fold in chocolate chips for the classic bite
Cannoli filling should be smooth, sweet, and thick enough to sit on a crisp shell without soaking through immediately. The best approach is to control moisture first, then sweeten and flavor, then add textural elements (like chips).
Drain ricotta for stability
If your ricotta is watery, place it in a fine-mesh sieve or cheesecloth for 10–20 minutes. You don’t need to remove every drop—you just want to avoid pooling liquid that can make cookie cups collapse.
Pro tip: After draining, stir ricotta well to smooth out any separated whey.
Mix for a professional texture
1. Combine ricotta + powdered sugar + vanilla.
2. Blend until smooth. Overmixing isn’t usually a problem, but you want a uniform texture so the filling tastes balanced in every bite.
3. Fold in mini chocolate chips last, gently, so they don’t break down and distribute evenly.
Optional cannoli-style enhancements
– Orange zest: Adds classic bright top notes that cut through sweetness.
– Pinch of cinnamon: Warmth that pairs with vanilla and chocolate.
– Candied fruit (micro-chopped): Mimics traditional cannoli texture, though cookie cups already deliver crunch—use sparingly.
Taste test benchmark
If your filling seems too mild, adjust with:
– A little more vanilla (aroma)
– A little more powdered sugar (sweetness)
– A small additional pinch of salt (balances sweetness—optional but effective)
Fill and Serve for Best Texture
– Fill cookie cups shortly before serving to maintain crunch
– Pipe or spoon filling evenly, and finish with extra chocolate chips if desired
Assembly is where cannoli cookie cups become “wow” desserts. The cookie shell and ricotta filling are each best at different times, so the strategy is to build right before serving.
Best assembly window
Fill within about 60 minutes of serving for maximum crunch. After that, even well-baked shells will gradually soften because ricotta releases moisture over time. This is normal—just plan for it.
Even distribution for consistent bites
– Pipe filling if you want a clean, restaurant-style look.
– Spoon filling if you prefer rustic presentation.
– Aim for consistent mounds so each cup has the same ratio of crunch to cream.
Finish with a few extra mini chocolate chips on top to signal cannoli flavor at a glance.
Serving suggestions for impact
For events or busy hosting:
– Serve on a tray lined with parchment so cups release easily if moved.
– Provide small napkins—ricotta is creamy and can be slightly messy with handheld eating.
– Pair with coffee or espresso for classic cannoli dessert vibes.
Make Them Ahead and Store Smart
– Bake shells ahead and store airtight at room temperature
– Refrigerate assembled cups briefly, but expect the cookie to soften over time
Cannoli cookie cups are one of the easiest “make ahead” desserts—as long as you separate components. Shells can be baked in advance; filling can be mixed ahead; assembly is the only timing-sensitive step.
Shells ahead
Bake shells fully, cool completely, then store airtight at room temperature. Crispness is highest the day they’re baked, but airtight storage helps preserve texture for up to a couple of days.
Filling ahead
You can mix the ricotta filling up to 24 hours ahead and refrigerate it in a covered container. If it firms slightly, stir to loosen before piping or spooning.
Assembled cups: short fridge window
If you must assemble early, refrigerate briefly, but understand that the cookie will soften. For best practice, assemble in batches closer to service time—especially if you’re serving guests who expect maximum crunch.
Re-crisping reality check
Microwaving or reheating filled cups isn’t recommended because it melts the filling and increases sogginess. If crispness is critical, keep shells and filling separate until the last minute.
Optional Variations and Flavor Boosts
– Add orange zest or cinnamon for a bright cannoli twist
– Swap chocolate chips for pistachios or candied fruit for extra texture
Cannoli cookie cups are adaptable without losing identity. Small changes can create noticeably different flavor profiles while keeping the core “cannoli in a cup” experience.
Citrus-forward cannoli
– Add orange zest to the filling (most common and highly effective).
– Consider a few drops of orange extract if your vanilla is subtle and you want a more pronounced aroma.
– Optional: sprinkle a tiny pinch of orange zest on top just before serving.
Warm spice profile
– Add cinnamon (just a pinch). Cinnamon should support—not dominate—the vanilla and ricotta.
Texture alternatives to chocolate
– Pistachios: Chop finely and fold into filling for a nutty, slightly savory note that complements sweetness.
– Candied fruit: Use small diced pieces so they distribute without overpowering the bite.
– Dark chocolate shavings: For a less sweet, more adult cannoli cookie cup.
Managing sweetness when swapping mix-ins
If you use candied fruit, reduce powdered sugar slightly (about 2–3 tablespoons) to prevent the dessert from tasting overly sweet.
Cannoli cookie cups are an easy, crowd-pleasing dessert: bake crispy shells, mix a classic ricotta filling, and assemble right before serving. Follow the shell targets (light golden edges, short rest before unmolding) and treat ricotta moisture control as your quality lever, and you’ll get the signature contrast—crunchy handheld cups with creamy cannoli flavor. Try this recipe next time you need a showy treat, and tell me whether you’d like a more chocolatey, citrusy, or pistachio-forward version—then I can tailor the exact filling proportions to match your preferred profile.
Frequently Asked Questions
What is a cannoli cookie cups recipe and what does it taste like?
A cannoli cookie cups recipe is a dessert that uses crunchy cookie “cups” as the shell and fills them with a sweet ricotta-style filling, often with chocolate chips and citrus zest. The result tastes like classic cannoli—creamy, lightly tangy, and studded with chocolate—while the cookie cup adds a crisp bite. It’s a popular cannoli-inspired treat for parties because it’s portioned and easy to serve.
How do you make cannoli cookie cups without the filling getting soggy?
To keep cannoli cookie cups crisp, bake or pre-bake the cookie cups until they’re fully set and lightly browned, then cool them completely before filling. Use a ricotta filling that’s well-drained (or use a thicker ricotta/cream cheese blend) so excess moisture doesn’t seep into the cookie crust. For best results, fill right before serving or store the shells and filling separately.
Why do my cannoli cookie cups crack or lose their shape?
Cookie cups can crack if the dough is too dry, if you overbake, or if the baking temperature is too high. Make sure the dough is evenly mixed and pressed firmly into the muffin tin or mold, and chill the dough briefly if it’s hard to handle. Also let the cups cool in the pan for a few minutes before removing so the cookies finish setting and don’t break.
Which ricotta should you use for cannoli cookie cups—fresh, salted, or store-bought?
For a classic cannoli cookie cups recipe, use high-quality fresh ricotta that drains well, ideally packed in liquid and strained before mixing. If your ricotta is watery, strain it through cheesecloth or a fine sieve to prevent a loose filling. Some recipes add cream cheese or mascarpone to stabilize the texture, giving you a thicker, pipeable cannoli filling.
What’s the best way to assemble and store cannoli cookie cups for a crowd?
Assemble cannoli cookie cups by piping or spooning the filling into cooled cookie shells, then topping with mini chocolate chips and a touch of cinnamon or powdered sugar if desired. For storage, keep shells in an airtight container at room temperature and refrigerate the filling separately—this prevents sogginess. Fill the cups within a few hours of serving for the best crunch and flavor, especially if you’re using a fresh ricotta-based cannoli filling.
References
- Cannoli
https://en.wikipedia.org/wiki/Cannoli - https://www.britannica.com/topic/cannoli
https://www.britannica.com/topic/cannoli - Ricotta
https://en.wikipedia.org/wiki/Ricotta - Ricotta | Cheese, Whey, & Production | Britannica
https://www.britannica.com/topic/ricotta - Pastry
https://en.wikipedia.org/wiki/Pastry - Sicilian cuisine
https://en.wikipedia.org/wiki/Sicilian_cuisine - Google Scholar Google Scholar
https://scholar.google.com/scholar?q=cannoli+recipe - Google Scholar Google Scholar
https://scholar.google.com/scholar?q=cannoli+shells+frying+dough+study - Google Scholar Google Scholar
https://scholar.google.com/scholar?q=cookie+cups+recipe+pastry+molds - Chocolate chip cookie
https://en.wikipedia.org/wiki/Chocolate_chip_cookie


