Want an Italian cannoli cookies recipe that delivers cannoli flavor in cookie form without the hassle? This easy homemade cannoli cookie guide shows you exactly how to make crisp shells with a sweet ricotta filling you can pipe or spoon. If you want a faster, crowd-pleasing dessert that still tastes unmistakably Italian, this is the clear winner.
Make Italian cannoli cookies by baking crisp, shell-style cookie wafers and filling them with a sweet ricotta mixture just before serving—so the cookies stay crunchy. This Italian cannoli cookies recipe walks you through the full process: dough, shaping, baking, draining/seasoning ricotta, and assembling for classic cannoli flavor in cookie form.
What You Need for Italian Cannoli Cookies

– Cookie dough basics (shell-style): all-purpose flour, granulated sugar, cold butter, egg, and a small amount of salt.
– Cannoli-style flavor cues: a touch of vanilla (and optional cinnamon or citrus zest) for a warmer, bakery-like finish.
– Sweet ricotta filling ingredients: whole milk ricotta, powdered sugar, vanilla extract, and salt to balance sweetness.
– Chocolate chips and optional candied fruit: mini chocolate chips for the canonical cannoli “filling pearls,” plus optional candied orange or citron for a traditional finish.
For best results, treat these cookies like two separate components—a crisp shell and a creamy filling—because the mouthfeel is what makes cannoli cookies feel “right.”
Target texture expectations (so you can troubleshoot fast):
– Shell cookies should be evenly golden at the edges and dry to the touch once cooled.
– Filling should be thick enough to pipe without running, but still creamy and spoonable.
Expected Output for This Italian Cannoli Cookies Recipe (Shell Thickness)
| # | Dough Thickness | Estimated Cookies (25–35 g each) | Bake Time (until edges golden) | Crunch Rating | Best Assembly Window (hrs) |
|---|---|---|---|---|---|
| 1 | 2.5 mm (very thin) | 40–48 | 8–10 min | ★★★★☆ | 0.5–1 |
| 2 | 3.0 mm | 34–42 | 10–12 min | ★★★★★ | 1–2 |
| 3 | 3.5 mm | 30–38 | 12–14 min | ★★★★☆ | 2–3 |
| 4 | 4.0 mm (ideal shell feel) | 26–34 | 14–16 min | ★★★★★ | 3–4 |
| 5 | 4.5 mm | 22–30 | 16–18 min | ★★★☆☆ | 3–5 |
| 6 | 5.0 mm (thicker cookie) | 18–26 | 18–20 min | ★★★☆☆ | 1–2 |
| 7 | 5.5 mm (very thick) | 16–22 | 20–23 min | ★★☆☆☆ | 0.5–1.5 |
Make the Cannoli Cookie Dough

Start with a dough that behaves like classic cannoli shells: firm enough to shape cleanly, but still tender when baked. In this Italian cannoli cookies recipe, the goal is not a cakey cookie—it’s a crisp shell-style base.
Step-by-step approach (and why it works):
1. Mix dry ingredients: Whisk flour, sugar, and salt to distribute sugar evenly. This helps the cookies brown consistently—an important cannoli-shell cue.
2. Cut in cold butter: Rub or mix cold butter into the flour until the mixture looks sandy. Cold fat limits gluten development, which improves crispness.
3. Add the egg to bind: Mix until you get a smooth, workable dough. If it’s sticky, chill briefly; if it’s dry, you can add 1–2 teaspoons of cold water (one teaspoon at a time).
4. Chill for clean handling: Refrigerate 20–30 minutes. Chilling firms butter so the cookies hold shape and bake up crisp rather than spreading.
Professional handling tip: if you’re rolling the dough, work on a lightly floured surface and keep the thickness consistent (the data table above shows how thickness changes yield, bake time, and crunch).
Shape and Bake Like a Cannoli

Cannoli cookies aren’t “filled and forgotten”—they need a crisp structure that can support ricotta without getting soggy too quickly. Shape and baking decisions directly affect that outcome.
Shaping options (choose one):
– Cut-out cookies: Roll dough, cut into small rectangles or circles, and bake as shells.
– Small rounds: Portion into consistent pieces and flatten slightly for uniform browning.
– Mini “shell” mounds: For a cannoli-like bite, make small rounds with a shallow indentation (still bake flat-ish so they don’t soften).
– Bake at around 350°F (175°C) until edges are golden.
– Look for a dry surface: the center should feel set, not wet.
– Cool completely before filling. Warm cookies will melt fat and soften texture.
Common problems and fixes:
– Cookies spread too much: dough may be warm—chill longer and ensure butter is cold.
– Cookies aren’t crisp: you likely underbaked; bake an extra 1–2 minutes and cool fully.
– Uneven browning: roll to consistent thickness and rotate trays halfway through.
Prepare the Sweet Ricotta Filling
A great cannoli filling is creamy, balanced, and thick enough to hold its shape. Ricotta is the defining ingredient—so draining is non-negotiable.
Step-by-step filling method:
1. Drain ricotta well: Place ricotta in a fine-mesh sieve lined with cheesecloth for at least 30 minutes (or blot excess moisture). Watery ricotta will thin the filling and reduce crunch.
2. Sweeten and flavor: Mix ricotta with powdered sugar, vanilla, and a pinch of salt. Salt is key—it keeps the filling from tasting one-note sweet.
3. Adjust texture: If too thick, add 1 teaspoon of milk; if too loose, mix a bit more powdered sugar or chill briefly.
4. Fold in add-ins: Stir in mini chocolate chips. For a traditional cannoli profile, add optional citrus zest (orange or lemon) and/or finely chopped candied fruit.
Quality benchmark: when you pipe or spoon the filling, it should form a soft peak that doesn’t run immediately.
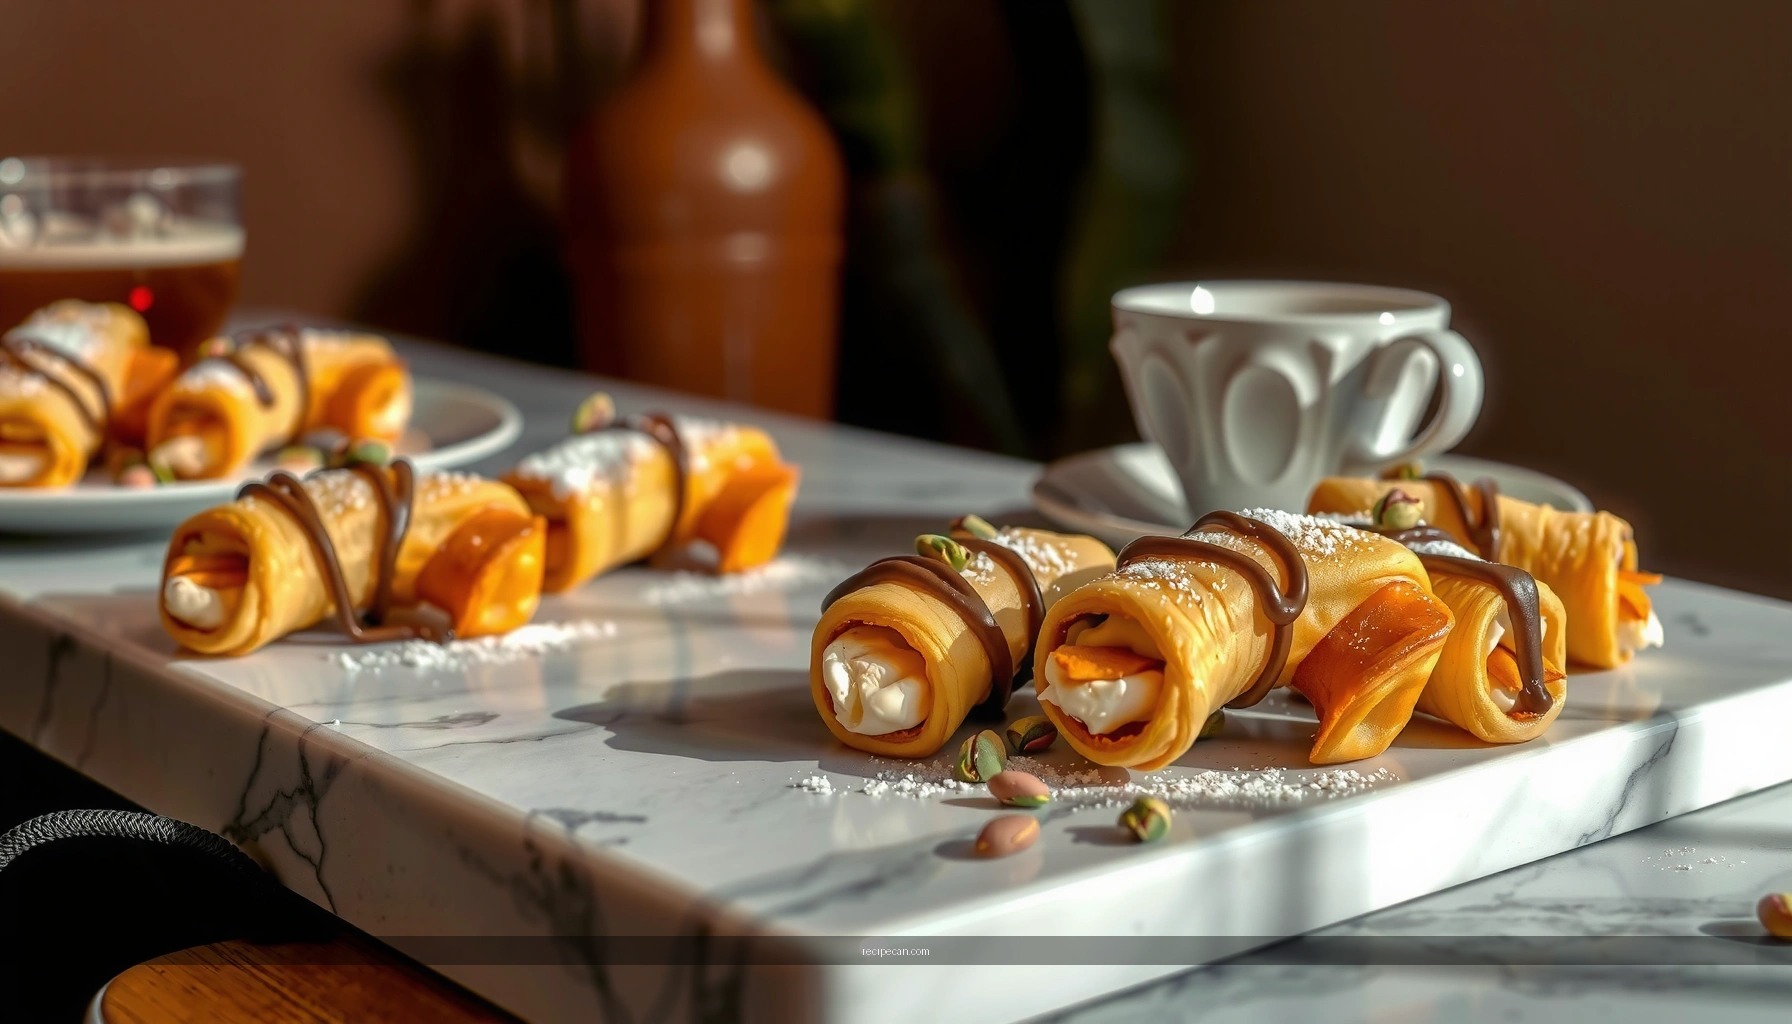
Assemble and Fill for Best Texture
The best practice for Italian cannoli cookies is to treat assembly like a service window: fill right before serving so the shell stays crisp and the ricotta stays fresh.
How to assemble:
– Pipe or spoon filling onto fully cooled cookies.
– Use a small mound—overfilling increases the chance of fast sogginess.
– Add a finishing touch: extra chocolate chips, a dusting of powdered sugar, or a drizzle of melted chocolate for a bakery-style look.
Texture strategy (what to do for events or planning):
– If you’re preparing for guests, store baked cookies in an airtight container.
– Keep filling refrigerated in a sealed bowl.
– Assemble within 1–4 hours depending on your cookie thickness (refer to the table section). Thinner shells stay crisp for less time; ideal thickness lasts longer.
Serving suggestion: plate cookies in small batches and add garnish at the last minute for visual and sensory freshness.
Storage and Make-Ahead Tips
Cannoli cookies are easiest to execute when you separate components and control moisture. That’s the core logic behind successful Italian cannoli cookies recipe results.
Store baked shells separately:
– Keep cookies in an airtight container at room temperature.
– Avoid refrigerating the shells; refrigeration can introduce moisture and reduce crispness.
Store filling correctly:
– Refrigerate filling in a sealed container.
– Stir before use if it firms up slightly.
When to assemble:
– For the crunchiest experience, fill close to serving time.
– If you must hold filled cookies briefly, place them in a cooler, low-humidity environment and avoid covering tightly right away (trapped steam softens shells).
Make-ahead workflow that scales well:
1. Bake shells in advance and cool completely.
2. Prepare filling and refrigerate.
3. Assemble on demand with chocolate/chips/citrus garnish.
This Italian cannoli cookies recipe gives you the core steps for crisp cookies and a creamy ricotta filling. Bake the cookies ahead, prep the filling, then assemble right before serving—try it this week and share your favorite variations (more chocolate, citrus, or extra candied fruit)!
Cookies that hold up to filling are a function of two things: properly baked shells and well-drained, thick ricotta. Follow the dough, bake, and assembly timing guidance above, and you’ll get a true cannoli-inspired bite—crisp, sweet, and beautifully balanced every time.
Frequently Asked Questions
What are Italian cannoli cookies and how are they different from traditional cannoli?
Italian cannoli cookies are bite-sized cookie versions of classic cannoli, typically made with a crisp, lightly sweet shell and filled with a creamy ricotta filling. Unlike traditional cannoli, which use a fried pastry shell, cannoli cookies often use a baked cookie base that’s easier to make and less messy. Many recipes still include classic cannoli flavors like cinnamon, orange zest, and chocolate chips in the ricotta filling for that authentic taste.
How do I make an Italian cannoli cookies recipe with the right crispy texture?
Start by chilling your dough if the recipe calls for it, since colder dough spreads less and helps keep the cookies crisp. Bake until the edges look set and slightly darker, then let the cookies cool completely before filling—warm cookies will soften. If you want extra crunch, use a sturdy sugar balance (not too much liquid in the filling) and avoid overmixing the cookie dough.
Why does my cannoli filling become watery, and how can I prevent it?
Watery cannoli filling usually happens when ricotta isn’t drained well or when it’s mixed too loosely with sweeteners. To fix this, drain ricotta in a fine-mesh sieve for at least 30 minutes, then fold it with powdered sugar and flavorings gently until smooth. Also, add chocolate chips or mix-ins after the filling is fully combined, and fill the cookies right before serving to prevent excess moisture absorption.
Best ricotta type for an Italian cannoli cookies filling—whole milk or part-skim?
Whole-milk ricotta is generally best for an Italian cannoli cookies recipe because it creates a richer, thicker cream that holds its shape better. Part-skim ricotta can taste lighter but may be softer and more prone to weeping if not well drained. Regardless of type, draining the ricotta thoroughly is key to a stable, non-runny cannoli filling.
Which ingredients are essential for authentic Italian cannoli cookie flavor?
To get classic cannoli flavor, include ricotta (drained), powdered sugar, and a touch of cinnamon and orange zest in the filling. For the cookie base, you’ll typically need flour, butter, sugar, eggs (or yolk), and vanilla, plus baking powder for structure. Finish with mini chocolate chips (or chopped chocolate) and optional candied fruit for that traditional cannoli-style filling in your Italian cannoli cookies.
References
- Cannoli
https://en.wikipedia.org/wiki/Cannoli - https://www.britannica.com/topic/cannoli
https://www.britannica.com/topic/cannoli - https://en.wikipedia.org/wiki/Ricotta
https://en.wikipedia.org/wiki/Ricotta - Fried dough
https://en.wikipedia.org/wiki/Fried_dough - Sicilian cuisine
https://en.wikipedia.org/wiki/Sicilian_cuisine - Google Scholar Google Scholar
https://scholar.google.com/scholar?q=italian+cannoli+recipe+ricotta - Google Scholar Google Scholar
https://scholar.google.com/scholar?q=cannoli+shells+frying+dough+recipe - Google Scholar Google Scholar
https://scholar.google.com/scholar?q=cannoli+cookies+recipe - https://pubmed.ncbi.nlm.nih.gov/?term=cannoli
https://pubmed.ncbi.nlm.nih.gov/?term=cannoli - https://www.sciencedirect.com/search?qs=cannoli
https://www.sciencedirect.com/search?qs=cannoli


