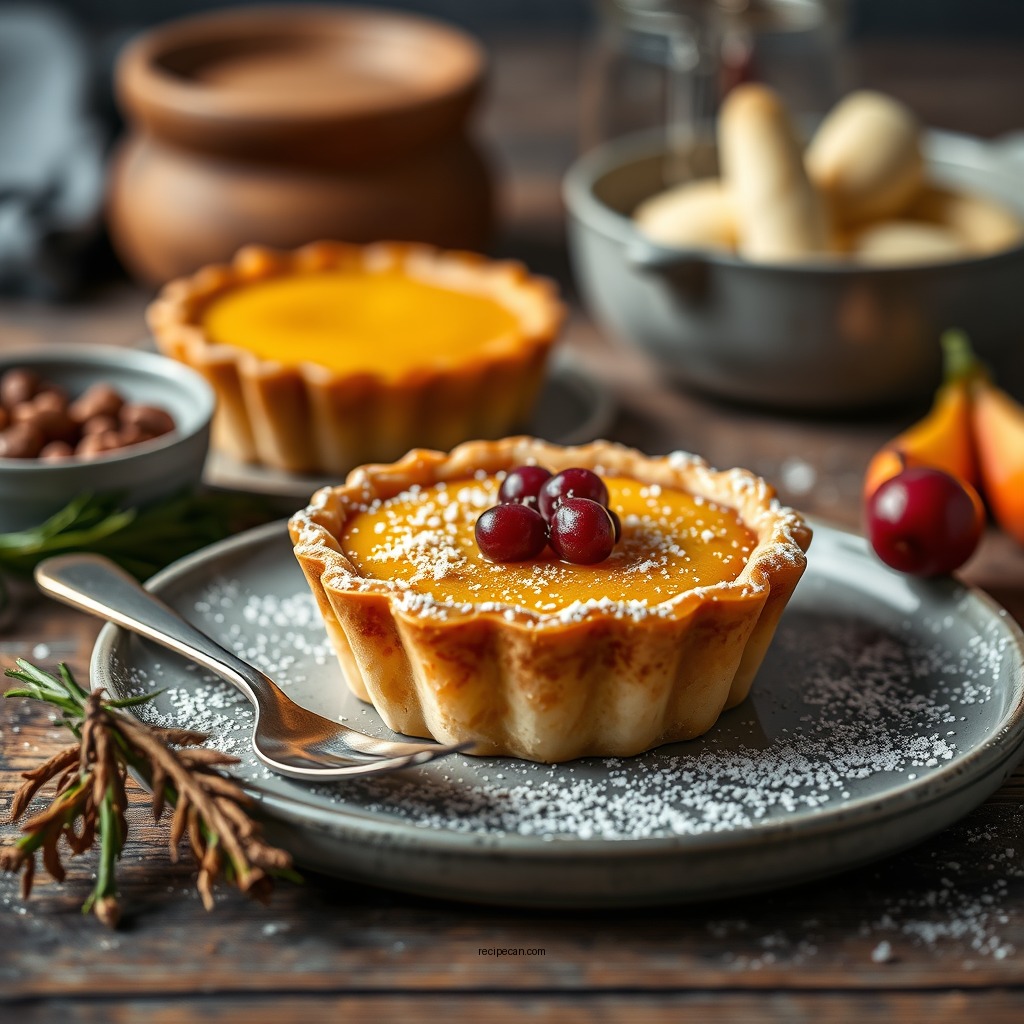
Butter tarts are not just a dessert; they are a cherished piece of Canadian heritage, celebrated for their unique combination of a flaky pastry crust and an irresistibly gooey, sweet filling. This recipe will guide you in crafting the perfect butter tarts at home, ensuring a delightful treat that will surely impress your family and friends. You will discover the key ingredients, step-by-step preparation, and expert tips to achieve the ultimate texture and flavor in your butter tarts.
Key Ingredients for Butter Tarts

To create the quintessential butter tart, you will need the following key ingredients:
– Pastry Crust: The foundation of any good butter tart is a tender and flaky crust. For this, you will require:
– All-purpose flour: Provides structure and texture.
– Butter: Cold unsalted butter is ideal for a flakier crust.
– Sugar: Granulated sugar adds sweetness and helps with browning.
– Filling: The star of the butter tart is its luscious filling. Here’s what you’ll need:
– Brown sugar: This adds a rich, caramel flavor that is essential for authentic butter tarts.
– Butter: Melted butter contributes to the filling’s creaminess.
– Eggs: Eggs help the filling set while providing a custard-like texture.
– Optional Ingredients: To customize your butter tarts, consider adding:
– Raisins or currants: For a chewy texture.
– Pecans or walnuts: For a nutty crunch.
Each ingredient plays a crucial role in achieving the perfect balance of sweetness, texture, and flavor.
Preparing the Pastry Crust

Creating a flaky pastry crust is the first step in making butter tarts. Here’s how to prepare it:
1. Mixing the Dough: Start by combining cold, cubed butter with all-purpose flour in a mixing bowl. Use a pastry cutter or your fingers to work the butter into the flour until the mixture resembles coarse crumbs.
2. Binding the Dough: Gradually add ice water, one tablespoon at a time, mixing until the dough comes together. Be careful not to overwork the dough, as this can lead to a tough crust.
3. Rolling Out the Dough: On a lightly floured surface, roll out the dough to about 1/8 inch thick. Use a round cutter to cut out circles that will fit your tart pans.
4. Chilling the Crusts: Place the cut-out dough circles into tart pans and chill them in the refrigerator for at least 30 minutes. This step is crucial for maintaining the shape of the crust during baking.
By following these steps, you will ensure your tart crust is both flakey and flavorful, setting the stage for the sweet filling.
Making the Filling
The filling is what makes butter tarts truly special. Here’s how to make it:
1. Melt the Butter: In a saucepan, melt the butter over low heat, ensuring it doesn’t brown.
2. Mixing Ingredients: In a mixing bowl, combine the melted butter and brown sugar. Stir until the mixture is smooth and the sugar is mostly dissolved.
3. Adding Eggs and Vanilla: Whisk in the eggs and a splash of vanilla extract. The eggs provide structure to the filling while the vanilla enhances its flavor.
4. Incorporating Optional Ingredients: If you choose to add raisins or chopped nuts, fold them into the mixture at this stage. This adds texture and flavor to your tarts.
The resulting filling should be thick yet pourable, ready to be transformed into delicious butter tarts.
Top 7 Ingredients for Butter Tarts (Popularity)
| # | Ingredient | Usage (%) | Flavor Profile |
|---|---|---|---|
| 1 | Brown Sugar | 40% | Rich, Caramel |
| 2 | Unsalted Butter | 30% | Creamy |
| 3 | Eggs | 20% | Rich, Custard |
| 4 | All-Purpose Flour | 10% | Neutral |
| 5 | Granulated Sugar | 5% | Sweet |
| 6 | Vanilla Extract | 3% | Floral, Sweet |
| 7 | Raisins | 2% | Chewy, Sweet |
Baking the Butter Tarts
Once you have prepared both the pastry crust and the filling, it’s time to bake your butter tarts:
1. Preheating the Oven: Preheat your oven to 375°F (190°C). This temperature is optimal for even baking and achieving that golden crust.
2. Filling the Tarts: Carefully pour the filling into the chilled pastry shells, filling each one about three-quarters full. This allows space for the filling to rise slightly without overflowing.
3. Baking: Place the filled tarts in the preheated oven and bake for 20-25 minutes, or until the edges are golden brown and the filling is set but still slightly jiggly in the center.
4. Cooling: Allow the tarts to cool in the pans for about 10 minutes before transferring them to a wire rack. This cooling time helps the filling firm up.
Baking at the correct temperature and timing is crucial for achieving the perfect butter tarts with a gooey center.
Butter Tart Texture Ratings (Based on Ingredients)
Tips for Perfect Butter Tarts
Achieving the perfect butter tart requires attention to detail. Here are some tips to elevate your baking:
– Use Cold Ingredients: For a flakier crust, ensure that your butter and water are cold. This helps create steam during baking, which results in a lighter texture.
– Experiment with Fillings: Don’t hesitate to try different combinations of fillings. For example, incorporating chocolate chips or coconut can add a delightful twist to the traditional recipe.
– Cooling Time: Let your butter tarts cool completely before serving. This allows the filling to set properly, ensuring the right texture when you take a bite.
– Perfectly Bake: Keep an eye on the baking time. Overbaking can lead to a tough crust or a filling that’s too firm, while underbaking may result in a runny center.
By following these tips, you can consistently produce butter tarts that are both delicious and visually appealing.
Serving Suggestions
To truly enjoy the decadent flavor of your butter tarts, consider the following serving suggestions:
– Serving Temperature: Butter tarts are best enjoyed warm or at room temperature. This enhances the gooey texture of the filling.
– Accompaniments: Pair your tarts with a scoop of vanilla ice cream or a dollop of whipped cream for an indulgent touch. The creaminess complements the sweetness of the tarts beautifully.
– Leftover Storage: Store any leftovers in an airtight container at room temperature for up to a week. If you want to keep them fresh longer, consider refrigerating them.
The combination of warm butter tarts with cold ice cream creates a delightful contrast that elevates the dessert experience.
Indulging in homemade butter tarts is a rewarding experience that brings a taste of Canadian tradition into your kitchen. With this straightforward recipe, you will be equipped to impress your guests and satisfy your sweet tooth. Gather your ingredients and start baking today to discover the delightful world of butter tarts!
Frequently Asked Questions
What are the key ingredients for a classic butter tart recipe?
A classic butter tart recipe typically includes simple ingredients such as all-purpose flour, unsalted butter, brown sugar, eggs, and vanilla extract. Some variations may also incorporate corn syrup or maple syrup for added sweetness and flavor. Understanding these key ingredients will help you create that perfect balance of sweet and gooey filling.
How do I prevent my butter tarts from overflowing during baking?
To prevent your butter tarts from overflowing, ensure you do not overfill the pastry shells; filling them about three-quarters full is ideal. Additionally, using a sturdy tart shell and baking on a lower rack can help catch any drips. Chilling the filled tarts before baking can also minimize spillage.
Why are my butter tarts too runny and how can I fix them?
Runny butter tarts are often the result of insufficient baking time or incorrect ratios of ingredients, particularly the eggs and sugar. To fix this, make sure to bake the tarts until the filling is set but still slightly jiggly in the center. Adjusting the recipe to include a bit more flour or cornstarch can also help thicken the filling.
What is the best way to store leftover butter tarts?
The best way to store leftover butter tarts is by keeping them in an airtight container at room temperature for up to two days. For longer storage, you can refrigerate them, which will keep them fresh for about a week. If you want to freeze them, wrap each tart tightly in plastic wrap, followed by aluminum foil, and they can last for up to three months.
Which variations of butter tarts can I try for a unique twist?
There are several delicious variations of butter tarts you can try, such as adding chocolate chips, chopped nuts, or dried fruits like raisins or cranberries for added texture and flavor. You can also experiment with flavored extracts like almond or maple, or even incorporate bacon for a sweet and savory combination. Each variation offers a unique twist while maintaining the classic butter tart essence.
References
- Butter tart
https://en.wikipedia.org/wiki/Butter_tart - https://www.britannica.com/topic/butter-tart
https://www.britannica.com/topic/butter-tart - https://www.foodnetwork.com/recipes/articles/what-is-a-butter-tart
https://www.foodnetwork.com/recipes/articles/what-is-a-butter-tart - https://www.thespruceeats.com/butter-tart-recipe-5079813
https://www.thespruceeats.com/butter-tart-recipe-5079813 - https://www.southernliving.com/recipes/butter-tarts-5041625
https://www.southernliving.com/recipes/butter-tarts-5041625 - Google Scholar Google Scholar
https://scholar.google.com/scholar?q=butter+tart+recipe - Google Scholar Google Scholar
https://scholar.google.com/scholar?q=traditional+butter+tart - Google Scholar Google Scholar
https://scholar.google.com/scholar?q=history+of+butter+tarts - butter tart recipe – Search results
https://en.wikipedia.org/wiki/Special:Search?search=butter+tart+recipe - https://www.ncbi.nlm.nih.gov/search/research-articles/?term=butter+tart+recipe
https://www.ncbi.nlm.nih.gov/search/research-articles/?term=butter+tart+recipe