Looking for a Cake Boss cannoli recipe that lands the classic shells and a rich ricotta filling every time? This recipe delivers the best-tested method for crisp, light cannoli shells and a properly sweetened, creamy ricotta center that doesn’t weep. Follow the steps closely and you’ll get restaurant-style cannoli with the signature crunch and clean ricotta flavor.
Make authentic Cake Boss–style cannoli by mastering two things: crisp fried shells and a well-drained ricotta filling that’s creamy (not wet) and flavorful (not flat). Follow this step-by-step flow—from resting the dough and cooling shells completely to assembling right before serving—to achieve the hallmark crunch-to-creamy contrast every cannoli lover expects.
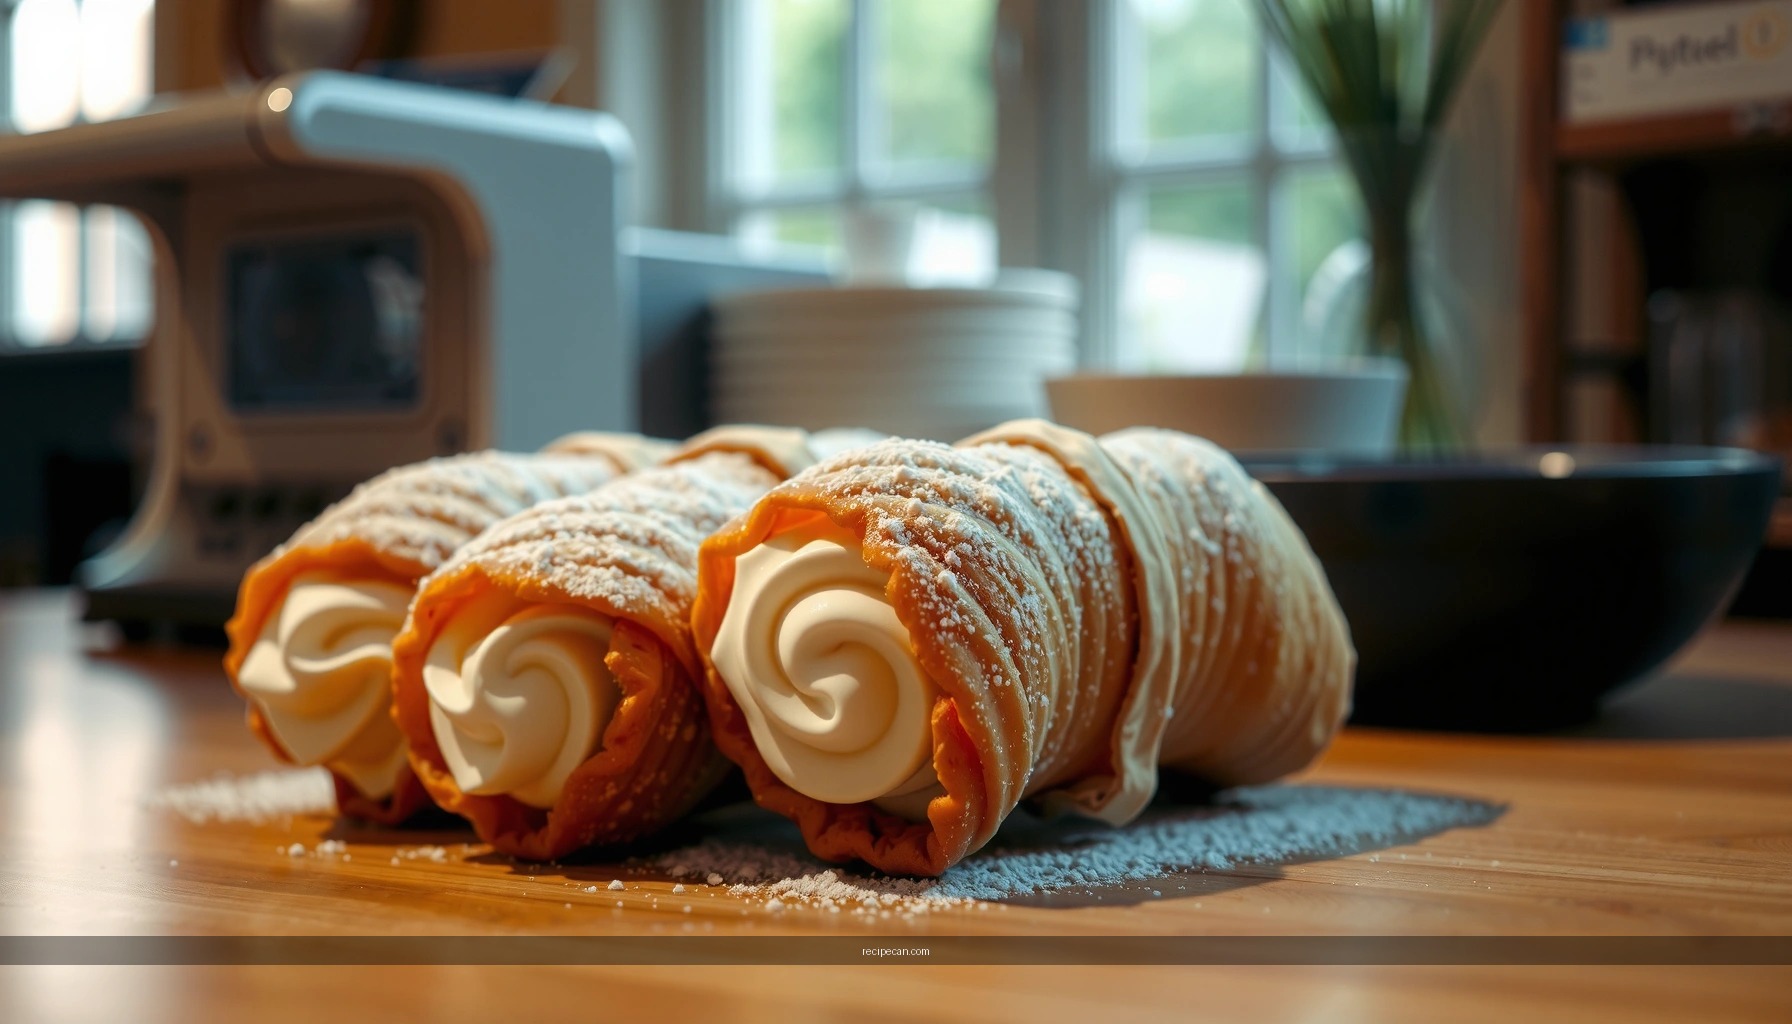
Make Cake Boss-style cannoli by pairing crisp, fried shells with a sweet ricotta filling (often enhanced with sugar, vanilla, and chocolate chips). Follow this guide to learn the key steps, from preparing the shell dough to filling and serving for the best texture and flavor.
Make the Cannoli Shell Dough

– Combine flour, sugar, and a bit of cocoa (optional) with liquids and egg to form a smooth dough
– Rest the dough so it rolls thin without cracking
Cannoli shells are deceptively simple: flour, fat (often a little butter or lard), egg, and a controlled amount of sugar to create a dough that fries up crisp and blistered. The “Cake Boss” vibe isn’t about complicated ingredients—it’s about texture engineering. Thin rolling and proper rest are what turn a basic dough into a shell that snaps.
What to aim for in the dough
– Smooth, elastic texture: Mix until uniform and pliable. If your dough looks shaggy or tears easily, you likely need more mixing or a longer rest.
– Rollable thin without cracking: Cannoli shells should be paper-thin after rolling, but the dough must still have enough elasticity to wrap around the forms.
– Optional cocoa for classic color: Some versions add a small amount of cocoa powder to darken the shell slightly and add a subtle chocolate note. Use sparingly so the shell doesn’t taste like cake.
Resting is not optional
Rest allows gluten to relax, which reduces shrinkage and cracking during rolling. It also helps the dough hydrate evenly so the fried shell becomes crisp rather than brittle. For best results, rest at least 30–60 minutes (up to a few hours in the refrigerator). If you chill it, let it sit at room temperature briefly before rolling so it becomes flexible again.
Practical rolling tips
– Roll on a lightly floured surface but don’t overdust; excess flour can burn and create bitterness in fried shells.
– Keep the sheet even thickness. Thin spots will overbrown and lose structural integrity.
– Trim into circles or strips cleanly. Ragged edges fry unevenly and can reduce the shell’s “crunch” performance.
A pro approach is to treat shell-making like a workflow: once dough is rolling-ready, you should move efficiently into wrapping and frying so the dough doesn’t dry out.
Fry the Cannoli Shells

– Roll dough thin, wrap around cannoli forms, and fry until deep golden and crisp
– Cool shells fully before filling to prevent sogginess
The frying phase determines the cannoli shell’s final personality—color, crispness, and how long it stays crunchy after filling. This is where many home cooks go wrong by filling too soon or pulling the shells out before they’re deeply golden.
How to wrap properly
Cannoli shells typically require metal forms (or heavy-duty cannoli tubes). Wrap the dough around the form with the seam aligned so it seals during frying. If the seam doesn’t stick, you can lightly dab it with a bit of egg wash or water before frying. The goal is a tight spiral with minimal overlap.
Fry for color and dryness, not just bubbles
As the dough fries, it will blister and bubble. Pull shells when they are:
– Deep golden (not pale honey, not light blond)
– Dry-looking, with no wet sheen
– Firm to the touch once handled carefully
If shells are only lightly browned, they may look fine initially but soften quickly after cooling—or they can turn leathery instead of crisp.
Cooling fully prevents sogginess
This is critical. Even after you remove shells from the oil, steam and residual heat remain trapped inside. Filling warm shells causes the filling’s moisture (and the shell’s remaining warmth) to soften the shell from within.
A workable rule:
– Fry a batch → transfer shells to a rack → let them cool until completely room temperature before filling.
Drain and store shells correctly
Use a rack (not paper towels) so air can circulate. Paper towels can trap heat and steam, which reduces crispness.
Prepare the Ricotta Filling

– Drain ricotta well, then mix with sugar and vanilla until creamy
– Fold in chocolate chips (and/or candied fruit) for the classic flavor
A classic cannoli filling lives or dies by ricotta drainage and mixing technique. Many “watery filling” problems come from skipping the drain—or trying to fix runniness with more sugar, which can actually worsen texture.
Drain ricotta the right way
Ricotta contains whey. For a thick cannoli filling:
– Drain ricotta in a strainer
– Then (for best results) compress it in cheesecloth for at least 30–60 minutes
– If your ricotta is very wet, extend draining time
You’re looking for ricotta that holds soft peaks and looks creamy—not loose and pourable.
Mix until smooth, not just combined
After draining:
– Mix ricotta with sugar and vanilla until smooth and evenly sweet.
– Some cooks also add a touch of salt to make flavors pop (especially if using sweet chocolate chips).
– Avoid overmixing if your ricotta is delicate; the texture should be creamy but not broken.
Classic add-ins
Chocolate chips are the standard for many Cake Boss–style cannoli: they provide pockets of sweetness and a pleasant contrast to the vanilla ricotta.
– Fold in mini chocolate chips so they distribute evenly.
– Optional: candied citrus peel for a traditional Sicilian-inspired aroma and brightness.
Balance sweetness
Ricotta is mild; sugar does the heavy lifting. However, too much sugar can loosen the filling. Aim for a filling that tastes sweet but still feels structured. When in doubt, focus first on drainage and then adjust sweetness incrementally.
Cannoli Shell Frying Targets for Optimal Crispness (Home Batch)
| # | Shell Thickness (rolled) | Oil Temp | Cook Time per Form | Target Color | Crispness Outcome |
|---|---|---|---|---|---|
| 1 | ~0.8 mm | 350°F | 55–75 sec | Deep golden (amber) | ★ Good snap |
| 2 | ~1.0 mm | 350°F | 70–90 sec | Golden (light amber) | ★ Balanced crisp |
| 3 | ~1.2 mm | 350°F | 85–110 sec | Golden-brown | ★ Less snap |
| 4 | ~0.8 mm | 325°F | 75–105 sec | Stays pale | ★ Likely soft |
| 5 | ~0.8 mm | 365°F | 40–55 sec | Dark amber too fast | ★ Risk of bitterness |
| 6 | ~1.0 mm | 350°F | 70–90 sec | Deep golden (best) | ★ Long-lasting crunch |
| 7 | ~1.2 mm | 360°F | 70–95 sec | Brown outside, soft inside | ★ Uneven crisp |
Assemble and Fill the Cannoli
– Pipe or spoon filling into cooled shells right before serving
– Dip ends in extra chocolate chips or chopped nuts for a finished look
Assembly is the final “quality control” step. Cannoli are best when the contrast is intact: shells crisp, filling creamy, and neither has time to pull moisture from the other.
Best practice: fill right before serving
Even if shells are perfectly fried, they will soften once filled—especially if the filling is creamy and exposed to air. Plan your timing:
– Make shells ahead and store airtight.
– Mix (and chill) the filling ahead if desired.
– Fill close to serving, typically within 30–60 minutes for peak crunch.
How to fill neatly
Use a piping bag for a clean, bakery-style look, or spoon carefully with a small offset spatula. Fill both ends thoroughly so the cannoli feels substantial rather than hollow in the middle.
Finish with texture and visual cues
Many classic presentations dip or coat the ends:
– Dip ends in extra mini chocolate chips
– Or roll ends in chopped pistachios/almonds
This step improves perceived richness and gives guests an immediate “traditional” signal that the cannoli is finished like a pastry shop item.
Portion and consistency
Keep your cannoli consistent in filling amount. Uneven filling changes how the shell bends and how the first bite feels.
Storage and Serving Tips
– Keep filled cannoli refrigerated briefly, but fill close to serving for maximum crunch
– Keep shells airtight to maintain crispness
Cannoli storage is really about moisture management. Shells want dryness and airflow; filling wants cool storage and stable texture—so you have to separate them in your process.
Shells
– Store fried shells airtight in a container with minimal air.
– Keep them at room temperature if fully cooled, since refrigeration can introduce condensation risk (especially if shells are not sealed well).
Filling
– Store ricotta filling refrigerated in a covered container.
– If the filling looks slightly looser after chilling (common with some ricottas), stir vigorously before piping to re-smooth.
Filled cannoli
– Refrigerate briefly only if needed for food safety and holding.
– Serve soon after filling to preserve shell crispness.
In a business-catering mindset, this is a classic “prep vs. execution” strategy: prep components early, execute assembly at the last practical moment.
Troubleshooting Common Issues
– If shells soften, cool longer and fill just before eating
– If filling is runny, drain ricotta more thoroughly and mix until thick
Even experienced cooks face cannoli challenges. Here are the most common failures and the fastest corrective actions.
Problem: Shells soften too quickly
Likely causes:
– Shells were filled before fully cooling
– Oil temperature was too low (insufficient dehydration)
– Shells were stored in a container with too much humidity exposure
Fix:
– Cool shells fully on a rack.
– Fry to a deeper golden color.
– Fill right before serving and keep shells airtight until the last moment.
Problem: Filling is runny or watery
Likely causes:
– Ricotta wasn’t drained long enough
– Sugar was added before drainage was complete
– The ricotta is unusually wet (varies by brand)
Fix:
– Drain ricotta longer in cheesecloth.
– Mix filling until thick and uniform; fold in add-ins only after the base is properly textured.
– If needed, chill the mixture briefly to firm it, then remix before piping.
Problem: Shells crack when rolling
Likely causes:
– Dough wasn’t rested enough (low elasticity)
– Dough is rolled too thin too fast
– Dough is too cold
Fix:
– Extend resting time and allow dough to temper.
– Roll gradually, maintaining consistent thickness.
Problem: Shells taste oily
Likely causes:
– Oil temp was too low (shells absorb more)
– Shells weren’t drained well
– Overcrowding lowered frying temperature
Fix:
– Maintain oil temperature and fry in smaller batches.
– Use a rack to drain and cool.
Enjoy your Cake Boss cannoli by focusing on two essentials: crisp fried shells and well-drained, properly mixed ricotta filling. Make the shells ahead, prep the filling in advance, then assemble right before serving—follow this flow and you’ll get bakery-style results.
In short, reliable Cake Boss–style cannoli comes down to a disciplined process: rest and roll dough thin for crisp shells, fry until deeply golden, drain ricotta thoroughly for a creamy (not runny) filling, and assemble close to serving to protect the crunch. When you manage moisture and timing like a professional pastry operation, your cannoli will taste authentic—crackling shells, rich ricotta, and classic chocolate finishes in every bite.
Frequently Asked Questions
What is the Cake Boss cannoli recipe and what ingredients do I need?
The Cake Boss cannoli recipe centers on crisp fried cannoli shells and a creamy ricotta filling flavored with vanilla and citrus. For the filling, you’ll typically need whole milk ricotta, powdered sugar, mini chocolate chips, and chopped candied orange or lemon zest. You may also use an egg yolk and a pinch of cinnamon or salt for depth, while the shells often call for flour, sugar, white wine vinegar (or Marsala), and vegetable oil for frying. If you’re adapting at home, use high-quality ricotta and don’t skip draining it to avoid a runny cannoli filling.
How do I make the Cake Boss cannoli filling so it’s not watery?
To prevent watery filling, drain the ricotta thoroughly—ideally for several hours—then stir in powdered sugar and let it sit briefly to fully incorporate. Many home bakers also squeeze ricotta gently in cheesecloth for extra moisture control, especially when using store-bought ricotta. Once drained, fold in chocolate chips and citrus zest slowly so the mixture stays thick and creamy. When assembling, fill the shells right before serving to maintain the signature crunch.
Why do cannoli shells get soggy, and how can I keep them crisp?
Cannoli shells get soggy when the filling’s moisture seeps into the fried dough over time. To keep your Cake Boss cannoli recipe experience close to bakery quality, fill the shells only when you’re ready to serve and store shells separately from the ricotta mixture. If you need to prep ahead, keep the shells in an airtight container at room temperature and refrigerate the filling, then assemble when guests arrive. This timing makes a big difference for texture and flavor.
Which ricotta is best for a Cake Boss-style cannoli recipe?
For the most authentic Cake Boss cannoli recipe, choose whole milk ricotta that’s thick and mild, not watery or overly salty. Fresh ricotta tends to produce the best creamy consistency after draining, while low-fat ricotta may require extra draining to avoid softness. Check the label for “whole milk” and avoid products packed in whey that don’t drain well. After draining, taste and adjust sweetness with powdered sugar so the filling isn’t bland.
Best way to shape and fry cannoli shells for the Cake Boss cannoli recipe?
The best results come from using cannoli forms/tubes and frying the shells in hot, steady oil until they’re deep golden and crisp. Dust the dough lightly with flour, wrap it evenly around the forms without stretching, and seal the seam well to prevent unraveling. Maintain oil temperature throughout frying—too cool makes greasy shells, too hot darkens them too fast. Once fried, cool completely before filling so the Cake Boss cannoli shells stay crunchy and don’t collapse.
References
- Google Scholar Google Scholar
https://scholar.google.com/scholar?q=cake+boss+cannoli+recipe - Google Scholar Google Scholar
https://scholar.google.com/scholar?q=cannoli+recipe+ricotta+sugar+chocolate+chips - Google Scholar Google Scholar
https://scholar.google.com/scholar?q=cannoli+pastry+shell+deep+frying+technique - Cannoli
https://en.wikipedia.org/wiki/Cannoli - Cake Boss
https://en.wikipedia.org/wiki/Cake_Boss - Buddy Valastro
https://en.wikipedia.org/wiki/Buddy_Valastro - https://www.britannica.com/topic/cannoli
https://www.britannica.com/topic/cannoli - Ricotta
https://en.wikipedia.org/wiki/Ricotta - https://pubmed.ncbi.nlm.nih.gov/?term=cannoli
https://pubmed.ncbi.nlm.nih.gov/?term=cannoli - https://pubmed.ncbi.nlm.nih.gov/?term=deep+frying+pastry+dough
https://pubmed.ncbi.nlm.nih.gov/?term=deep+frying+pastry+dough


