Get an easy cannoli cups recipe that delivers real cannoli flavor in portable dessert cups—no fuss, no rolling dough. This make-ahead method shows you exactly how to assemble cannoli filling and crunchy cup shells so they hold their texture and taste fresh. If you need a stress-free dessert for guests, this is the clear winner that solves both prep time and “will it stay crispy?” concerns.
Cannoli cups are a simple, no-mess twist on classic cannoli—bake or prep crisp sweet shells, fill with a creamy ricotta mixture, then chill until set. This recipe walks you through making the cannoli cups (or using ready-to-bake options), preparing a thicker, scoopable filling, and assembling the cups so they stay crisp and taste like a true cannoli, not a soggy remix.
Ingredients for Cannoli Cups

– Gather cannoli shell cups (or mini shells), ricotta, sugar, vanilla, and chocolate chips
– Optional add-ins: cinnamon, orange zest, or mini candied fruit
– Check labels for ingredients that stay fresh when chilled
To keep cannoli cups reliable for make-ahead serving, focus on three ingredient categories: crisp shells, well-drained ricotta, and flavor boosters that don’t lose impact in the fridge.
1) Shell options (choose based on how much time you have)
– Store-bought cannoli cups or mini shells: Typically already shaped for individual portions. These are ideal for events because they reduce downtime and keep portions consistent.
– Bake-your-own mini shells: If you can access cannoli shell dough or mini shell forms, baking helps you control crispness.
2) Ricotta: drain it like the texture depends on it (because it does)
For cannoli cups, ricotta should be thick and spoonable. If it’s too wet, the filling bleeds into the shells and softens them faster. Drain ricotta thoroughly (details in the filling section).
3) Sweetness and flavor that read “cannoli” even after chilling
Classic cannoli flavor comes from the balance of:
– vanilla (rounds sweetness)
– citrus (often orange zest) (cuts richness)
– cinnamon (optional, warm and aromatic)
– chocolate chips (melts slightly when chilled, adding pockets of richness)
If you prefer a more traditional cannoli taste, orange zest is the most “signature” upgrade.
Shell Strategy vs. Crispness Retention for Cannoli Cups (Refrigerated)
| # | Shell Approach | Best Time to Fill | Crispness Rating | Make-Ahead Friendliness | Tradeoff | Outcome Score |
|---|---|---|---|---|---|---|
| 1 | Store-bought cannoli cups (dry, unfilled) | 0–2 hours after opening | ★★★★☆ (4.6) | High | Lowest control over bake-time | +9 |
| 2 | Bake store-bought mini shells briefly for extra crisp | Fill within 3–4 hours | ★★★★☆ (4.4) | High | Requires oven timing | +7 |
| 3 | Freshly baked mini shells (cool fully, then store dry) | Same day (up to 6 hours) | ★★★★☆ (4.3) | Medium-High | More prep steps | +6 |
| 4 | Bake shells, cool overnight in open air (drying step) | Fill next day (best day 1) | ★★★★☆ (4.5) | Medium | Needs timing and airflow | +5 |
| 5 | Fill immediately while shells are warm | Not recommended | ★★★☆☆ (2.6) | Low | Condensation softens shells | -8 |
| 6 | Store shells uncovered in the fridge before filling | Fill within 1–2 hours | ★★★☆☆ (3.0) | Low-Medium | Humidity reduces crunch | -4 |
| 7 | Fill with very wet ricotta (under-drained) | Only if serving immediately | ★★☆☆☆ (1.9) | Very low | Filling seeps into shells | -9 |
Make or Prepare the Cannoli Cups

– Bake store-bought cups (or bake mini shells) until lightly crisp
– Let shells cool completely so they don’t soften the filling
– Keep cups dry and ready before assembling
The core principle of cannoli cups is crunch first, cream second. You want the shell to stay dry enough to provide structure even after chilling.
Best practice: lightly re-crisp before filling
If you’re using pre-formed shells:
1. Preheat your oven to 300°F / 150°C.
2. Arrange shells/cups on a sheet pan.
3. Bake 5–8 minutes (start checking early). You’re aiming for “slightly crisper,” not browned toast.
4. Remove and cool completely.
Why “fully cool” matters
Warm shells create trapped heat and condensation when they meet cold ricotta. That moisture is what turns crisp cannoli cups into soft cups. Cooling fully prevents that early softening.
Storage while you prep
Keep shells in a dry container:
– Line with a paper towel or parchment to absorb stray moisture.
– Avoid covering them tightly while they’re still warm.
– If your kitchen is humid, allow them to dry at room temperature until completely cool.
Cannoli Filling (Creamy Ricotta Mixture)

– Drain ricotta well for a thicker, scoopable filling
– Mix with sugar and vanilla until smooth, then fold in add-ins
– Stir in chocolate chips last for even distribution
A cannoli filling should be creamy but not pourable. For cannoli cups, think “thick frosting” rather than “ricotta spread.”
Drain ricotta for the right viscosity
– Place ricotta in a fine-mesh sieve or cheesecloth.
– Refrigerate while draining at least 1–2 hours, or up to overnight for best results.
– You should be able to scoop it and have it hold shape.
Mix for smoothness and balance
1. Stir or beat drained ricotta until smooth.
2. Add sugar gradually to dissolve and reduce graininess.
3. Mix in vanilla for a classic dessert base.
4. Fold in optional add-ins:
– orange zest for bright, traditional aroma
– cinnamon for warmth
– mini candied fruit for texture and sweetness
Add chocolate chips last
Stir chocolate chips in at the end so they don’t melt or break down from overmixing. Even distribution also helps each cup feel like it has “surprise” chocolate.
Texture check before assembly
If the mixture looks runny, fix it before building:
– Chill the filling 20–30 minutes to firm slightly.
– Or add a small amount of sugar or thickened dairy substitute if your filling is unusually loose (only if needed—don’t overcomplicate).
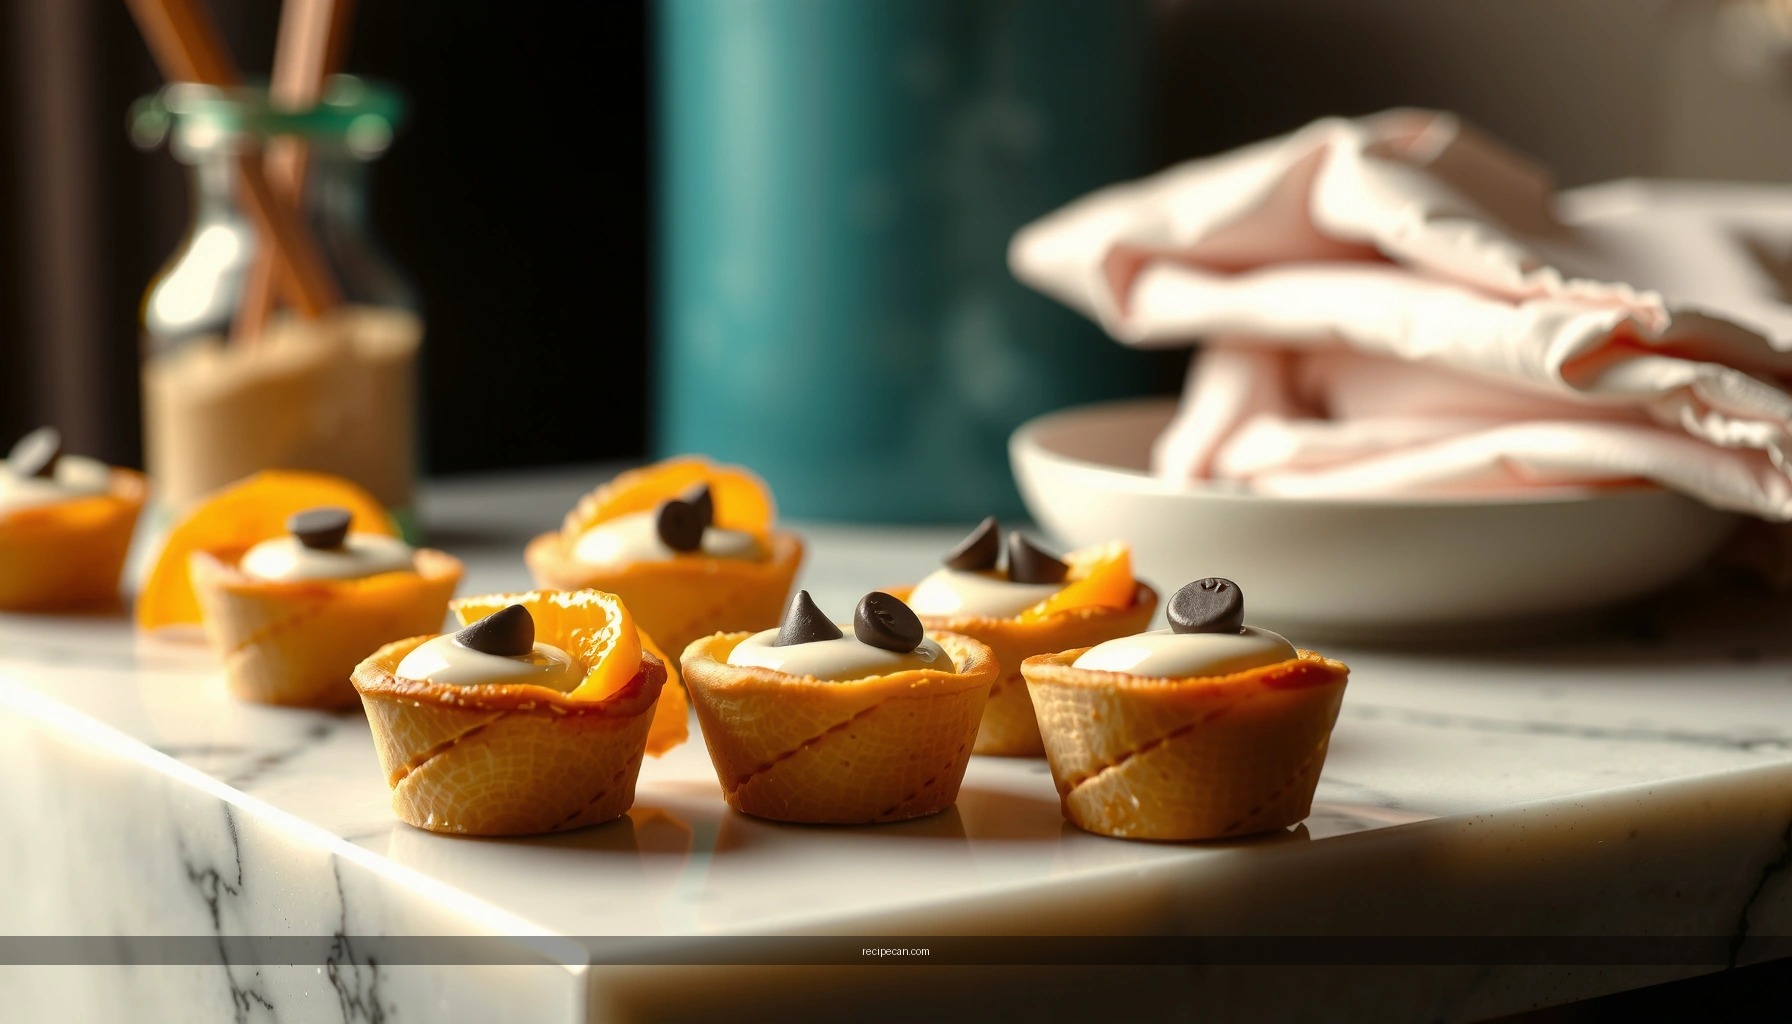
How to Assemble Cannoli Cups
– Spoon filling into each cooled cup with a gentle, even layer
– Top with extra chocolate chips or a sprinkle of powdered sugar
– Add garnish right before serving if you want maximum crunch
Assembling cannoli cups is where technique drives quality. You’re minimizing contact time between shell surfaces and moisture while creating a clean, attractive portion.
Spoon, don’t dump
Use a small spoon or piping bag:
– Fill each shell with a consistent, gentle layer.
– Leave a small rim at the top so the cup looks neat and provides a surface for garnishes.
Top strategically
Immediately topping inside the cups can speed softening, so choose toppings wisely:
– Add a few chocolate chips into/over the filling (fine because they don’t create moisture).
– Finish with powdered sugar if you want a classic look—just remember it can dissolve slightly in very humid conditions.
Best timing for garnish
If you’re using crunchy garnish (like chopped toasted nuts, crisp cookie crumbs, or additional shells), apply it right before serving. This preserves the sensory contrast: crisp exterior, creamy interior.
Make-Ahead, Storage, and Serving Tips
– Assemble up to a few hours ahead for best texture
– Refrigerate covered; avoid leaving shells exposed too long
– Serve chilled, and refresh the presentation with quick toppings
Cannoli cups are inherently make-ahead friendly—just not “overnight open-air” friendly. The goal is controlled chilling without extra humidity exposure.
How far ahead should you assemble?
– Ideal: 1–3 hours ahead for best shell crispness.
– Acceptable: up to 4–6 hours if shells were properly dried and ricotta was well-drained.
– Beyond that: the dessert still tastes great, but crunch tends to soften.
Refrigeration method
– Place assembled cups in an airtight container.
– Use parchment between layers if you stack them.
– Keep toppings separate if they’re crunchy and should stay crisp.
Serving approach
– Serve cold, straight from the fridge.
– Add fresh toppings right before you serve so each bite gets the contrast cannoli is known for.
Event-friendly workflow (highly practical)
– Day-of morning: drain ricotta and prepare filling.
– Midday: re-crisp shells and cool completely.
– Late afternoon: assemble.
– Just before guests arrive: top with chocolate chips and powdered sugar.
Troubleshooting Common Issues
– If filling is runny, drain ricotta longer or chill the mixture
– If shells soften too fast, ensure they’re fully cooled before filling
– If flavor feels flat, adjust sweetness and add vanilla or citrus zest
Even well-tested recipes can misbehave because ricotta brands vary and kitchen humidity changes outcomes. Here’s how to diagnose quickly.
Problem: Filling is runny or spreads into the shell
– Fix: Drain ricotta longer (most common cause).
– Fix: Chill the filling 20–30 minutes to firm slightly before assembly.
– Fix: Check that your ricotta isn’t a “low-fat” variety with higher moisture content than expected.
Problem: Shells soften too fast
– Fix: Make sure shells cool completely—warm shells create condensation.
– Fix: Don’t refrigerate shells uncovered; humidity is the silent crunch killer.
– Fix: Assemble closer to serving time, especially if your environment is humid.
Problem: Flavor tastes flat
– Fix: Increase vanilla slightly or add a touch more sugar—but do it gradually.
– Fix: Add orange zest. Citrus is a reliable “flavor lift” that keeps cannoli taste recognizable after chilling.
– Fix: Ensure salt balance. If your ricotta is unsalted, a tiny pinch of salt can make sweetness taste more complete.
Final note on consistency and results
Cannoli cups are an easy, crowd-pleasing dessert that delivers classic cannoli flavor in individual portions. Follow the steps for crisp shells, well-drained ricotta filling, and careful assembly, then refrigerate and serve chilled. Make a batch, garnish right before serving, and enjoy every bite—save the recipe for your next gathering!
Frequently Asked Questions
What is a cannoli cups recipe and how is it different from traditional cannoli?
A cannoli cups recipe uses small, edible “cup” shells (often made with wonton wrappers or phyllo) instead of long cannoli shells. This makes it easier to portion the ricotta filling and serve as bite-sized desserts. Traditional cannoli usually uses fried tubes that hold the filling, while cannoli cups focus on a convenient, crunchy base with the same classic flavors.
How do you make cannoli cups that don’t get soggy?
To avoid sogginess, fully cool the fried cups (or baked/phyllo cups) before filling them. Use a thick ricotta filling by draining ricotta well and mixing in powdered sugar gradually until it holds its shape. For best results, fill cannoli cups shortly before serving or keep the cups and filling separate until the last minute.
Which fillings work best for a cannoli cups recipe?
The classic choice is a sweetened ricotta filling with mini chocolate chips, vanilla, and a touch of citrus zest (like orange or lemon). For extra flavor and texture, many people add cinnamon or a spoonful of mascarpone to make the cannoli cups filling richer. If you want a lighter dessert, you can fold in whipped cream into the ricotta, but keep it thick so the cannoli cups don’t soften.
What temperature and timing should you use for frying cannoli cup shells?
For frying cannoli cups, heat oil to about 350°F (175°C) so the shells turn golden quickly without absorbing too much grease. Cook the cups until crisp and lightly browned, typically 1–3 minutes depending on their size. Carefully drain on a rack (not paper towels) to keep the shells crisp, then cool completely before adding the cannoli filling.
Best way to store cannoli cups—can you prepare ahead?
For the best texture, prepare the cannoli cups shells ahead of time and store them airtight once completely cooled. Make the ricotta filling separately and refrigerate it in a covered container; assemble cannoli cups within a few hours of serving for maximum crunch. If you must assemble earlier, expect the shells to soften, so keep them refrigerated and serve as soon as possible.
References
- Cannoli
https://en.wikipedia.org/wiki/Cannoli - https://www.britannica.com/topic/cannoli
https://www.britannica.com/topic/cannoli - Cannoli recipe | Good Food
https://www.bbcgoodfood.com/recipes/cannoli - https://www.theguardian.com/food/recipe/2007/jan/22/italianfood.foodandwine
https://www.theguardian.com/food/recipe/2007/jan/22/italianfood.foodandwine - https://cooking.nytimes.com/recipes/1016243-cannoli
https://cooking.nytimes.com/recipes/1016243-cannoli - Google Scholar Google Scholar
https://scholar.google.com/scholar?q=cannoli+shells+recipe - Google Scholar Google Scholar
https://scholar.google.com/scholar?q=cannoli+cups+recipe - Google Scholar Google Scholar
https://scholar.google.com/scholar?q=italian+pastry+frying+cannoli+shells - cannoli cups recipe – Search results
https://en.wikipedia.org/wiki/Special:Search?search=cannoli+cups+recipe - https://www.ncbi.nlm.nih.gov/search/research-articles/?term=cannoli+cups+recipe
https://www.ncbi.nlm.nih.gov/search/research-articles/?term=cannoli+cups+recipe


