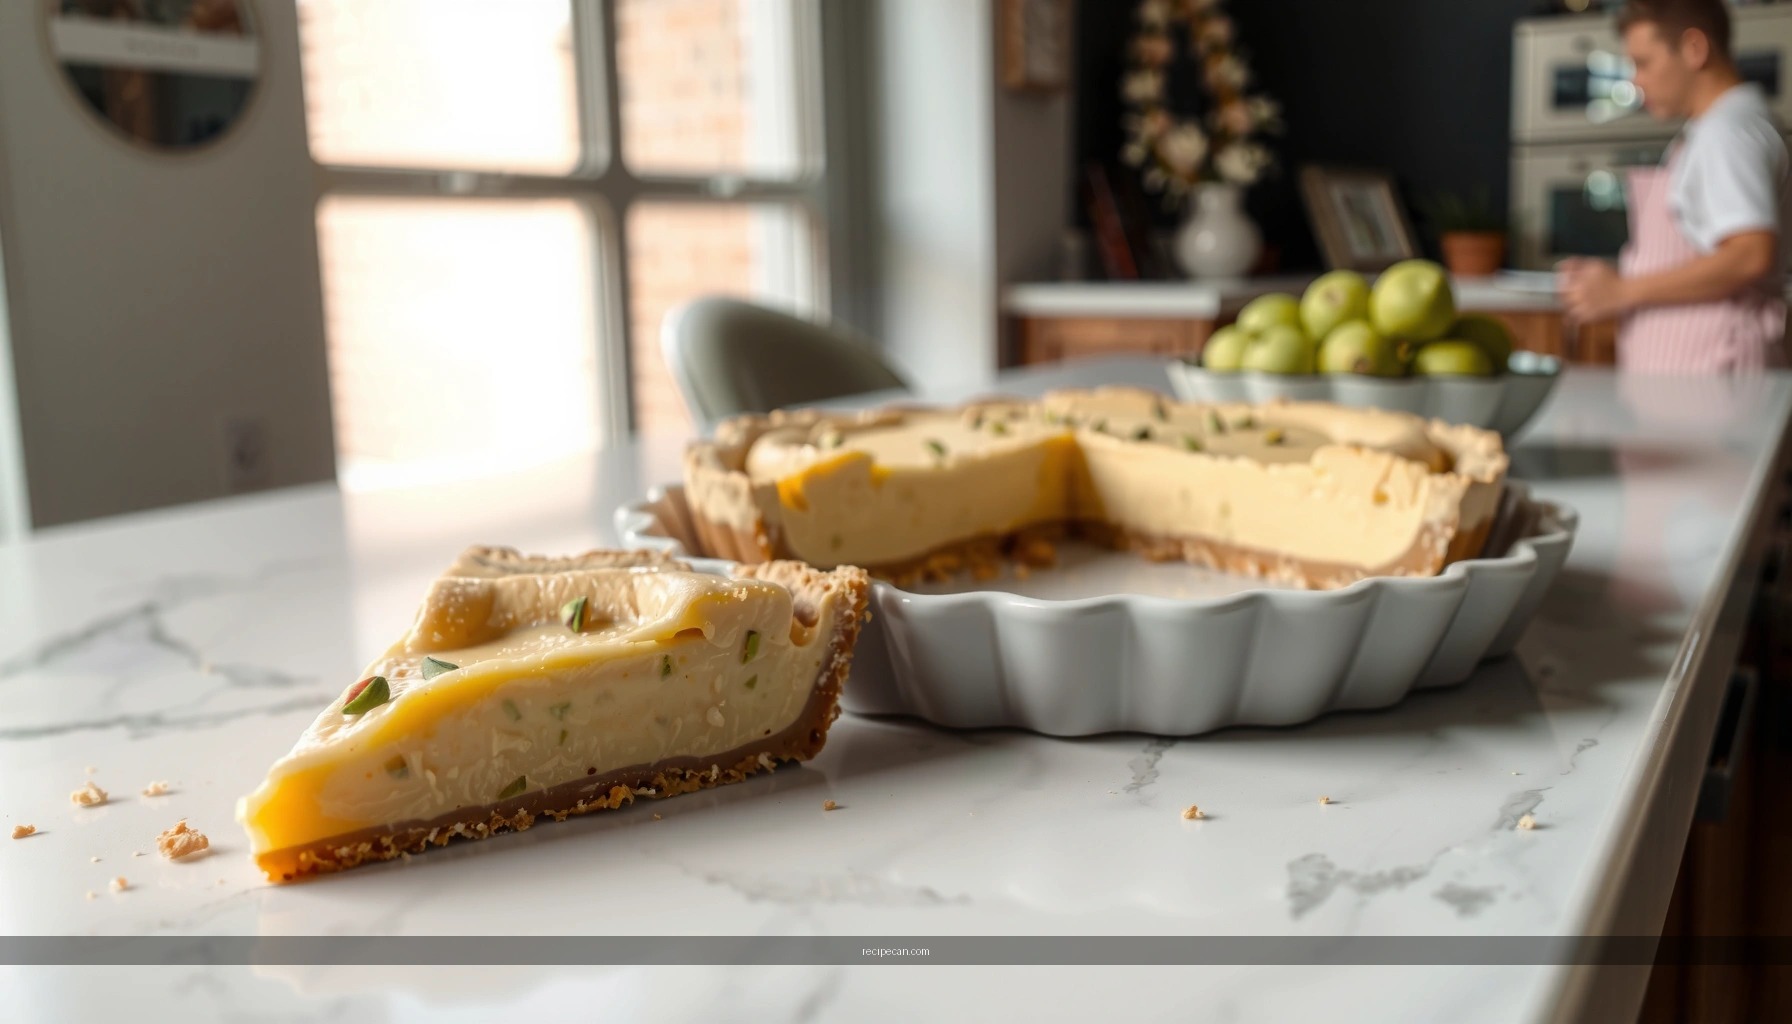
Looking for a recipe for pistachio pudding pie that delivers a creamy filling and a crisp, buttery crust without complicated steps? This easy homemade pistachio pudding pie walks you through the exact ingredients and timing to set the pudding properly and get clean slices every time. If you want a guaranteed crowd-pleaser dessert with minimal effort, this is the one to bake.
This recipe delivers a creamy, nutty pistachio filling with a straightforward crust—and it’s designed to chill into clean, sliceable wedges. In the sections below, you’ll find the ingredients, precise steps to make smooth instant pistachio pudding pie, and the best setting strategies so the pie holds its shape for serving.
In practical terms, pistachio pudding pie is one of those desserts that feels “bakery-quality” without requiring advanced pastry skills. The instant pudding method builds the silky custard base quickly, while chopped pistachios add texture and a distinct, toasted-nut flavor. Whether you’re preparing a holiday dessert, a potluck crowd-pleaser, or an easy weeknight treat, this is a reliable approach that scales well and keeps well in the refrigerator.
Ingredients for Pistachio Pudding Pie

To make a classic pistachio pudding pie, you’ll want components that work together: a stable crust, a thick custard filling, and (optionally) a creamy topping that balances the nutty profile.
– Gather instant pistachio pudding mix, milk, and chopped pistachios (plus vanilla for extra flavor)
– Choose a ready-made crust or make a basic homemade pie crust
– Have whipped topping or cream on hand for a classic finish
What to buy (and why it matters):
– Instant pistachio pudding mix: This is the engine of the recipe. Instant versions set faster and more predictably than cook-and-stir custard powders.
– Cold milk: Cold temperature helps pudding thicken quickly and reduces the risk of lumps.
– Chopped pistachios: Use roughly chopped nuts (not dust) so you get visible specks and a pleasant crunch.
– Vanilla and/or salt: A small amount sharpens flavor and makes the pistachio taste richer.
– Crust option: A store-bought pie shell saves time; a homemade crust improves flavor and flakiness.
If you’re cooking for a mixed group, consider a short “ingredient strategy”: keep the filling simple (pudding + milk + pistachios) and reserve optional add-ins—like vanilla, salt, or extra nuts—for garnishes. That way, everyone gets the core pistachio flavor in every bite.
Instant Pistachio Pudding Pie: Best Practice Targets (8–10 slices)
| # | Pie Component | Recommended | Target Outcome | Impact Score |
|---|---|---|---|---|
| 1 | Milk Temperature | Cold (about 35–40°F) | Faster thickening, fewer lumps | +9 |
| 2 | Mixing Time | 2 minutes whisking | Smooth custard texture | +8 |
| 3 | Chopped Pistachios | 1/2 to 3/4 cup | Visible nutty crunch | +7 |
| 4 | Chill Time (Core Set) | 4–6 hours minimum | Clean slices without collapse | +10 |
| 5 | Overnight Rest | 12–18 hours (covered) | Maximum slice stability | +9 |
| 6 | Topping Added | After filling sets | Prevents thinning/bleeding | +6 |
| 7 | Portion Cooling | 10 minutes after chilling | Easier knife cuts | +5 |
Make the Pistachio Filling

The filling is the heart of this homemade pie. With instant pistachio pudding mix and proper mixing, you’ll get a creamy custard that thickens quickly—ideal for a no-bake pistachio pudding pie.
– Whisk pudding mix with cold milk until thickened, then fold in pistachios
– Optional: add a splash of vanilla or a pinch of salt to boost flavor
– Ensure the filling is smooth before spreading into the crust
Step-by-step filling approach (what to do and why):
1. Chill your milk first. Cold dairy helps the pudding powder hydrate and thicken quickly and evenly.
2. Whisk until thickened. Follow your pudding mix package timing, but whisk steadily—this reduces the odds of dry pockets that later become lumps.
3. Fold in pistachios gently. Over-mixing can break nuts down into smaller bits and dull the texture.
4. Taste and adjust subtly. Vanilla enhances aroma; a pinch of salt can make the pistachio flavor taste more pronounced without turning the dessert savory.
Common troubleshooting:
– Lumpy filling: Usually caused by warm milk or insufficient whisking. Strain-and-reblend is possible, but for best results, whisk thoroughly at the start.
– Thin filling: Often a sign the mixture wasn’t thickened to the package target before pouring. Let it sit a minute while you keep mixing, then confirm it has reached a pudding-like consistency.
For food-service style results, prioritize smoothness and thickness first, then focus on texture (pistachios) and aroma (vanilla). That sequence yields a pie that slices cleanly rather than crumbling or weeping.
Assemble and Chill

Once your filling is properly thick, assembly is quick. The main “active” work is pouring and smoothing; the rest is controlled refrigeration time.
– Pour the pistachio filling into the crust and smooth the top
– Chill until fully set (typically several hours or overnight)
– Cover the pie to prevent a skin from forming on top
Assembly best practices:
1. Use a room-temperature crust. A warm crust can soften too quickly; a cold crust may firm up unevenly.
2. Pour and level. Spread with a spatula and tap the pie gently on the counter to release large air pockets.
3. Cover while chilling. Use a pie cover or loosely tent plastic wrap so the top doesn’t form a dry skin. If the surface skins, it can affect topping adhesion later.
How long to chill:
– For an easy pistachio pudding pie, plan on 4–6 hours minimum for a stable set.
– If you want maximum slice quality for a party, overnight is best. Chilling time influences how well the custard firms up and how smoothly the knife glides.
If you’re preparing ahead, assemble in the afternoon or evening, then add whipped topping shortly before serving. That timing helps maintain the light, creamy look at the top.
Add Toppings and Garnishes
Toppings are optional, but they elevate presentation and mouthfeel. A whipped topping layer adds a cloudlike finish that contrasts with the denser custard and nutty pieces.
– Spread whipped topping over the chilled pie for a light, creamy texture
– Garnish with extra chopped pistachios for crunch and visual appeal
– Serve with a sprinkle of crushed pistachios if you want extra nutty flavor
Topping options (and how they behave):
– Whipped topping (store-bought): Easy to apply and holds well on a set filling.
– Fresh whipped cream: More perishable; best added close to serving.
– Creamy garnish strategy: If you want a “pistachio-forward” bite, sprinkle extra crushed pistachios over the whipped layer so the aroma hits first.
Presentation detail that matters:
Chopped pistachios on top aren’t just decorative. They also create consistent texture from the first slice to the last. Use a mix of finely chopped and coarsely chopped nuts for both crunch and visual variety.
Baking vs. No-Bake Options
This recipe works in two formats: a true no-bake dessert (with a crust that’s ready) or a partially baked method for extra structure.
– Use the no-bake method for a quick dessert with minimal effort
– If you prefer baking, bake the crust first and then chill the filled pie
– Follow the setting time carefully for the best slice
No-bake method (fastest route):
– Use a pre-made graham cracker crust or a store-bought pie shell.
– Pour in the filling and chill until fully set.
– Add whipped topping after chilling.
Baked-crust method (optional refinement):
– Bake your crust according to package or recipe directions.
– Cool it completely before filling.
– Chill the filled pie as normal.
Which method should you choose?
– Choose no-bake if you need speed, simplicity, and dependable results.
– Choose baked crust if you prefer a firmer crust with deeper toasted notes.
Either way, the filling’s set time is non-negotiable. Even a perfectly baked crust can’t compensate for an under-chilled pistachio pudding layer.
Tips for the Best Slice and Flavor
A great pistachio pudding pie isn’t just about ingredients—it’s about control. Small handling choices significantly impact texture, sliceability, and overall flavor.
– Use cold milk and mix thoroughly to avoid lumps
– Let the pie chill long enough for clean, firm slices
– Store covered in the fridge and serve within a few days for peak freshness
Professional, repeatable improvements:
1. Use a whisk, not a spoon, for the pudding base. This promotes even hydration and smooth consistency.
2. Confirm thickness before assembly. The mixture should resemble thick pudding—not syrup—before you pour.
3. Chill with the lid on (literally). Covering prevents condensation and top skin formation.
4. Slice with a warm knife. Run the knife under hot water, wipe dry, then slice. Warming reduces dragging and crumbly edges.
5. Store properly: Keep covered in the refrigerator. For best quality, aim to serve within 2–3 days—especially once whipped topping is added.
Flavor-enhancing shortcuts that don’t complicate the recipe:
– Toasted nuts (if you’re using raw pistachios) can deepen flavor, but even plain chopped pistachios work well.
– A tiny pinch of salt can elevate the pistachio taste without making the pie “salty.”
This recipe for pistachio pudding pie is a simple, creamy dessert you can make fast and chill to perfection. Follow the filling steps, give it enough chill time, and finish with whipped topping and pistachios for the best flavor and texture—then make it again for your next family gathering or holiday table.
Whether you go no-bake for efficiency or choose a baked crust for extra structure, the same guiding principle applies: thick, smooth filling plus adequate refrigeration. When you respect those two variables, you’ll consistently get a nutty, custard-like pistachio pudding pie that slices cleanly and tastes indulgent with minimal effort.
Frequently Asked Questions
What is the best recipe for pistachio pudding pie with a creamy no-bake filling?
A classic pistachio pudding pie uses instant pistachio pudding mix whisked into cold milk, then folded with whipped topping for a thick, spoonable texture. Many recipes also add chopped pistachios for flavor and color. For the crust, use a pre-made graham cracker or Nilla wafer crust, then chill the pie until the filling fully sets (usually 4–6 hours). This approach makes an easy pistachio pudding pie that’s rich, smooth, and consistent without baking the filling.
How do you make pistachio pudding pie filling thick enough to slice cleanly?
To avoid runny pistachio pudding pie filling, use the exact liquid measurements on the pudding mix package and whisk thoroughly to remove lumps. If you want extra firmness, let the pie chill longer—overnight works best—so the pudding sets fully. Folding in whipped topping gently (instead of stirring aggressively) helps keep structure, and adding a small amount of cream cheese can improve thickness and sliceability. For best results, slice with a sharp knife dipped in hot water and wipe between cuts.
Why does my pistachio pudding pie turn out too watery or not set properly?
Watery filling is usually caused by using too much milk, not whisking long enough, or skipping the chilling time needed for the pistachio pudding to set. Some people also thin the mixture by substituting a lower-fat milk or using homemade pudding without the right ratio. Another common issue is over-folding whipped topping, which can break down the structure and make the pie softer. Make sure your pie refrigerates until fully firm before serving.
Which crust works best for a pistachio pudding pie—graham cracker, shortbread, or homemade crust?
Graham cracker crust is a popular choice because its mild sweetness balances the nutty flavor of pistachios and the creamy pudding. Shortbread crust is also excellent if you want a richer, buttery bite that pairs well with pistachio pudding mix. Homemade crust can work too, but pre-baked is helpful if you want a sturdier base for a no-bake pie. Ultimately, whichever crust you use, keep it chilled so it holds up when you slice.
How can you boost pistachio flavor in pistachio pudding pie without overpowering sweetness?
Use a mix of pistachio pudding plus real pistachios—chopped roasted pistachios in the filling and a sprinkle on top adds texture and authentic flavor. A touch of pistachio extract can intensify the taste, but start small so it doesn’t turn bitter. If you prefer a more natural nut profile, choose a pudding mix labeled “pistachio” and consider adding a small amount of vanilla or a pinch of salt to round out flavors. The goal is a creamy pistachio pudding pie that tastes nutty and fragrant, not just sweet.
References
- Pistachio
https://en.wikipedia.org/wiki/Pistachio - Pudding
https://en.wikipedia.org/wiki/Pudding - Custard
https://en.wikipedia.org/wiki/Custard - Shortcrust pastry
https://en.wikipedia.org/wiki/Pie_crust - Corn starch
https://en.wikipedia.org/wiki/Cornstarch - Pudding | Definition, Types, & Ingredients | Britannica
https://www.britannica.com/topic/pudding - Pie | Definition, Types, & American pie | Britannica
https://www.britannica.com/topic/pie - https://scholar.google.com/scholar?q=Pistachio+dessert+custard+thickening Google Scholar
https://scholar.google.com/scholar?q=Pistachio+dessert+custard+thickening - Google Scholar Google Scholar
https://scholar.google.com/scholar?q=pudding+pie+cornstarch+gelatinization - Google Scholar Google Scholar
https://scholar.google.com/scholar?q=pie+crust+fat+shortening+structure