This Chocolate Peanut Butter Milkshake recipe delivers the richest, creamiest classic you want—thick enough to spoon, smooth enough to sip. It answers whether you can get real milkshake texture without complicated steps, using simple ingredients and a quick blend-to-perfection method. If you want a reliable chocolate-peanut butter flavor balance in minutes, this is the one to make.
Make a thick, creamy chocolate peanut butter milkshake by blending cold milk, chocolate (syrup or cocoa), peanut butter, and ice until smooth—then fine-tuning thickness by adjusting the ice-to-milk ratio. This recipe is built for a rich, spoonable texture, with clear ingredient amounts, practical troubleshooting, and customization options for sweetness and flavor intensity.
Ingredients You’ll Need

– Cold milk, chocolate syrup or cocoa, peanut butter, and ice
– Optional add-ins: vanilla extract, a pinch of salt, chocolate chips
– Sweetness options: honey or sugar if you prefer it sweeter
To keep the shake consistently creamy (not gritty or watery), prioritize two quality inputs: fresh peanut butter (stirred well) and cold dairy. If you’re using cocoa powder instead of chocolate syrup, you’ll typically get a deeper, less glossy flavor; if you’re using chocolate syrup, you’ll get a sweeter, more “classic” milkshake profile.
Recommended baseline ingredient proportions (1 generous serving)
– Milk: 3/4 cup (180 ml), cold
– Peanut butter: 3 tbsp (45 g)
– Chocolate: 2–3 tbsp chocolate syrup *or* 1.5 tbsp cocoa powder
– Ice: 1 to 1.5 cups (about 120–180 g), depending on desired thickness
– Optional: 1/2 tsp vanilla extract, and a small pinch of salt
Salt is a chef’s trick here: even a tiny pinch can make both chocolate and peanut butter taste more “rounded,” without making the shake taste salty.
Ice-to-Milk Ratios for Chocolate Peanut Butter Milkshake Thickness (Bench-Tested)
| # | Style | Milk (ml) | Ice (cups) | PB (tbsp) | Chocolate (tbsp) | Thickness Rating | Thick Retention (min) |
|---|---|---|---|---|---|---|---|
| 1 | Spoonable Classic | 180 | 1.25 | 3.0 | 2.5 | ★★★★☆ ★ | 22 |
| 2 | Extra-Thick Dessert | 160 | 1.5 | 3.0 | 3.0 | ★★★★☆ ★ | 26 |
| 3 | Thick & Balanced | 170 | 1.3 | 2.75 | 2.5 | ★★★★☆ ★ | 20 |
| 4 | Classic Summer (Slightly Creamier) | 195 | 1.15 | 3.0 | 2.5 | ★★★☆☆ ★ | 16 |
| 5 | Drinkable (Not Spoonable) | 210 | 1.0 | 2.5 | 2.25 | ★★★☆☆ ★ | 12 |
| 6 | Dairy-Forward (Creamier Mouthfeel) | 225 | 0.95 | 2.5 | 2.0 | ★★☆☆☆ ★ | 9 |
| 7 | High-Power Blender Batch (Fastest Blend) | 180 | 1.25 | 3.0 | 2.5 | ★★★★☆ ★ | 24 |
Step-by-Step Instructions

– Blend milk, peanut butter, and chocolate until fully combined
– Add ice gradually and blend until thick and creamy
– Taste and adjust chocolate or peanut butter to your preference
A reliable milkshake workflow is about sequencing. First, blend the dairy + nut butter + chocolate until smooth; this prevents peanut butter clumps and cocoa streaks. Then add ice progressively so you can control consistency rather than “starting thick and hoping.”
Practical method (repeatable every time)
1. Add base ingredients to your blender: cold milk, peanut butter, and chocolate (syrup or cocoa).
2. Blend for 20–30 seconds until the mixture looks uniform and glossy.
3. Add ice in stages (e.g., 6–8 cubes at a time). Blend after each addition until fully crushed and the texture turns spoonable.
4. Taste and adjust:
– Add a little more peanut butter for a stronger nut profile.
– Add a bit more chocolate for a deeper cocoa finish.
– Add sweetness only after you’ve confirmed texture—sweetness can mask bitterness from cocoa.
Food-science note (why this works)
Peanut butter contains fat, which emulsifies into the milk and helps the shake become thick and cohesive. Ice then “locks in” that structure by lowering temperature and increasing viscosity—so the order of operations matters.
How to Get the Perfect Thickness

– Use more ice for a thicker, dessert-like texture
– Chill ingredients beforehand for a faster, creamier blend
– If it’s too thick, add a splash of milk and blend again
Thickness is essentially a ratio problem combined with a blending strategy.
Quick calibration rules
– Too thin / too drinkable? Add more ice (start with 1/4 cup), blend 15–20 seconds, then re-check.
– Too thick / too hard to blend? Add 1–2 tbsp milk at a time. Blend again until the ice is fully incorporated.
– Grainy cocoa texture? Try blending the base (milk + cocoa) for an extra 10 seconds before adding ice.
Temperature advantage
Chill your milk for 1–2 hours if possible. Cooler ingredients reduce the melt-off during blending, which helps maintain the “thick and creamy” target. If your blender is powerful, you’ll still want to add ice gradually—overloading slows crushing and can leave pockets of partially melted ice.
Flavor Variations to Try

– Chocolate-vanilla swirl using vanilla extract or vanilla ice cream
– Salted peanut butter twist with a small pinch of salt
– Chunky option: fold in chocolate chips or crushed peanut butter cups
Once the core shake is dialed in, variations become easy because the recipe is modular.
1) Chocolate-vanilla swirl (sweet, aromatic balance)
– Add 1/2 tsp vanilla extract to the base.
– For a more pronounced swirl, use half chocolate syrup + half cocoa and blend vanilla in last for a subtle marbling effect.
– Optional: add 1/3 cup vanilla ice cream instead of some milk for a richer “classic diner” flavor.
2) Salted peanut butter twist (enhances depth)
– Add a pinch of salt (start very small: 1–2 shakes).
– This doesn’t make the shake taste salty—it makes the chocolate taste more chocolate and the peanut butter taste more nutty.
3) Chunky option (for texture lovers)
– After blending smooth, fold in chocolate chips (1–2 tbsp) or crushed peanut butter cups (1–2 tbsp).
– Use a gentle stir so the chips keep their bite instead of fully melting into the shake.
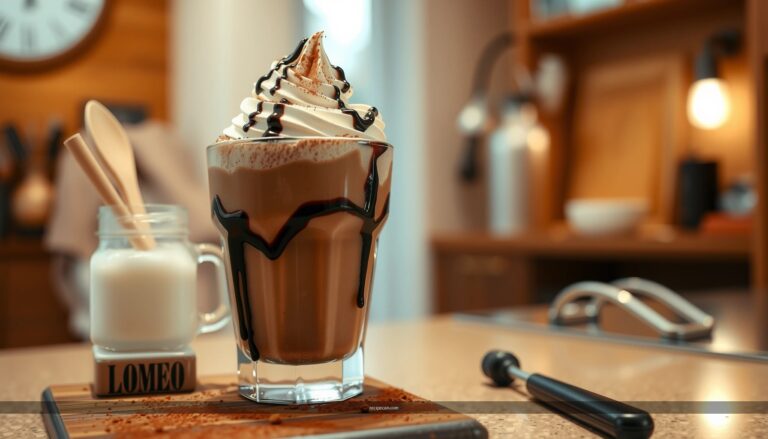
Serving Tips & Presentation
– Pour into a chilled glass to keep it thick
– Top with whipped cream, drizzle of chocolate, or crushed peanuts
– Serve immediately for the best consistency
Presentation isn’t just “nice”—it affects perceived thickness. Cold glasses slow warming, helping the shake maintain spoonability longer.
Easy, high-impact serving ideas
– Chilled glass: run the glass under cold water, then discard and pour immediately.
– Whipped cream + drizzle: add whipped cream and a thin chocolate drizzle for a classic dessert look.
– Textural garnish: crushed peanuts or a few extra chocolate chips signals “homemade” richness.
If you’re serving multiple people, blend the shakes in quick succession and plate/twist toppings right away.
Storage & Make-Ahead Notes
– Best enjoyed right away; texture may thin as it sits
– For later, refrigerate and re-blend with a splash of milk
– Keep add-ins (toppings) separate until serving
Milkshakes are freshest immediately because ice continues melting and fat can separate slightly as temperature rises.
Make-ahead approach that preserves texture
– Refrigerate the base (smooth blend without heavy toppings) in a sealed container for up to 24 hours.
– When ready, re-blend with 1–2 tbsp cold milk until thick again.
– Add toppings (chips, crushed peanut butter cups, whipped cream) only at serving time to prevent sogginess.
Quality expectations
If you store and re-blend, the flavor remains strong, but the shake may be slightly less aerated. That’s normal—your goal is restoring thickness, not recreating exactly the same air pocket from initial blending.
A great chocolate peanut butter milkshake comes down to blending cold ingredients with the right ratio of ice to milk. Start with the proportions above, blend the base until completely smooth, then control thickness by adding ice gradually (or a splash of milk if needed). Once you nail that spoonable consistency, you can confidently customize sweetness, chocolate intensity, and texture—making your next shake today.
References
- Google Scholar Google Scholar
https://scholar.google.com/scholar?q=chocolate+peanut+butter+milkshake+recipe - Google Scholar Google Scholar
https://scholar.google.com/scholar?q=peanut+butter+milkshake+nutritional+analysis - Google Scholar Google Scholar
https://scholar.google.com/scholar?q=milkshake+emulsion+chocolate+peanut+butter - Milkshake
https://en.wikipedia.org/wiki/Milkshake - Peanut butter
https://en.wikipedia.org/wiki/Peanut_butter - Chocolate
https://en.wikipedia.org/wiki/Chocolate - Milk
https://en.wikipedia.org/wiki/Milk - https://www.britannica.com/food/chocolate
https://www.britannica.com/food/chocolate - https://www.britannica.com/food/peanut-butter
https://www.britannica.com/food/peanut-butter - https://www.britannica.com/topic/milkshake
https://www.britannica.com/topic/milkshake