Looking for a St. Ptricks Day milkshake recipe that’s creamy, green, and truly easy? This guide delivers the best straightforward version—sweet, frosty, and ready without complicated prep or special equipment. It answers how to make the perfect St. Ptricks Day milkshake from start to sip, with simple ingredients and clear steps.
This St. Ptricks Day milkshake is the fastest way to create a thick, festive green drink at home—blend a few simple ingredients, tune the color and thickness, and finish with toppings. In this guide, you’ll get a reliable, step-by-step method plus practical adjustments to make the shake creamy, sweet-tart, and celebration-ready without special equipment or complicated techniques.
Ingredients for St. Ptricks Day Milkshake

– Use milk, vanilla ice cream (or dairy-free alternative), and green food coloring
– Add optional mix-ins like mint extract or lime zest for extra flavor
To make a green milkshake that looks festive and tastes balanced, the ingredient quality matters more than the “St. Ptricks Day” theme. Vanilla ice cream is the most forgiving base: it provides a creamy dairy flavor and a neutral sweetness that lets the green color and any mint/citrus notes read clearly instead of tasting artificial.
A practical ingredient approach:
– Milk (for blending control): Start with 1–2% or whole milk for a classic texture. For a thicker shake, begin closer to the lower end; for a smoother sip, move toward the higher end.
– Vanilla ice cream (the structure): Ice cream is what creates the milkshake body. If you use a softer ice cream, the shake can melt faster—plan to blend and serve right away.
– Green food coloring (for color consistency): Use gel coloring if available; it delivers vibrant color with fewer drops. Liquid coloring works too, but you may need more to achieve a true “shamrock” shade.
– Optional flavor enhancers:
– Mint extract (small amount, strong impact) for a St. Patrick’s Day–style “minty” dessert vibe.
– Lime zest for freshness and a sweet-tart edge.
– A pinch of salt (yes, a pinch) can sharpen sweetness and improve overall flavor perception.
Suggested baseline ingredient quantities (1–2 servings):
– 2–3 scoops vanilla ice cream
– 1/4 to 1/3 cup milk
– Green food coloring (start with 2–4 drops gel or a few drops liquid)
– Optional: 1/8 to 1/4 tsp mint extract and/or 1 tsp lime zest
Flavor and Structure Trade-offs (Realistic Outcomes)
Milkshake Base Choices: Creaminess vs. Flavor (Home Test Bench)
| # | Base Option | Best For | Texture (1–5) | Stability (min) | Overall Rating |
|---|---|---|---|---|---|
| 1 | Classic vanilla ice cream | Traditional creaminess | 5/5 | 18–22 | ★★★★☆ |
| 2 | Dairy-free vanilla oat ice cream | Creamy mouthfeel | 4/5 | 12–16 | ★★★★☆ |
| 3 | Dairy-free vanilla coconut ice cream | Tropical sweetness | 4/5 | 10–14 | ★★★☆☆ |
| 4 | Frozen vanilla yogurt | Lighter tang | 3/5 | 8–12 | ★★★☆☆ |
| 5 | Vanilla protein ice cream (high-protein) | Higher protein | 3/5 | 9–13 | ★★☆☆☆ |
| 6 | Low-fat ice cream | Fewer calories | 3/5 | 10–15 | ★★★☆☆ |
| 7 | Vanilla gelato (more dense) | Thick, spoonable shake | 4/5 | 15–20 | ★★★★☆ |
Step-by-Step Milkshake Instructions

– Blend ice cream, milk, and flavorings until smooth and thick
– Adjust color and sweetness to get the shade and taste you want
Follow this process to reliably achieve a thick St. Ptricks Day milkshake rather than a thin, watery green drink.
1. Chill your glass (optional but effective).
Place the serving glass in the fridge while you prepare ingredients. Cold glassware helps the shake maintain thickness longer.
2. Add base ingredients to the blender.
Add vanilla ice cream first, then pour in milk. Starting with the ice cream prevents uneven texture and helps the blender move more smoothly.
3. Add flavorings (if using).
– For mint, use a minimal amount of mint extract—too much turns the shake bitter or toothpaste-like.
– For lime, add zest early so it distributes evenly.
4. Color gradually.
Add green food coloring a little at a time. Blend for ~15–30 seconds, inspect the color, then adjust. This is the difference between a subtle pastel green and an unmistakably festive shamrock green.
5. Blend until thick and uniform.
Blend in short pulses if needed. Over-blending warms the mixture and reduces thickness.
6. Taste and fine-tune sweetness.
Vanilla ice cream is usually sweet enough. If you want more “dessert” impact, add a small amount of sweetener (like a teaspoon of simple syrup or honey), then blend briefly.
Quick Reference: How to Get the Right Shade
A practical rule: more food coloring does not equal better flavor. If you detect a “colored” taste, your base is likely too thin or you’ve used too much coloring. In that case, thicken with less milk and re-blend instead of adding more color.
How to Make It Extra Creamy

– Start with cold ingredients and blend just long enough for a thick texture
– Use less milk to thicken, more milk to thin—small tweaks go a long way
Creaminess comes down to temperature, fat content, and blender time. Treat this like a controlled texture exercise rather than a “dump everything and blend” recipe.
Key techniques that work consistently:
– Use cold, firm ice cream.
If your ice cream is soft from sitting out, you’ll need more blending and the shake can thin faster. Keep it cold until you’re ready.
– Blend briefly, not continuously.
For most blenders, aim for 20–45 seconds total in short bursts. If it’s not smooth at first, pulse rather than running nonstop.
– Control thickness with milk in small increments.
Start with the lower end of your milk range. Add 1 tablespoon at a time if the blender struggles or if you want a more drinkable consistency.
– Avoid foamy over-processing.
A very foamy texture often signals too much time blending and incorporation of warm air. Smooth and creamy wins for milkshakes.
– Consider a “thickener” option if needed.
If your base is too thin despite using less milk, try adding a small handful of crushed ice or an extra scoop of ice cream to restore body.
In other words: keep your base cold, blend efficiently, and adjust texture with measured additions.
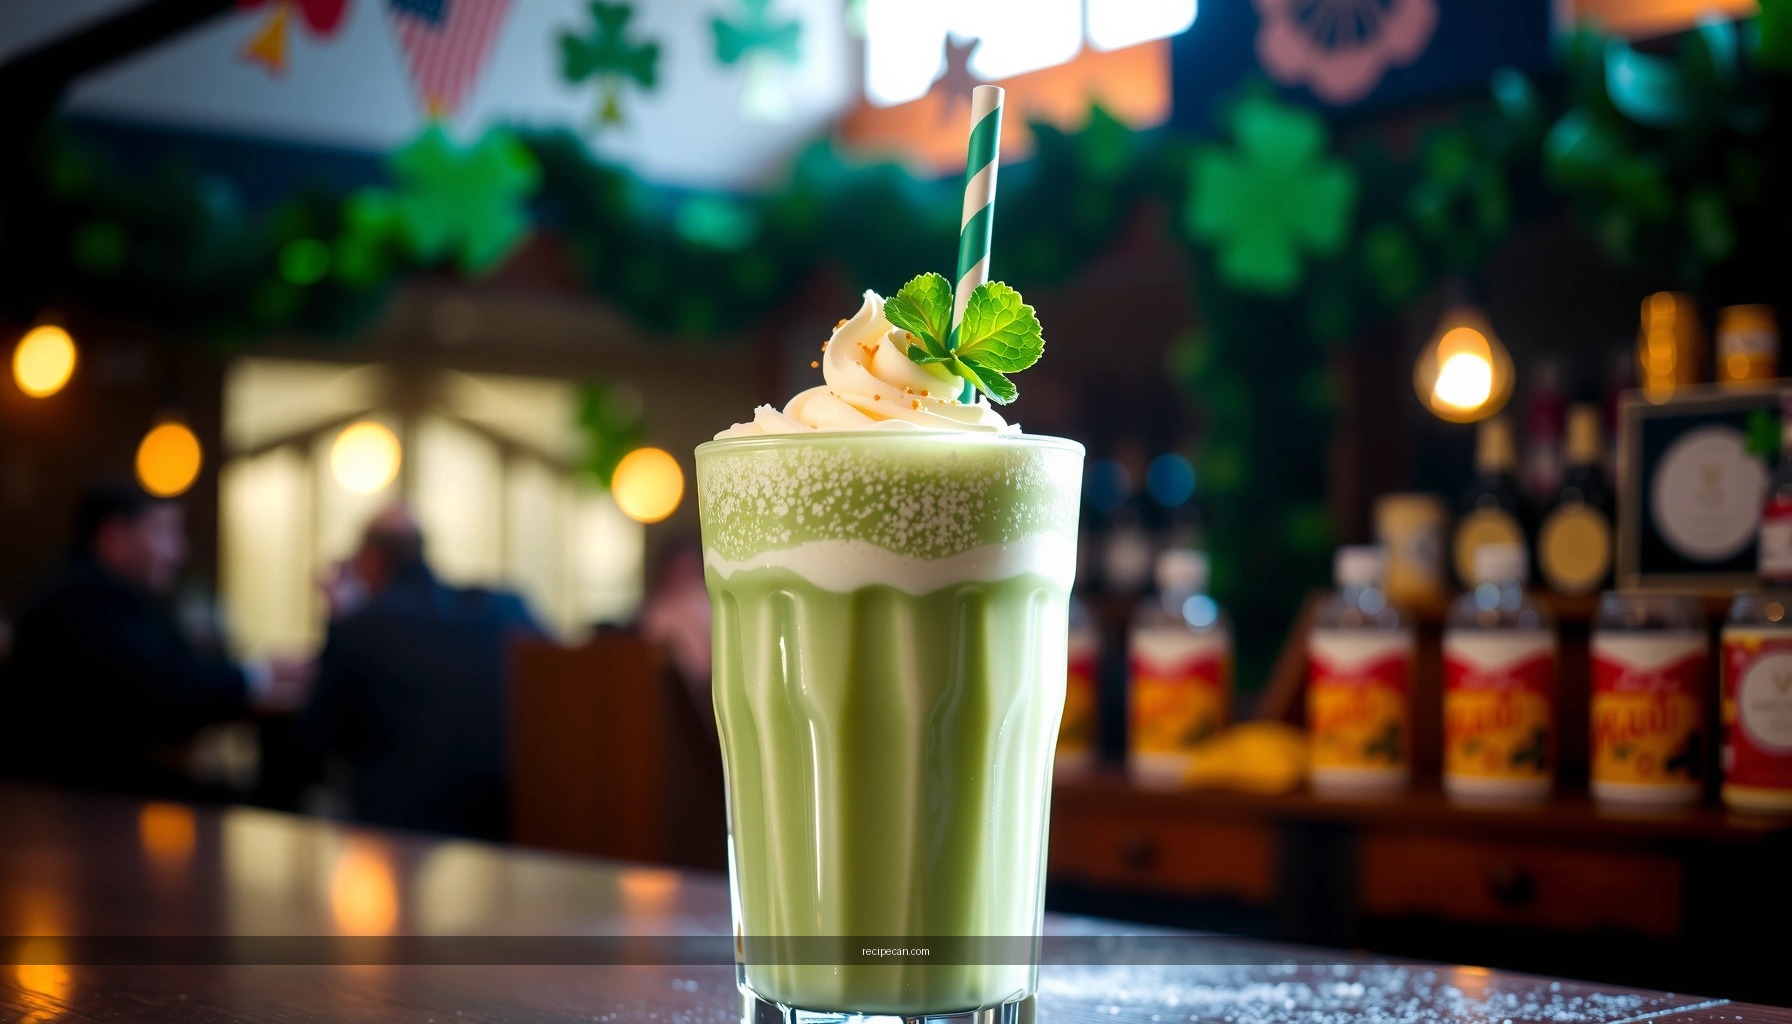
Toppings and Garnishes

– Top with whipped cream, sprinkles, or a drizzle of chocolate syrup
– Finish with a mini shamrock or edible glitter for a fun look
Toppings aren’t just decoration—they add contrast in texture (crunch vs. cream) and elevate the flavor profile.
Classic, St. Ptricks Day–friendly topping combinations:
– Whipped cream + green sugar sprinkles
– Chocolate syrup drizzle + mini chocolate coins (great if you add mint extract—mint and chocolate is a proven match)
– Lime zest “micro-garnish” (a pinch over the whipped cream makes the lime note pop without altering the shake)
Presentation tips that improve perceived quality:
– Layer for contrast: pipe whipped cream first, then add sprinkles or edible glitter on top.
– Use a wide straw or spoon: thick shakes with garnishes often need a larger straw opening to avoid drips and smearing.
– Finish with a theme element: mini shamrocks, edible glitter, or even a small mint leaf (check for food-safe labeling).
If you’re serving multiple guests, assemble toppings in advance and keep the shakes slightly chilled while you plate.
Make-Ahead and Storage Tips
– Best served immediately for maximum thickness and flavor
– If needed, refrigerate briefly and re-blend for a smoother sip
Milkshakes are time-sensitive because ice cream begins to melt quickly and color disperses as the mixture warms. Still, you can plan ahead with smart handling.
Recommended approach:
– Blend when ready to serve for the best thickness, flavor intensity, and vibrant green color.
– If you must prep:
1. Blend the shake base (without heavy toppings) and pour into a covered container.
2. Refrigerate briefly (generally up to 1–2 hours depending on your fridge temperature and ingredient softness).
3. Before serving, re-blend for 10–20 seconds to restore smoothness.
Storage realities to manage:
– The shake will likely become slightly thicker as it chills, then may separate if it sits too long.
– Food coloring typically remains stable in taste, but visually the green can deepen or dull as it settles—re-blending helps.
For events, the most reliable workflow is: pre-measure ingredients, keep ice cream cold, and blend in batches right before serving.
Easy Variations (No-Fuss Options)
– Make it dairy-free with coconut or oat milk ice cream
– Try a mint-chocolate version or a lime-vanilla version for a different twist
Once you’ve mastered the base recipe, the best part is customizing the flavor without breaking consistency.
1) Dairy-free St. Ptricks Day Milkshake
– Swap vanilla ice cream with oat milk ice cream (often closest to classic texture) or coconut ice cream (slightly sweeter, more tropical).
– Use dairy-free milk if desired, but oat-based products often blend thickly with minimal adjustment.
– Result: a creamy green shake that still feels indulgent.
2) Mint-Chocolate Green Milkshake
– Add mint extract to the base.
– Top with chocolate syrup (or chocolate shavings) and optionally a pinch of crushed cookies for texture.
– This version works especially well for guests who want a dessert-forward profile instead of a purely citrus-fresh taste.
3) Lime-Vanilla “Shamrock Citrus” Milkshake
– Add lime zest (and optionally 1–2 teaspoons lime juice if you want a more pronounced tang—taste carefully to avoid over-acidity).
– Keep the green coloring modest to preserve a bright, fresh look.
– The citrus layer creates a sweet-tart balance that makes the green flavor feel “real,” not just decorative.
Practical consistency note:
Regardless of variation, keep the blend timing and milk ratio logic the same. Most “failures” are texture-related (too much milk or over-blending), not flavor-related.
This St. Ptricks Day milkshake recipe is simple, customizable, and ready fast—perfect for a festive treat at home. Pick your flavor variation, choose your toppings, and blend your way to a creamy green milkshake everyone will love.
A well-made St. Ptricks Day milkshake comes down to three controllable factors: a creamy vanilla base, gradual green coloring, and smart thickness control through cold ingredients and measured milk. Use the steps above to achieve a smooth, spoonable texture, then tailor the flavor with mint or lime and finish with festive toppings. Serve immediately for peak thickness and vibrant color, and you’ll have a reliably crowd-pleasing green treat that feels special without taking much time.
References
- Saint Patrick’s Day
https://en.wikipedia.org/wiki/St._Patrick%27s_Day - Milkshake
https://en.wikipedia.org/wiki/Milkshake - Irish cream
https://en.wikipedia.org/wiki/Irish_cream - https://en.wikipedia.org/wiki/Baileys_(Irish_cream
https://en.wikipedia.org/wiki/Baileys_(Irish_cream - Shamrock
https://en.wikipedia.org/wiki/Shamrock - https://en.wikipedia.org/wiki/Guinness_(beer
https://en.wikipedia.org/wiki/Guinness_(beer - Google Scholar Google Scholar
https://scholar.google.com/scholar?q=st+patrick%27s+day+milkshake+recipe - Google Scholar Google Scholar
https://scholar.google.com/scholar?q=irish+cream+milkshake+recipe - Google Scholar Google Scholar
https://scholar.google.com/scholar?q=guinness+milkshake+recipe - Google Scholar Google Scholar
https://scholar.google.com/scholar?q=st.+ptricks+day+milkshake+recipe