Get the best recipe for milkshake with a creamy, easy homemade version that you can make in minutes. This quick guide answers whether you can skip store-bought shortcuts and still get a thick, scoopable shake with rich flavor. You’ll get the exact ingredient amounts and simple steps for a consistently smooth result every time.
A truly creamy homemade milkshake is simple: blend cold milk with ice cream (or a dairy-free alternative) and choose a flavor base, then control thickness by adding ingredients gradually. In this guide, you’ll get an easy step-by-step method plus practical tips for making every milkshake thick, smooth, and spoonable—without turning it into a watery drink.
A great milkshake comes down to two controllable variables: the base (milk + ice cream) and the blend ratio/time. Once you understand how to tune those, you can reliably make vanilla, chocolate, coffee, or fruit shakes that taste like your favorite diner version—right from your blender.
7 Milkshake Styles: Recommended Blend Ratios & Thickness Scores
| # | Milkshake Style | Milk : Creamy Base | Blend Time | Target Texture | Thickness Score |
|---|---|---|---|---|---|
| 1 | Classic Vanilla | 1 : 2 | 25–30 sec | Spoonable | 5.0 ★★★★★ |
| 2 | Chocolate (Cocoa) | 1 : 2 | 28–35 sec | Velvety & thick | 4.8 ★★★★★ |
| 3 | Salted Caramel | 1 : 2.5 | 30–40 sec | Dense + smooth | 4.9 ★★★★★ |
| 4 | Mocha (Coffee) | 1 : 2.25 | 25–35 sec | Thick with aeration | 4.6 ★★★★☆ |
| 5 | Strawberry (Fruit) | 1.25 : 2 | 35–45 sec | Thick, slightly tangy | 4.2 ★★★★☆ |
| 6 | Banana Cream | 1 : 2 | 30–40 sec | Smooth, thick body | 4.7 ★★★★★ |
| 7 | Dairy-Free Vanilla Oat | 1 : 2 | 25–35 sec | Creamy, dairy-free | 4.5 ★★★★☆ |
Choose Your Milkshake Base

The base is what determines mouthfeel—how thick, creamy, and stable the shake feels after blending. Most “thin” milkshakes happen because milk was added too early or too much, and the ice cream wasn’t cold enough to hold structure.
– Use whole milk for the creamiest texture or adjust with skim if needed
Whole milk adds fat, which helps the shake stay smooth rather than icy. If you prefer a lighter version, you can switch to 2% or skim, but expect a slightly less “custard-like” texture. A reliable approach is to keep the creamy base (ice cream or frozen yogurt) generous and adjust milk down gradually.
– Pick ice cream (or frozen yogurt) as the main creamy ingredient
Ice cream is your stabilizer: the frozen fat and sugars help the blend thicken as air gets incorporated. For a “classic diner” style, choose a vanilla ice cream or one with a simple ingredient list—fewer mix-ins means fewer uneven chunks.
– For dairy-free, use almond/oat milk and dairy-free ice cream
Dairy-free milkshakes can be just as thick when you use a dairy-free ice cream that’s designed to spoon well straight from the freezer. Oat milk often performs best for creaminess because it mimics the body that dairy fat provides; almond milk can work, but it may yield a slightly thinner mouthfeel.
Quick base guideline: for a standard 12–16 oz serving, start with about 2–3 scoops of ice cream (or dairy-free ice cream) and add milk in small splashes until the blender starts moving freely.
Add Flavor Ingredients

Once the base is correct, flavor becomes your differentiator. Think in layers: flavor base first, then sweetness and any “accent” ingredients.
– Common flavors: vanilla extract, cocoa powder, coffee, or caramel syrup
Use vanilla extract for a rounded classic flavor (about ½–1 tsp per serving). For chocolate, cocoa powder is concentrated—start small (roughly 1–2 tbsp) and taste after blending. Coffee works best when it’s either cold brewed or concentrated espresso-like coffee; adding warm coffee can melt the base and thin the shake.
– For fruit shakes, use fresh or frozen fruit (banana works especially well)
Frozen fruit is usually better because it increases coldness and thickness. Banana is particularly forgiving: its natural starches help create a smooth, creamy texture even when blended.
– Sweeten to taste with sugar or honey if your mix needs it
Sweetness depends on your ice cream and your add-ins. Cocoa and fruit often require a little extra sugar or honey. Professional practice: adjust sweetness after blending once the coldness and flavor distribution are fully combined.
Analytical tip: cocoa powder and coffee sometimes taste “flat” at lower sweetness until the shake is fully chilled. If you’re tasting straight from the blender and it seems underwhelming, give it 30–60 seconds—the flavors integrate as it thickens.
Blend for the Perfect Thickness

Thickness is engineering, not luck. Your blender needs enough cold liquid to spin ingredients, but not so much milk that the shake loses its frozen structure.
– Start with a small amount of milk, then blend and add more gradually
Begin with just enough milk to help the blender pull the ice cream down. If your blender struggles, add 1 tbsp at a time. This prevents over-thinning, which is much harder to correct than adding a touch more milk.
– Blend until smooth and thick; stop before it gets too thin
Over-blending can warm the mixture and break down structure. As a rule, blend in short bursts (10–15 seconds at a time), scraping down the sides between bursts, until smooth.
– Add extra ice cream for a thicker shake
If the shake is thinner than desired, the fastest fix is adding more ice cream (or frozen yogurt). If you’re using fruit, extra ice cream balances the wateriness fruit can release.
Practical benchmark: if your shake “runs” like a drink, it needs more ice cream. If it’s too stiff and won’t pour, add milk a small amount.
Optional Mix-Ins for Extra Flavor

Mix-ins can elevate a milkshake from “good” to “signature,” but they must be handled thoughtfully to preserve texture.
– Try toppings like chocolate chips, crushed cookies, or whipped cream
For a thicker, cohesive texture, fold in some toppings gently after blending, or pulse very briefly if you want them integrated. Crushed cookies should be added in moderation—too many can create a gritty mouthfeel.
– Add a pinch of salt to enhance chocolate and caramel flavors
Salt improves perceived sweetness and depth, especially for chocolate and caramel. Start with a tiny pinch; it should enhance rather than taste salty.
– For crunch, blend in briefly or layer on top
Blend in briefly if you want distributed crunch. For a café-style presentation, layer crunch on top so it remains distinct and satisfying.
Pro-level move: if using cookie or brownies, ensure they’re fully crushed (or add them as a topping). Large chunks don’t break down consistently and can create uneven thickness.
Serve and Enjoy
Serving is where quality becomes noticeable. A milkshake is best at a narrow window of temperature and viscosity.
– Serve immediately for the best texture and strongest flavor
As the shake sits, it slowly melts and becomes thinner. If you’re preparing for multiple people, blend in batches rather than waiting for one large pour.
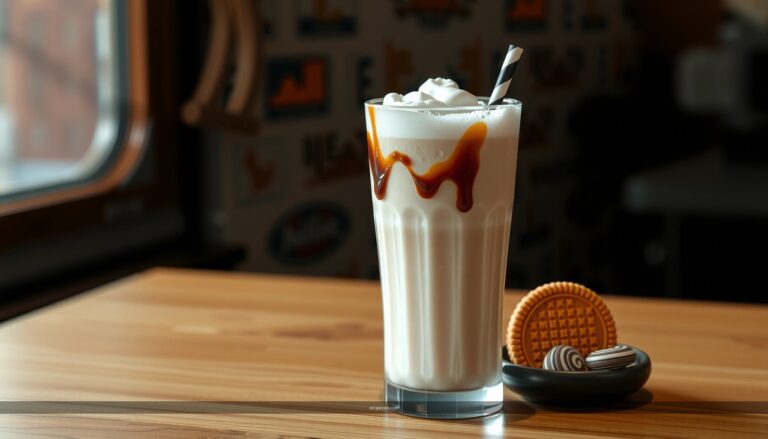
– Garnish with a drizzle, sprinkles, or a straw and chilled glass
A chilled glass helps slow melting. For a refined look, add a drizzle (caramel or chocolate) along the rim and finish with sprinkles that match the flavor profile.
– Adjust flavor after blending (more cocoa, fruit, or sweetener if needed)
This is your final calibration step. Taste carefully, then blend again for just a few seconds to reincorporate.
Texture cue: if you notice slight thinning right after pouring, you can often “re-thicken” by adding a small scoop of ice cream and blending briefly—just enough to restore body.
Troubleshooting Common Problems
Even with the best base, milkshakes can misbehave. Here’s how to diagnose quickly and fix without wasting ingredients.
– Too thin? Add more ice cream or a few ice cubes and blend again
Adding ice cubes can help if the issue is temperature, but the most reliable fix is extra ice cream to rebuild structure.
– Too thick? Add milk a splash at a time
Add milk gradually—start with 1 tbsp increments—then blend briefly. Thick shakes can look perfect in a cup but become awkward to drink once you add a straw, so confirm your final consistency.
– Not smooth? Blend longer or strain fruit chunks if needed
Fruit-based shakes can retain small fiber chunks. For a totally smooth texture, pulse longer and consider straining if you used berries with more seeds or fibrous fruit.
Common root causes to avoid:
– Milk added too early or too much
– Ice cream not cold enough (or slightly melted)
– Over-blending until it warms
– Large fruit/cookie chunks not processed enough
A great milkshake comes down to the right base (milk + ice cream), blending to your preferred thickness, and choosing flavors you love. Use this recipe as your starting point, then experiment with mix-ins and toppings—make one today and tweak it until it’s perfect for your taste.
References
- Milkshake
https://en.wikipedia.org/wiki/Milkshake - https://www.britannica.com/topic/milkshake
https://www.britannica.com/topic/milkshake - Acute sinusitis: Do over-the-counter treatments help? – Mayo Clinic
https://www.mayoclinic.org/healthy-lifestyle/nutrition-and-healthy-eating/expert-answers/sugars/faq-20058562 - https://pubmed.ncbi.nlm.nih.gov/?term=milkshake+milk+ice+cream+blend
https://pubmed.ncbi.nlm.nih.gov/?term=milkshake+milk+ice+cream+blend - https://www.cdc.gov/nutrition/index.html
https://www.cdc.gov/nutrition/index.html - Google Scholar Google Scholar
https://scholar.google.com/scholar?q=milkshake+recipe - Google Scholar Google Scholar
https://scholar.google.com/scholar?q=milkshake+preparation+ingredients+proportions - Google Scholar Google Scholar
https://scholar.google.com/scholar?q=dairy+beverage+milkshake+homogenization+emulsion - Healthy diet
https://www.who.int/news-room/fact-sheets/detail/healthy-diet - How to cook | The Guardian
https://www.theguardian.com/lifeandstyle/series/how-to-cook