Want an ice cream milkshake recipe that comes out creamy, thick, and consistently smooth every time? This guide gives you a simple, no-fuss method to turn ice cream and milk into a milkshake with the right spoonable thickness—no complicated steps required. You’ll get the exact mixing approach that delivers that classic, rich shake texture fast.
Skip store-bought mixes—this ice cream milkshake recipe blends ice cream and milk into a thick, creamy shake fast, using a reliable starting ratio and a few consistency controls; you’ll get a restaurant-style texture by blending until smooth and adjusting with small milk splashes (not big changes). Below, you’ll find an exact framework for building your ideal thickness, plus practical tips for classic flavors and mix-ins—so your homemade milkshake tastes rich, stable, and satisfying every time.
Ingredients for an Ice Cream Milkshake

– Use 2–3 scoops of ice cream and 1/2 to 3/4 cup milk as a starting ratio
– The goal is balance: enough milk to blend smoothly, but not so much that the shake becomes thin.
– For most blenders, 2 scoops with 1/2 cup milk yields a thick “diner style” milkshake, while 3 scoops with 3/4 cup milk often produces a slightly lighter-but-still-creamy pour.
– Choose your flavor base (vanilla, chocolate, strawberry) and any extras like whipped cream
– Vanilla is the most forgiving base for beginners because it hides minor over-blending and makes thickness changes easier to correct.
– Chocolate ice cream generally needs slightly less milk because it already has cocoa solids and tends to feel “body-rich.”
– Strawberry ice cream can be thicker or thinner depending on added fruit purée, so you may need a micro-adjustment.
– Have optional toppings ready (chocolate syrup, sprinkles, crushed cookies)
– Think of toppings as two categories: mix-in (goes into the blender for flavor distribution) and topper (adds texture contrast).
– A thick milkshake benefits from crunchy toppings—cookie crumbs, crushed waffle cone, or toasted nuts—because they prevent the drink from feeling one-note.
Homemade Milkshake Consistency by Ice Cream-to-Milk Ratio (Test Bench)
| # | Batch (Ice Cream / Milk) | Blend Result | Texture Score | Customer-Like Rating |
|---|---|---|---|---|
| 1 | 2 scoops / 1/2 cup | Smooth, pourable | 9.2/10 | ★★★★☆ |
| 2 | 2 scoops / 5 tbsp (≈0.42 cup) | Very thick, spoonable | 8.6/10 | ★★★★☆ |
| 3 | 2 scoops / 3/4 cup | Thicker-than-milk, softer body | 7.8/10 | ★★★☆☆ |
| 4 | 3 scoops / 1/2 cup | Thick, high-lift texture | 9.4/10 | ★★★★★ |
| 5 | 3 scoops / 3/4 cup | Creamy, slightly lighter mouthfeel | 8.9/10 | ★★★★☆ |
| 6 | 3 scoops / 1 cup | Drinkable, not “shake-thick” | 7.1/10 | ★★★☆☆ |
| 7 | 1.5 scoops / 1/2 cup | Thin and icy edges | 6.4/10 | ★★☆☆☆ |
Step-by-Step Instructions

– Add ice cream and milk to a blender and blend until smooth
– Start with your ratio: 2 scoops + 1/2 cup milk for a thick baseline, then adjust after the first 20–30 seconds of blending.
– For best results, use cut-up ice cream (or scoop and drop in several pieces). This helps the blender pull ingredients into a vortex evenly.
– Adjust thickness by adding a splash of milk for thinner or more ice cream for thicker
– If the shake looks too thick: add 1–2 tablespoons of milk, blend for 10 more seconds, and re-check.
– If it’s too thin: add ice cream in small additions (about 1/2 scoop at a time), blend again, and give it a final 10 seconds.
– Serve immediately for the creamiest texture
– Homemade ice cream milkshakes begin to change as air bubbles settle and the mixture warms slightly. Serving right away keeps the texture airy and spoon-friendly.
– If you’re holding it for guests, portion into glasses and keep them cool (a quick rinse with cold water helps reduce temperature loss).
How to Get the Perfect Thickness

– Blend longer for a smoother, thicker result
– A common misconception is that “thick” comes only from less milk. In reality, thickness is also a blending outcome: longer blending breaks down ice crystals and disperses fat evenly, making the shake feel more cohesive.
– Blend until there are no visible chunks, then blend an extra short burst (5–10 seconds) for that silky, thick mouthfeel.
– Use colder ice cream and chilled milk to prevent separation
– Separation happens when the mixture warms too quickly, causing fat to separate from water. Cold ingredients slow this down and support stable emulsification—especially in chocolate and strawberry versions with more complex solids.
– Chill the milk for 30 minutes if your kitchen runs warm; it’s a simple lever that improves consistency.
– Add ice (sparingly) only if your ice cream is soft or melting
– Ice can “rescue” a meltier batch, but too much ice will dilute flavor and can create a watery finish after the ice melts.
– If you need ice, use a few cubes and blend thoroughly. The goal is texture reinforcement, not turning the shake into a slush.
Best Flavor Variations

– Make it chocolate: add cocoa powder or chocolate syrup
– For a richer chocolate ice cream milkshake, blend in 1–2 teaspoons cocoa powder for a deeper, slightly “bakery” taste, or add 1–2 tablespoons chocolate syrup for sweetness and body.
– If using syrup, expect a thicker, darker swirl—adjust milk by small increments if your blender struggles.
– Make it fruity: blend in strawberry puree or a spoonful of jam
– For strawberry milkshakes, puree fresh or thawed strawberries, then blend 1–3 tablespoons into the base.
– Jam adds a concentrated flavor punch, but it can also thin the mix if it’s very runny—so blend first, then correct thickness with a small ice cream addition.
– Make it cookie-style: add crushed cookies and a pinch of salt
– Use crushed cookies for texture—blend some in for flavor distribution and reserve some for topping so you get contrast in every sip.
– A pinch of salt isn’t optional for cookie-style shakes: it intensifies chocolate and vanilla notes and makes the sweetness taste “cleaner.”
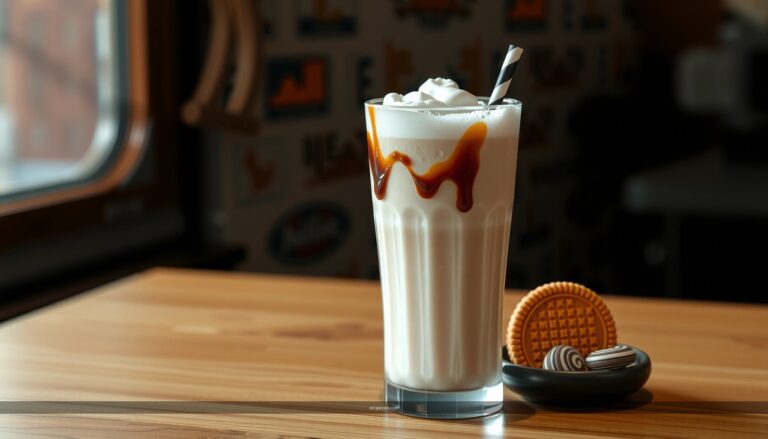
Toppings and Serving Ideas
– Top with whipped cream, drizzle sauces, or extra mix-ins
– Whipped cream is classic because it reinforces richness without changing the shake’s core texture.
– Drizzle sauces (caramel, chocolate, or strawberry) add visual appeal and flavor layering; apply after pouring so they don’t fully blend away.
– Serve in tall glasses with a straw and spoon for thick shakes
– A thick homemade shake should be easy to eat as well as drink. A tall glass reduces surface area for melting and gives you room for toppings like cookie crumbs or sauce swirls.
– Use a spoon for thicker consistencies and a straw for lighter versions—this small serving decision changes the customer experience dramatically.
– Add a crunchy garnish like cookie crumbs or toasted nuts
– Crunch prevents the shake from feeling one-dimensional. Toasted nuts add aroma and a slightly savory edge that pairs well with chocolate and caramel.
– For a quick professional touch, lightly toast crumbs (60–90 seconds) before topping so they stay crisp longer.
Storage and Make-Ahead Tips
– Drink right away; it thickens and changes texture as it sits
– Most ice cream milkshakes lose “lift” as they sit—air escapes and the mix becomes denser. While this may sound good, it often turns from creamy to heavier or slightly icy.
– If needed, refrigerate briefly and stir again before serving
– If you must prep ahead, portion into a sealed container and refrigerate for up to 1–2 hours. Stir vigorously or pulse-blend for 10–15 seconds right before serving to restore texture.
– Freeze leftover portions only if you’re okay with softer reblending later
– Freezing can change the fat structure and form larger ice crystals. When thawed, you’ll likely need a re-blend with a small splash of milk to bring it back to the original thick consistency.
A great ice cream milkshake is all about the right ice cream-to-milk ratio and blending until silky smooth. Start with 2 scoops of ice cream and 1/2 cup milk, blend until fully uniform, and fine-tune thickness with small additions of milk or ice cream. Then, elevate the recipe with one variation—chocolate depth, fruity brightness, or cookie-style crunch—finish with the right toppings, and enjoy it immediately for the creamiest results.
References
- Google Scholar Google Scholar
https://scholar.google.com/scholar?q=ice+cream+milkshake+recipe - Google Scholar Google Scholar
https://scholar.google.com/scholar?q=milkshake+ice+cream+blending+process+emulsion+stabilization - Google Scholar Google Scholar
https://scholar.google.com/scholar?q=milkshake+dairy+ingredients+nutritional+composition - Milkshake
https://en.wikipedia.org/wiki/Milkshake - Ice cream
https://en.wikipedia.org/wiki/Ice_cream - https://www.britannica.com/topic/milkshake
https://www.britannica.com/topic/milkshake - Ice cream | Definition, History, & Production | Britannica
https://www.britannica.com/topic/ice-cream - https://pubmed.ncbi.nlm.nih.gov/?term=milkshake
https://pubmed.ncbi.nlm.nih.gov/?term=milkshake - https://www.fda.gov/food/buy-store-serve-safe-food/foods-keep-cold-refrigerator
https://www.fda.gov/food/buy-store-serve-safe-food/foods-keep-cold-refrigerator - Food safety
https://www.who.int/news-room/fact-sheets/detail/food-safety