Get a reliable rice balls recipe for perfect onigiri every time, with easy steps you can follow even if you’re new to shaping. This guide answers how to cook the rice, season it, and form tidy, non-sticky rice balls that hold their filling. Choose the simplest method that delivers the best texture and flavor for classic onigiri, not guesswork.
Rice balls (onigiri) are easy to perfect when you use warm, properly seasoned short-grain rice and shape firmly but briefly—before adding a centered filling. Below, you’ll get a clear method for rice-to-handling, smart seasoning ratios, and the most reliable shaping techniques to produce sturdy onigiri that hold together.
What You Need for a Rice Balls Recipe
– Use warm, cooked short-grain rice for the best stickiness
Short-grain rice (often labeled “Japanese rice” or “sushi rice”) has the right starch profile to bind without becoming pasty. Aim for rice that’s hot enough to steam faintly when handled.
– Plan seasonings like salt, soy sauce, or furikake for flavor
Onigiri flavor is built into the rice, not just the filling. A pinch of salt, a light soy-based seasoning, or furikake (seasoned rice flakes) can dramatically improve taste without complicating the process.
– Choose optional fillings (tuna, salmon, umeboshi, or veggies)
Choose fillings that are either dry-ish (so they don’t leak) or pre-cooked and cooled. Classic fillings are flavorful, but structurally, drier fillings are easiest for first-time success.
Quick reference: Onigiri “bind + flavor” targets
Onigiri Rice & Seasoning Guide (Practical Kitchen Targets)
| # | Rice Amount | Water Level (Cook Method) |
Salt/Furikake Added to Rice |
Filling Texture Best Fit |
Shaping Success |
|---|---|---|---|---|---|
| 1 | 2 cups cooked rice (~4 cups cooked) |
Follow package ratio | 1/2 tsp salt or 2 tbsp furikake | Moist, not wet | ★★★★☆ |
| 2 | 1.5 cups cooked rice | Follow package ratio | 1/3 tsp salt + 1 tsp soy (optional) | Firmer (tuna flakes / salmon) | ★★★★☆ |
| 3 | 3 cups cooked rice | Follow package ratio | 3/4 tsp salt or 3 tbsp furikake | Dry-ish (grilled mushrooms) | ★★★★★ |
| 4 | 1 cup cooked rice | Follow package ratio | 1/4 tsp salt + pinch pepper | Tangy (umeboshi) | ★★★☆☆ |
| 5 | 3.5 cups cooked rice | Slightly less water (if stovetop) | 1 tsp salt (start small) | Saucy (mix with crumbs) | ★★★☆☆ |
| 6 | 2 cups cooked rice | Follow package ratio | 2 tbsp furikake (no extra salt) | Almost any (balanced) | ★★★★★ |
| 7 | 2 cups cooked rice + chilled 10 min |
— | Salt/furikake as above | Moist fillings only | ★★☆☆☆ |
How to Season and Prep the Rice

– Season rice with salt and/or a light vinegar-based mix if desired
A simple starting point is salt first—then build with furikake or soy. If you use a vinegar mix, keep it subtle: too much tang can thin the rice’s natural stickiness and make shaping feel unstable.
– Keep rice warm so it molds without cracking
Onigiri is a “timing” recipe. Once the rice cools, starches set and binding weakens. If your rice sits too long, re-warm gently (microwave in short bursts or steam briefly) and re-check moisture.
– Wet your hands to shape without sticking
Use clean water to prevent excessive sticking. For best results, keep water use minimal—wet hands, not dripping hands. Excess water can create a slick surface that prevents a tight shell from forming.
Actionable workflow (what to do first):
1) Cook rice, then let it rest covered.
2) Season while still hot: sprinkle salt and/or furikake, then fold gently.
3) Keep a small bowl of water nearby for shaping.
4) Prepare fillings before you start—because once the rice is ready, you’ll want to move quickly.
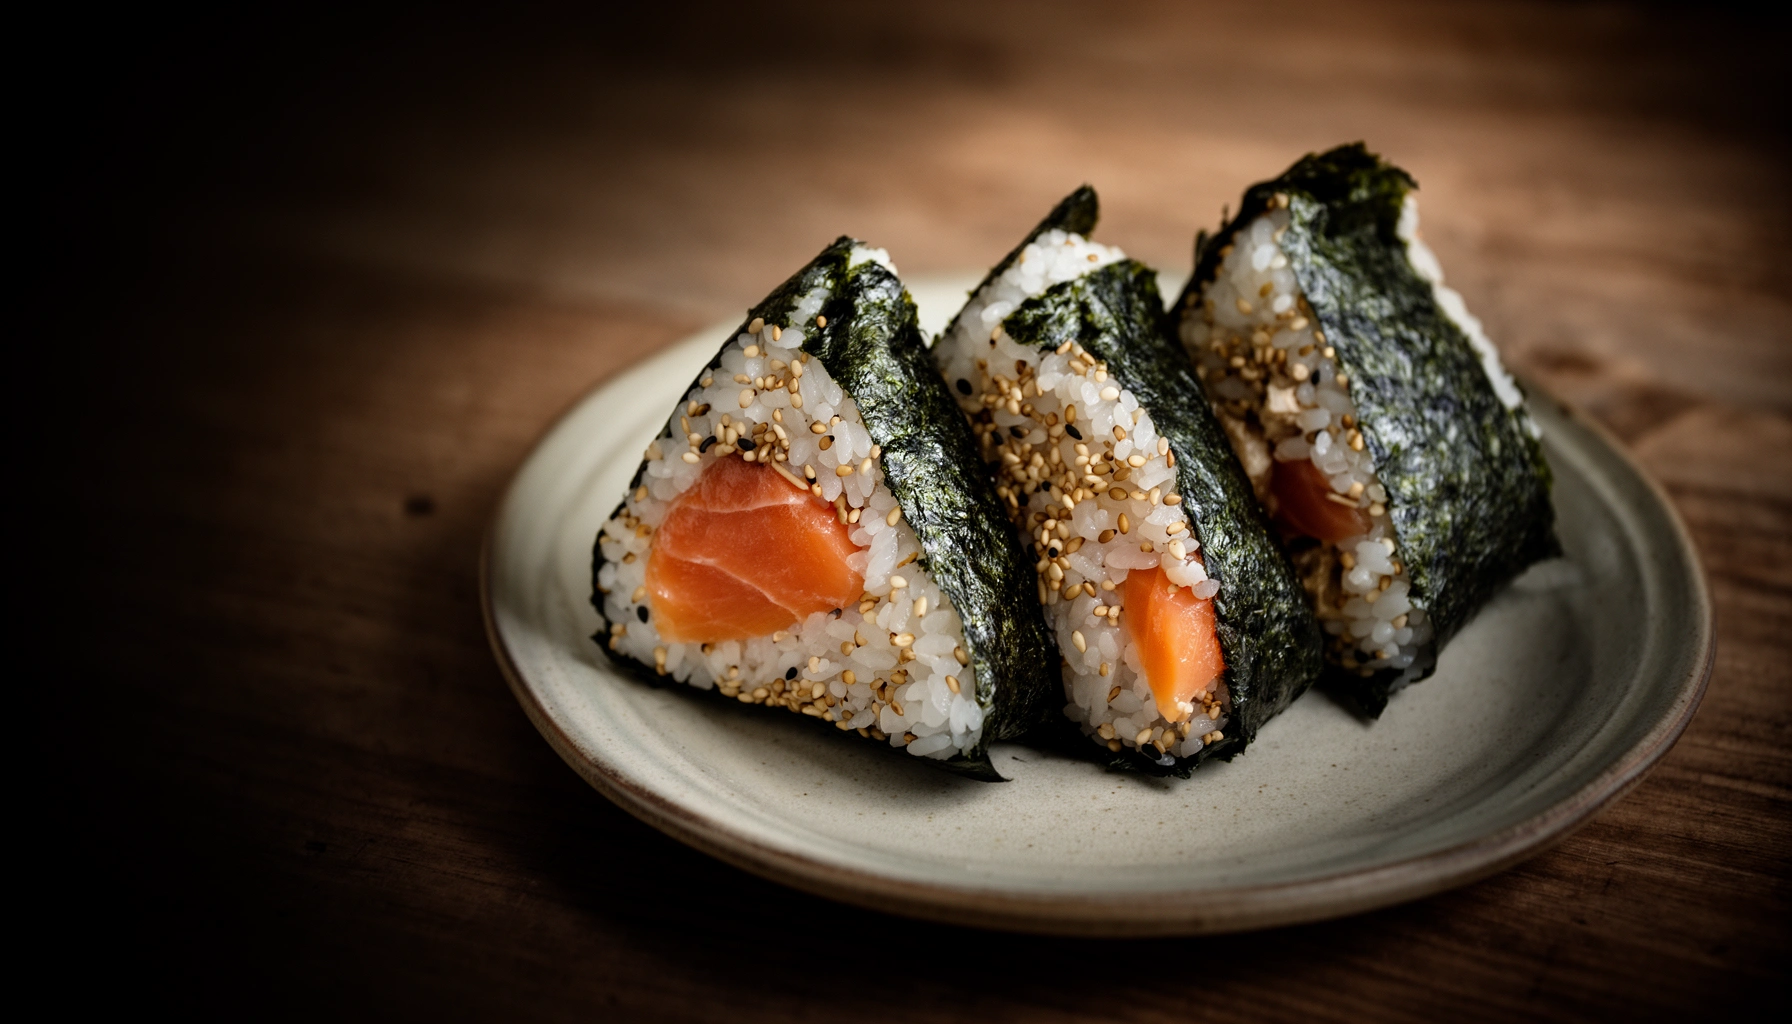
How to Shape Rice Balls (Onigiri) Correctly
– Form a tight ball or triangle using gentle, firm pressure
The goal is compression, not smashing. Triangles are common because they distribute pressure evenly, but a tight ball works just as well for lunchboxes.
– Press rice around filling so it stays centered and intact
Create a shallow “pocket” in the rice, add filling, then close the rice around it. Pinch edges together and compress the outside so the seam disappears.
– Use minimal handling to prevent the rice from becoming mushy
Frequent touching warms and breaks down rice texture. Handle in short sequences: shape → compress → finish. If the rice begins sticking to your fingers excessively, pause and re-wet lightly.
Practical shaping method (triangle version):
– Wet hands.
– Place a small portion of rice in one palm.
– Create an indent with your thumb (don’t dig too deep).
– Add about 1–2 teaspoons filling.
– Cover and seal, then compress into a triangular form by tightening the sides.
Best Fillings and Variations for Rice Balls
– Classic: tuna mayo or grilled salmon
These fillings are popular because they’re savory and easy to portion. For stability, mix tuna/salmon with a small amount of mayo (or a drizzle of sesame oil) and keep the filling thick enough to hold a spoonful.
– Tangy: umeboshi (pickled plum) or pickled vegetables
Use a small amount—umeboshi is intensely salty and acidic. Pairing it with evenly seasoned rice gives a clean, balanced flavor without overwhelming the palate.
– Vegetarian: sautéed mushrooms, edamame, or spiced tofu
Vegetarian onigiri works best when fillings are pre-cooked and cooled. Add a binder like a touch of soy sauce, miso, or sesame oil, then finish with toasted sesame for texture.
Filling reliability checklist:
– Low-leakage (thick texture, cooled)
– Strong flavor (so rice doesn’t taste bland)
– Portionable (easy to center and seal)
If you’re experimenting, start with a classic tuna mayo or grilled salmon filling: they’re forgiving, flavorful, and less likely to “wet out” the rice shell.
Cooking and Serving Tips
– Wrap with nori only right before eating for best texture
Nori absorbs moisture and softens quickly. If you’re packing onigiri, keep nori separate until the moment you eat, or wrap tightly with minimal air exposure.
– Chill briefly if needed, then serve at cool-room temperature
If you need to firm up onigiri for packing, chill for 10–20 minutes. Then serve at cool-room temperature for best flavor and rice texture.
– Store leftovers properly to avoid drying out
Store in an airtight container. If your onigiri dried slightly, reheat briefly in short intervals (microwave) and re-crisp nori separately when possible.
Business-style “quality control” tip:
Make a small batch first. If the rice feels crumbly, adjust warmth and moisture next time; if fillings leak, reduce portion size or thicken the filling.
Common Mistakes to Avoid
– Using cold rice (it won’t shape well)
Cold rice is less elastic and more likely to crack. Onigiri is best when the rice is still “workable” with steam heat.
– Overpacking or overworking the rice (can make it gummy)
Too much pressure or constant re-handling can break rice grains down. Compress firmly once, then stop.
– Skipping seasoning, leaving the balls flat or bland
Rice needs seasoning to taste complete. If you’re unsure, use furikake—it’s a reliable shortcut to balanced flavor.
Alternatives Roundup: 7 Ways to Make Rice Balls (Onigiri) and What Each Does Best
Below are practical alternatives to the classic “cook + season + shape + fill” method. Each one optimizes a different constraint: speed, structure, portability, dietary needs, or flavor intensity.
Alternative 1: Traditional salted rice + center filling
Pros
– Strong classic flavor with minimal ingredients
– Salt boosts rice cohesion and taste
– Works well for both triangles and balls
Cons
– Requires good seasoning timing while rice is hot
– Salt-only rice can feel “simple” for some palates
Usability
– Ideal for first-time onigiri makers
– No special tools needed beyond rice and a bowl of water
User experience
– Predictable texture; clean hand-feel if you keep water minimal.
Alternative 2: Furikake-forward onigiri (season the rice with flakes)
Pros
– Fastest seasoning method with consistent results
– Adds sesame, seaweed, and umami depth
– Great for lunchbox variety without extra prep
Cons
– Can vary in sodium depending on brand
– Some furikake blends are saltier than desired
Usability
– Excellent if you want “set it and forget it” seasoning
User experience
– Flavor is immediately apparent and forgiving when shaping.
Alternative 3: Vinegar-seasoned rice for a sharper profile
Pros
– Adds brightness and reduces perceived heaviness
– Pairs well with tangy fillings like umeboshi
Cons
– Too much vinegar can reduce stickiness
– Requires careful measurement for consistency
Usability
– Best as an “upgrade” after you master salted/furikake rice
User experience
– Tastes restaurant-like, but texture precision matters.
Alternative 4: Nori-wrapped “onigiri sandwich” for portability
Pros
– Easier to pack with minimal mess
– Nori acts as a protective outer layer
Cons
– Nori softens if wrapped too early
– Might mask subtle filling flavors
Usability
– Good for travel and office lunches
User experience
– More stable feel during transport; best when eaten promptly.
Alternative 5: Dry-filling strategy (thick fillings to prevent leakage)
Pros
– Highest structural integrity, fewer “wet rice” failures
– Cleaner eating experience
Cons
– Requires reducing sauces or cooling fillings longer
– Can feel less juicy than classic versions
Usability
– Recommended for tuna mayo that tends to run or for veggie fillings
User experience
– You’ll notice fewer seams breaking and less exterior crumbling.
Alternative 6: Vegetarian umami base (miso-sesame or mushroom fillings)
Pros
– Strong savory depth without fish-based ingredients
– Great for meal prep and batch cooking
Cons
– Fillings must be cooked down to avoid watery centers
– Some miso blends are sweeter—adjust seasoning accordingly
Usability
– Ideal for dietary preferences and variety
User experience
– Satisfying and balanced when fillings are thick and cooled.
Alternative 7: High-speed “batch shaping” with portion discipline
Pros
– Consistency improves when each portion is weighed/standardized
– Faster than shaping slowly while rice cools
Cons
– Requires preparation discipline (fillings pre-portioned)
– Less forgiving if rice cools mid-session
Usability
– Best when making 12–24 onigiri at once
User experience
– Feels like production line cooking: consistent shapes and fewer texture issues.
Conclusion
Perfect rice balls come down to three controllable variables: use warm short-grain rice, season the rice itself (salt/furikake/optional vinegar) for full flavor, and shape quickly with firm, minimal handling to lock in your filling. Start with a reliable classic filling first, then expand into tangy umeboshi, vegetarian umami options, and portability-focused variations—so every batch of onigiri is sturdy, flavorful, and easy to replicate.
Frequently Asked Questions
What are the best types of rice for making rice balls (onigiri)?
For a classic rice balls recipe, use short- to medium-grain Japanese rice because it becomes sticky when cooked, helping the onigiri hold their shape. Look for labels like “Japanese rice,” “short grain,” or “sushi rice,” and cook it according to package directions for proper texture. If you only have long-grain rice, the rice balls may crumble unless you use extra binding techniques.
How do you keep rice balls from falling apart when shaping them?
Let the rice cool slightly so it’s warm and sticky, not piping hot and wet, which can cause sliding. Wet your hands with water (and a little vinegar for extra stickiness) and squeeze gently but firmly when forming the rice balls. If you’re using a filling like tuna mayo or salmon, avoid overstuffing and seal the filling completely before shaping.
How do you cook rice for a rice balls recipe so it clumps correctly?
Rinse the rice until the water runs mostly clear to remove excess surface starch, then cook with the right water ratio for sticky results. After cooking, let the rice rest for a few minutes and then fluff lightly so steam distributes evenly. For the most reliable onigiri texture, season while warm with a pinch of salt (or a small amount of rice vinegar if your recipe uses it) so the grains cling together.
Why do some rice balls have a raw taste or dry texture?
A raw taste usually comes from undercooked rice, so confirm the rice balls filling isn’t disguising poorly cooked grains and use the correct cooking time. Dry or crumbly onigiri can happen if the rice is over-fluffed, cooled too long, or stored uncovered; cover the rice while shaping and use promptly. If your rice feels dry, lightly sprinkle with water and steam for a short moment before re-shaping.
Which fillings work best for rice balls, and how should you prepare them?
Popular rice ball fillings include umeboshi (pickled plum), salted salmon, tuna mayo, and teriyaki chicken, because they’re flavorful and relatively easy to portion. Keep fillings moist but not runny—mix tuna with mayo until thick, or break salmon into small flakes and bind with a little seasoning. For best results, chill thicker fillings briefly, then place a small amount in the center and press the rice around it to form a tight seal.
References
- Google Scholar Google Scholar
https://scholar.google.com/scholar?q=rice+ball+recipe - Google Scholar Google Scholar
https://scholar.google.com/scholar?q=onigiri+recipe+rice+balls - Google Scholar Google Scholar
https://scholar.google.com/scholar?q=arancini+recipe+rice+balls - Onigiri
https://en.wikipedia.org/wiki/Onigiri - Arancini
https://en.wikipedia.org/wiki/Arancini - Supplì
https://en.wikipedia.org/wiki/Suppl%C3%AC - Rice ball
https://en.wikipedia.org/wiki/Rice_ball - Tangyuan
https://en.wikipedia.org/wiki/Tangyuan - Mochi
https://en.wikipedia.org/wiki/Mochi - https://en.wikipedia.org/wiki/Sh%C5%8Dchikubai
https://en.wikipedia.org/wiki/Sh%C5%8Dchikubai