Get the classic Graveyard Pudding recipe with the exact easy steps that deliver a perfect set and a proper crumble every time. This method answers whether you can make it without fuss—using straightforward layers and reliable baking time—so you finish with a pudding that slices cleanly. If you want the truest “graveyard” flavor and texture in a single go, follow this winning process from first spoonful to final serving.
This graveyard pudding recipe is a fast, no-bake Halloween dessert that delivers creamy layers, crunchy “grave” crumbs, and playful gummy toppings with minimal cooking. In this guide, you’ll learn exactly how to assemble it cleanly, chill it for a thick, scoopable texture, and plate it so the “graves” look realistic and spooky for your next party.
What You Need for Graveyard Pudding

– Gather key ingredients like pudding mix, milk, and crushed cookies.
– Plan your “graveyard” items: gummy worms and chocolate/wafer biscuits.
To build a reliable no-bake graveyard pudding, think in three components: the base, the creamy set layer, and the graveyard toppings. Most versions rely on instant pudding mix because it thickens quickly and sets in the fridge without cooking—ideal for a Halloween timeline.
Core ingredients (creamy layers)
– Instant vanilla pudding mix (or chocolate pudding mix if you prefer darker “soil” tones)
– Cold milk (cold helps the pudding thicken predictably)
– Optional: heavy cream or whipped topping for extra creaminess and a thicker mouthfeel (especially helpful if your milk is lower-fat)
Base ingredients (crunch + contrast)
– Chocolate sandwich cookies (crushed for “dirt” texture) or wafer biscuits
– Optional: a small pinch of salt or cinnamon to deepen flavor and make the chocolate taste more “graveyard-rich”
Graveyard items (spooky finishing touches)
– Gummy worms (assorted sizes look especially natural)
– Chocolate “graves” (store-bought wafer biscuits, chocolate bars broken into rectangles, or even white-chocolate wafer “tombstones” if available)
– Optional: a few crunchy chocolate pieces (chopped candy bars or chocolate-coated biscuits) for extra “rocks” across the top
Practical shopping tip: If you want consistent results, match the cookie to the pudding. Chocolate cookies pair best with vanilla pudding; vanilla wafers pair nicely with chocolate pudding for a balanced sweetness level.
Graveyard Pudding Layering Ratios (Serves ~8)
| # | Component | Target Amount | What It Impacts | Result |
|---|---|---|---|---|
| 1 | Instant pudding mix | 2 (3.4 oz / 96 g) boxes | Set firmness | Thick, scoopable layers |
| 2 | Cold milk | 3 cups (720 ml) | Consistency control | Minimal runniness |
| 3 | Crushed cookies / wafers | 3 cups (about 18–22 cookies) | Crunch + structure | Firm base without sogginess |
| 4 | Crunchy chocolate pieces | 1/2 cup (50–70 g) | Top “rocks” effect | More texture per bite |
| 5 | Gummy worms | 24–30 cm total (about 10–16 worms) | Spooky movement | Layered “burrows” look |
| 6 | Chocolate wafer “graves” | 10–14 tombstone pieces | Height + visual realism | Crisp, upright tombstones |
| 7 | Salt (optional) | 1/8 tsp | Flavor lift | Better chocolate depth |
Step-by-Step Instructions

– Mix and thicken the pudding, then layer it over crushed cookie base.
– Add toppings (worms, “graves,” and chocolate pieces) before serving or chilling.
This recipe succeeds because it respects timing: pudding should be thickened promptly, cookies should go in a firm base layer, and toppings should be added at the right moment to prevent melting or sinking.
1) Crush the cookie base
Place cookies (sandwich cookies or wafers) in a sealed bag and crush into medium crumbs—not flour. Medium crumbs create a “dirt” texture and keep the base from disappearing into the pudding. For a neat base, press the crumbs into the bottom of a dish.
Serving format tip: A clear trifle bowl makes the layered look more dramatic, while a loaf pan works well for slicing into neat portions.
2) Mix and thicken the pudding
Whisk instant pudding mix with cold milk until fully combined, usually 2 minutes (or according to package directions). You’re looking for a texture that holds a ribbon briefly before it slowly settles.
If your pudding mix package allows it, consider using slightly less milk than stated (e.g., 1–2 tablespoons less per box). This is a dependable technique for preventing a runny graveyard pudding, especially if your kitchen is warm.
3) Layer the pudding over the crumbs
Spoon pudding over the cookie base in an even layer. Use a spatula to smooth the surface so your grave toppings stand more securely.
If you want a more dramatic effect, repeat the layering: crumbs → pudding → crumbs → pudding. Keep each crumb layer relatively thin so it doesn’t block the creamy set.
4) Add graveyard toppings
Add:
– Gummy worms (some laid on the surface, others tucked halfway down)
– “Graves” made from chocolate wafers or broken biscuit rectangles (placed upright)
– Chocolate pieces as “rocks” around the base of the tombstones
At this stage, you can either:
– Serve after a short chill (30–60 minutes) for a softer, more “wavy” look, or
– Chill longer (2–4 hours) for firm, scoopable layers.
How to Get the Best Texture

– Chill long enough so the layers set and don’t get runny.
– Use the right cookie-to-pudding ratio for a firm, scoopable dessert.
Texture is the central variable in any no-bake Halloween pudding: you want cream that sets, crumbs that stay crisp enough, and toppings that don’t collapse.
Chill time: the non-negotiable step
Instant pudding sets in the fridge because its starch thickens and stabilizes. If you rush, the result can be loose or watery—especially once the dessert meets room temperature.
For most home fridges:
– Minimum: 2 hours
– Ideal: 3–4 hours (best balance of firmness and freshness)
– Over-chilling: Generally safe, but extremely long sits can slightly dull cookie crunch
Cookie-to-pudding ratio: structure vs. sogginess
Too many cookies can make the dessert feel dense and dry. Too few can make it feel like pudding with decoration. A reliable baseline is about 3 cups crushed cookies for two 3.4 oz pudding boxes, as reflected in the data table above.
Use “placement engineering” for toppings
– If you want tombstones to look upright, press them gently into the pudding surface so they anchor before the dessert is fully chilled.
– Add gummy worms in different depths: one-third surface, one-third halfway in, and one-third just under the top layer. This distributes weight and prevents “all worms on top” sagging.
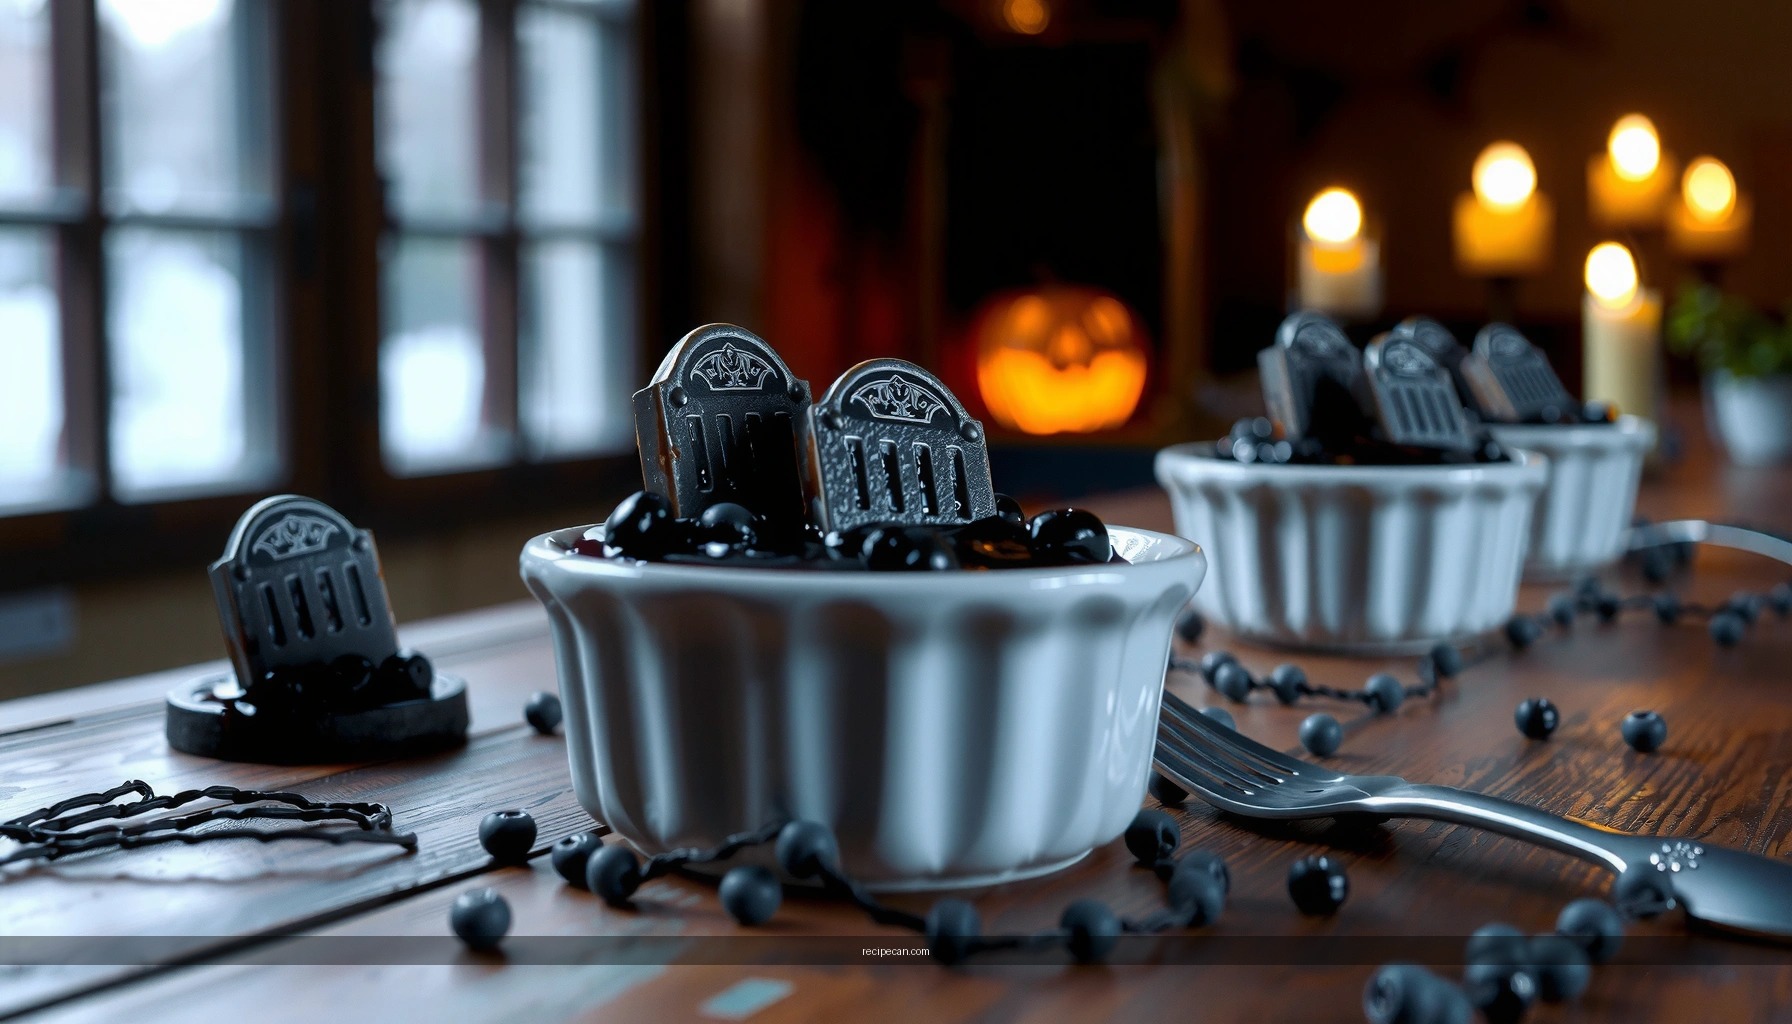
Spooky Presentation Tips
– Arrange “graves” upright with a slight angle for a realistic look.
– Add gummy worms at different depths to create a layered effect.
Presentation matters because graveyard pudding is a visual dessert first and a flavor dessert second—your guests should feel the Halloween theme before the first bite.Tombstone layout: angle beats symmetry
For realism, avoid perfectly straight rows. Instead:
– Place “graves” upright but slightly angled (think “leaning over” rather than “standing at attention”).
– Leave small gaps between tombstones so the creamy layer looks like visible “soil.”
If your chocolate pieces are too slick to stand, chill the dessert 15–20 minutes first, then place tombstones while the surface is set but still workable.
Layered worms: create depth
Depth creates the illusion of a lived-in graveyard:
– Bury a few gummy worms partially, with their heads near the surface.
– Tuck others beneath the top layer so only a curve peeks out.
– Keep at least one worm “emerging” from the crumb edge for a stronger focal point.
Finish with “soil texture”
Sprinkle a light dusting of crushed cookies over the top edges—just enough to frame the tombstones and hide any smooth seams from layering.
Make-Ahead, Storage, and Serving
– Make it ahead and store covered in the fridge to maintain freshness.
– Serve cold; stir slightly only if you want a softer texture.
This is a strong make-ahead dessert because chilling is part of the process, not an optional step. For events, this reduces stress while keeping quality high.
Make-ahead guidance
– Prepare the base and pudding, assemble, and add toppings.
– Chill until set (typically 3–4 hours).
– If your event is the same day, assemble in the late morning or early afternoon so it’s ready before guests arrive.
Storage
– Cover tightly with plastic wrap or a lid.
– Store in the fridge for up to 3 days for best texture and flavor.
– Avoid repeated temperature swings—moving it in and out of the cold often leads to a softer set.
Serving
Serve directly from the dish for maximum visual impact. For slicing, chill a bit longer so the pudding holds shape. If you prefer a softer, spoonable texture, let it sit at cool room temperature for 5–10 minutes—no more.
Easy Variations for Different Tastes
– Swap ingredients: vanilla pudding, chocolate pudding, or homemade custard.
– Add extra crunch with chopped Oreos or graham cracker crumbs.
One advantage of graveyard pudding is customization without complexity. You can adjust flavor and texture while keeping the same structure.
Flavor swaps (instant and dependable)
– Vanilla pudding + chocolate cookies: classic contrast; the vanilla keeps it lighter.
– Chocolate pudding + vanilla wafers: darker, richer “earth” look for a more dramatic Halloween palette.
– Homemade custard: works, but requires proper cooling and thickening so you don’t undermine the no-bake stability.
If using homemade custard, cool it completely before assembling and confirm it has a spoon-coating thickness similar to boxed instant pudding.
Crunch upgrades
– Chopped Oreos: adds deep chocolate flavor and slightly more chew in the base.
– Graham cracker crumbs: gives a toasty “soil” profile and pairs especially well with vanilla pudding.
– Add a thin crumble ring: keep some crumbs reserved so you can refresh the top texture right before serving.
Dietary-friendly thinking
If you need alternatives, consider:
– Gluten-free cookies for the base
– Dairy-free pudding mix and plant-based milk (choose combinations that thicken reliably)
Always test thickness first; texture consistency is more important than ingredient “type.”
Graveyard pudding is an easy, spooky dessert you can assemble quickly with pudding layers, cookie crumbs, and fun “grave” toppings. Follow the steps, chill it for the best texture, and use the presentation tips to wow your guests—then try a variation and serve it cold at your next Halloween gathering.
Frequently Asked Questions
What is a graveyard pudding recipe and what makes it different from regular pudding?
A graveyard pudding recipe is a no-bake or baked layered dessert that’s typically made with pudding or cream cheese and crushed cookies, then decorated to look like a spooky graveyard. The “graveyard” look usually comes from crushed chocolate cookies and gummy worms, tombstones, or chocolate “dirt” using Oreo-style crumbs. It’s popular because it’s easy to assemble and can be made ahead for parties.
How do I make graveyard pudding with instant pudding without it getting runny?
Use instant pudding mix prepared exactly according to package directions, and chill it until thick before folding or layering. If you want extra stability, beat the pudding briefly to remove lumps and consider adding whipped topping or whipped cream to create a thicker graveyard pudding filling. For best results, let the dessert set in the fridge for at least 2–4 hours (or overnight) so the layers firm up.
Which toppings and decorations work best for a realistic graveyard pudding look?
For a classic graveyard pudding recipe, use chocolate cookie crumbs as “soil,” gummy worms as “worms,” and tombstone shapes made from chocolate graham crackers, wafer cookies, or fondant/white chocolate. You can also add candy bones, gravestones made from edible paper, or chocolate chips for extra texture. Keep toppings refrigerated until serving so the gummies hold their shape and the crumbs don’t become soggy too early.
Why does my graveyard pudding get soggy, and how can I prevent it?
Sogginess usually happens when cookie crumbs sit too long in wet pudding or when the dessert isn’t chilled long enough to set. To prevent this, layer in stages (or serve the same day if using very fine crumbs), and keep the dessert tightly covered in the fridge. You can also choose slightly thicker pudding consistency and ensure the pudding layer is fully chilled before adding the “soil” crumbs.
Best way to make a kid-friendly graveyard pudding recipe that’s not too messy?
Make individual cups or mini mason jars so each portion is easier to serve and doesn’t require cutting. Stir gummy worms into one portion at a time for control, and use sturdy tombstone decorations that won’t crumble during handling. Opt for a no-bake layered approach with instant pudding for a quicker, safer graveyard pudding recipe that stays intact for school parties and Halloween events.
References
- Google Scholar Google Scholar
https://scholar.google.com/scholar?q=graveyard+pudding+recipe - Google Scholar Google Scholar
https://scholar.google.com/scholar?q=graveyard+pudding+Halloween+recipe - Google Scholar Google Scholar
https://scholar.google.com/scholar?q=graveyard+pudding+dessert+origin - Google Scholar Google Scholar
https://scholar.google.com/scholar?q=pudding+graveyard+Halloween+dessert+recipe - Google Scholar Google Scholar
https://scholar.google.com/scholar?q=“graveyard - Google Scholar Google Scholar
https://scholar.google.com/scholar?q=Halloween+“graveyard”+pudding - Google Scholar Google Scholar
https://scholar.google.com/scholar?q=Halloween+custard+dessert+recipe - Google Scholar Google Scholar
https://scholar.google.com/scholar?q=gelatin+pudding+Halloween+recipe - Google Scholar Google Scholar
https://scholar.google.com/scholar?q=British+Halloween+pudding+recipe - Google Scholar Google Scholar
https://scholar.google.com/scholar?q=children%E2%80%99s+Halloween+recipes+graveyard+pudding