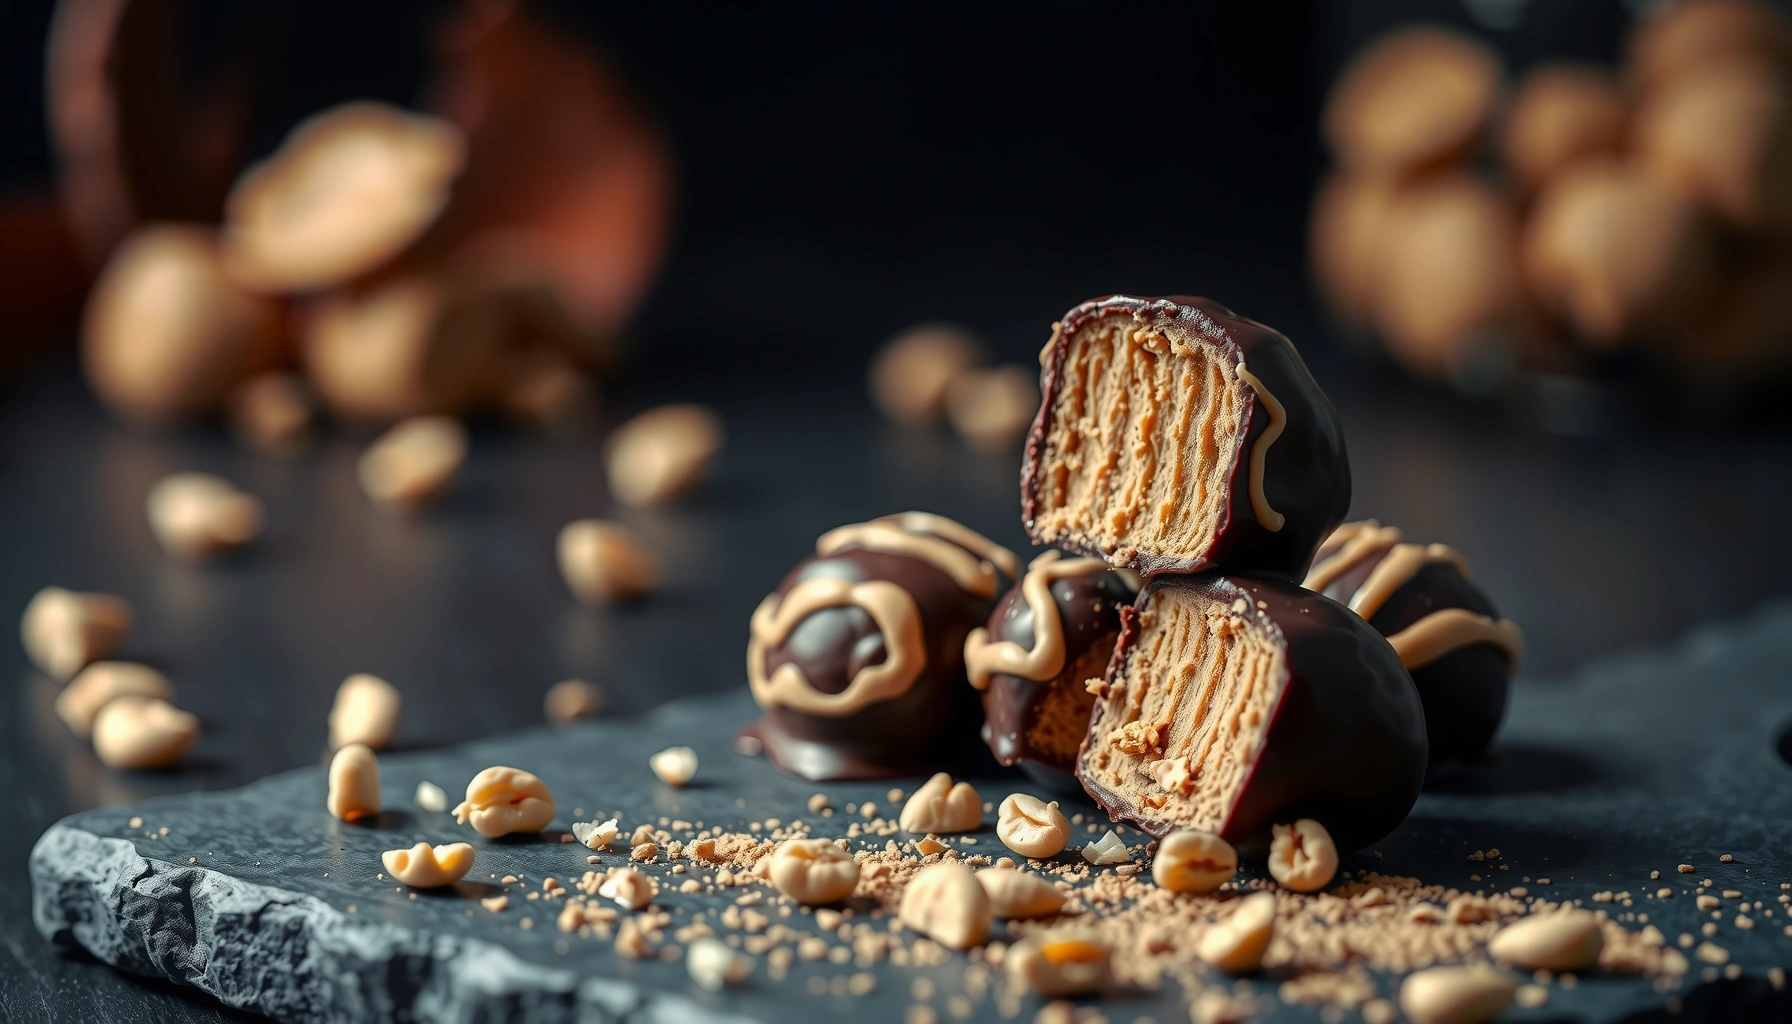
This chocolate covered peanut butter balls recipe delivers the best bite: rich, creamy centers wrapped in a smooth chocolate shell that sets cleanly every time. You’ll get an easy, no-fuss method with the exact ingredients and timing to skip grainy peanut butter, loose balls, or chocolate that won’t harden. If you want fast, reliable results for parties or sweet cravings, this is the winner version.
Chocolate covered peanutbutter balls are easy to make: mix a thick peanut butter filling, roll into bite-size balls, chill, then dip in smooth melted chocolate. This recipe walks you through a reliable, step-by-step method that protects the texture (so the centers don’t slip) and helps you achieve a clean, glossy coating every time.
Ingredients You’ll Need

To make chocolate covered peanutbutter balls with a “shop-bought” look and satisfying bite, start with ingredients that create a filling that’s firm enough to roll—and chocolate that melts predictably.
Base filling:
– Peanut butter: Use creamy peanut butter for the smoothest texture. For a more rustic bite, natural peanut butter works too, but you may need a touch more powdered sugar to stabilize the mixture.
– Powdered sugar: Provides sweetness and structure so the filling holds its shape after chilling.
– Butter: Adds richness and helps the mixture become scoopable and cohesive rather than crumbly.
Optional flavor enhancers (recommended):
– Vanilla extract: Rounds out the peanut butter flavor with a bakery-style aroma.
– Salt: A small amount makes the chocolate taste more intense and balances the sweetness.
Chocolate coating:
– Chocolate chips (or melting chocolate): Chocolate chips are convenient, but melting chocolate (or high-quality couverture) tends to produce a smoother, shinier finish.
– Optional: coconut oil or shortening (small amount): If your chocolate feels thick, a tiny amount can help it thin for dipping and create a more even coat.
Pro tip: If you’re aiming for the smoothest chocolate, avoid “barely melted” chocolate. Gentle heat keeps cocoa solids stable and reduces the chance of a dull or grainy coating.
Typical Yield, Size Targets, and Chilling Guidance for Peanut Butter Balls
| # | Batch Configuration | Ball Size | Approx. Count | Chill Time (Firming) | Expected Coating Success |
|---|---|---|---|---|---|
| 1 | Standard (1 batch filling + 12 oz coating) | 1 tablespoon each | 24–28 | 30–45 min | ★★★★☆ |
| 2 | Smaller scoops (scaled down) | 2 teaspoons each | 40–50 | 25–35 min | ★★★★☆ |
| 3 | Larger “truffle-style” balls | 1.5–2 tablespoons each | 16–20 | 45–60 min | ★★★☆☆ |
| 4 | Extra-structured filling (slightly more sugar) | 1 tablespoon each | 24–28 | 35–50 min | ★★★★★ |
| 5 | Natural peanut butter (not stabilized) | 1 tablespoon each | 24–28 | 45–75 min | ★★☆☆☆ |
| 6 | Warm kitchen + rapid dipping | 1 tablespoon each | 24–28 | 30–45 min, re-chill often | ★★☆☆☆ |
| 7 | Tempered/coverture-style chocolate (higher quality) | 1 tablespoon each | 24–28 | 30–45 min | ★★★★★ |
Equipment and Setup

Successful chocolate dipping is as much about setup as it is about ingredients. Before you start, organize your workspace so the filling stays cold and the chocolate stays controllably warm.
Core tools:
– Mixing bowl for combining the peanut butter filling.
– Spoon or spatula to mix until thick and uniform.
– Parchment-lined tray to hold the chilled balls and allow chocolate to set without sticking.
Helpful accessories for consistency:
– Small scoop (or a tablespoon measure) to portion evenly. Uniform balls melt and chill at the same rate, which improves coating uniformity.
– Small pot or microwave-safe bowl for melting chocolate.
– Fork or dipping tool for controlled dipping and tapping off excess chocolate.
Setup strategy (high impact):
1. Chill the tray first (optional but useful in warm kitchens).
2. Clear space for cooling so you can place dipped balls immediately.
3. Keep chocolate near dipping temperature—not scorching hot—so it doesn’t seize or thicken.
Make the Peanutbutter Ball Mixture

The peanut butter mixture is the foundation of the texture. If it’s too soft, balls will deform during dipping; if it’s too dry, they won’t roll smoothly.
How to combine for a scoopable texture:
– Mix peanut butter, powdered sugar, and butter until you get a thick paste. The goal is a mixture that clumps and holds shape when pressed.
– If using vanilla extract and salt, add them once the base is well combined.
Analytical texture checkpoints:
– Too sticky? Add powdered sugar in small increments (1–2 tablespoons at a time).
– Too crumbly? Add butter, 1 teaspoon at a time, or warm the mixture slightly to redistribute fat, then chill again.
– Streaks or unevenness? Keep mixing until the paste looks uniform—some peanut butters need a little extra stirring to fully incorporate sugar.
Chill briefly so rolling is clean:
– Refrigerate the mixture briefly (often 15–25 minutes) until it’s firm enough to roll without sticking to your hands.
– Avoid over-chilling to the point where it becomes stiff; you want it plastic, not hard.
Portion and roll:
– Scoop consistent amounts, then roll between your palms quickly to form smooth balls.
– If your hands are warm, rinse briefly with cool water and dry—this is a simple way to prevent sticking.
Chill and Prep for Dipping

This phase determines whether your chocolate covered peanutbutter balls have clean edges and stable centers.
Refrigerate until firm:
– Place rolled balls on the parchment-lined tray and refrigerate until they’re firm—typically 30–45 minutes for standard size.
– The balls should feel cold and solid, not tacky.
Keep chocolate smooth by melting gently:
– Melt chocolate slowly—microwave in short bursts or use a low simmer for a double boiler.
– Stir frequently so the chocolate heats evenly. Overheating can lead to grainy texture or thickening that won’t coat smoothly.
Prevent moisture issues:
– Make sure everything is dry. Even small amounts of water can cause chocolate to seize.
– If your kitchen is humid, avoid leaving the melted chocolate uncovered for long.
Tray lining matters:
– Parchment reduces sticking and makes it easy to lift set balls without breaking the coating.
Dip in Chocolate and Set
Dipping is where the recipe becomes “looks professional.” The technique is straightforward, but precision makes a difference.
Dip each ball fully:
– Hold a ball by the edge (or use a fork), then dip into melted chocolate.
– Lift slowly and tap off excess chocolate so drips don’t form thick ridges.
Place on parchment:
– Set each ball back onto the parchment-lined tray with space around them so they don’t touch while setting.
Chill to harden:
– Refrigerate the dipped balls until the coating is set. For most kitchens, this can be 15–30 minutes.
– If you’re freezing later, setting in the fridge first can help maintain shape and visual quality.
Avoid overheating for best texture:
– If chocolate looks thick or starts to dull, stop and rewarm gently rather than continuing at higher heat.
– Chocolate that’s too hot can soften the filling and cause slipping or soft spots.
Optional finishing for variety:
– Drizzle with contrasting chocolate (white or dark) using a spoon or fork.
– Sprinkle crushed peanuts or flaky salt immediately after dipping—timing matters before the chocolate hardens.
Serving, Storage, and Make-Ahead Tips
Chocolate covered peanutbutter balls are ideal for planning because they hold well and improve slightly as the flavors meld.
Storage (best practice):
– Store in the refrigerator to keep the centers firm and prevent chocolate from softening.
– Use an airtight container to reduce fridge odors and help maintain texture.
Freezing method for batch prep:
– Freeze balls in a single layer on a tray until solid, then transfer to a container or freezer bag.
– This prevents them from clumping and makes it easy to grab a few at a time.
Serving timing:
– Let them sit 5–10 minutes at room temperature before serving. This softens the bite slightly and enhances chocolate aroma without fully losing the firm structure.
Make-ahead workflow (efficient):
– Make filling and roll balls up to a day ahead, then chill.
– Dip the day you serve for maximum shine, or dip ahead and store refrigerated for consistent quality.
Quality expectations by method:
– Fresh-dipped: best gloss and cleanest edges.
– Dipped-ahead: slightly less shine but equally delicious—especially if served slightly cool-to-neutral.
Chocolate covered peanutbutter balls are simple: mix, roll, chill, dip, and set for a rich, no-fuss treat. Follow the chilling and gentle-melting tips to protect the filling and achieve smooth chocolate, then serve right away or refrigerate/freezer for later—this is a dependable batch recipe worth making this week.
References
- Google Scholar Google Scholar
https://scholar.google.com/scholar?q=chocolate+covered+peanut+butter+balls+recipe - https://scholar.google.com/scholar?q=peanut+butter+chocolate+confection+truffles+fat+sugar+ratio Google Scholar
https://scholar.google.com/scholar?q=peanut+butter+chocolate+confection+truffles+fat+sugar+ratio - Google Scholar Google Scholar
https://scholar.google.com/scholar?q=chocolate+truffle+emulsion+formulation+peanut+butter - https://en.wikipedia.org/wiki/Chocolate_truffle
https://en.wikipedia.org/wiki/Chocolate_truffle - Peanut butter
https://en.wikipedia.org/wiki/Peanut_butter - https://www.britannica.com/topic/chocolate-truffle
https://www.britannica.com/topic/chocolate-truffle - Peanut butter | Description, History, Nutrition, & Facts | Britannica
https://www.britannica.com/topic/peanut-butter - Tempered chocolate
https://en.wikipedia.org/wiki/Chocolate_tempering - Google Scholar Google Scholar
https://scholar.google.com/scholar?q=chocolate+covered+peanutbutter+balls+recipe - chocolate covered peanutbutter balls recipe – Search results
https://en.wikipedia.org/wiki/Special:Search?search=chocolate+covered+peanutbutter+balls+recipe