Looking for a cannoli poke cake recipe that delivers true cannoli flavor without the fuss? This easy cannoli-style dessert soaks a tender vanilla cake with creamy filling and finishes with crunchy topping for the sweet, citrusy bite you expect from classic cannoli. If you want the quickest path to a crowd-pleasing cannoli dessert that slices cleanly and tastes like the real thing, this is the one to make.
Make a cannoli poke cake by baking a vanilla cake, poking holes, and filling them with a smooth ricotta mixture—then finishing with chocolate chips and crunchy crushed cannoli shells or cookies. This method delivers the classic cannoli flavor profile (creamy ricotta + chocolate crunch + sweet vanilla notes) in a simple, make-ahead dessert that holds up beautifully for parties and busy schedules.
Ingredients You’ll Need

– Vanilla cake mix or homemade vanilla cake as the base
– Ricotta filling with sugar, vanilla, and mini chocolate chips
To make the recipe genuinely “cannoli-style,” focus on three flavor pillars: (1) vanilla cake sweetness, (2) creamy ricotta sweetness, and (3) chocolate crunch. For best results, use whole-milk ricotta (or at least a thick-style ricotta) rather than watery low-fat varieties—your filling will set more cleanly and taste closer to classic cannoli filling.
Optional add-ins that improve realism and texture
– Mini chocolate chips (ideal for distributing chocolate in every bite)
– Crushed pizzelle or cannoli shells (for authentic crunch)
– Crushed vanilla wafers or biscotti (easy substitute when shells aren’t available)
– A pinch of salt in the ricotta to sharpen sweetness and improve flavor balance
How to Make the Cannoli Cake Base

– Bake the cake and let it cool completely before poking
– Use a fork or skewer to create evenly spaced holes across the cake
Start with a vanilla cake that will be sturdy enough to absorb filling without collapsing. If you’re using a boxed mix, prepare it exactly as directed and bake until the center is set and springs back lightly when touched.
Cooling is not optional—this is where many poke cakes fail.
Let the cake cool fully, ideally 1–2 hours (or until room temperature). Warm cake can cause the filling to melt and leak rather than remain creamy and thick inside the holes.
Poking technique for consistent flavor
1. Place the cake on a flat surface (still in the pan or on a serving board).
2. Use a fork, skewer, or the handle of a wooden spoon to poke holes about 1 inch apart (or at least evenly across the surface).
3. Aim for holes that are deep enough to reach near the bottom layer, but not so deep that you cut through the bottom.
A helpful practice for presentation: keep your pokes relatively uniform so the filling shows an even pattern when served.
Make the Ricotta Filling

– Mix ricotta with powdered sugar (and vanilla) until smooth
– Fold in chocolate chips and optional mini cookie crumbs for texture
Your ricotta filling should taste like cannoli filling: gently sweet, bright with vanilla, and speckled with chocolate. The key variable is texture. Ricotta naturally varies by brand; some are creamy and thick, others are softer.
How to get a smooth, pipeable cannoli filling
– If your ricotta looks slightly grainy, blend it briefly or press it through a fine mesh strainer.
– Mix ricotta with powdered sugar until smooth (powdered sugar dissolves better than granulated).
– Add vanilla extract for the classic cannoli aroma.
– Fold in mini chocolate chips at the end so they stay intact.
Texture upgrade (optional, highly recommended)
Fold in a small amount of crushed cookies (such as vanilla wafers) or even finely crushed biscotti. This adds tiny “shell-like” bits throughout the creamy filling so the bite feels more layered, not just soft and chocolatey.
If the filling seems too loose, chill it 20–30 minutes before assembling. That short rest improves hold and makes filling easier to spoon into the holes cleanly.
Assemble the Poke Cake
– Spoon or pipe filling into the holes so every slice tastes like cannoli
– Spread any remaining filling over the top for a rich finish
Assembly is where you convert a standard vanilla poke cake into a cannoli-style dessert. Your goal is distribution: filling should be present throughout the cake, not just on the surface.
Best practice: fill in layers
– Spoon or pipe filling directly into the holes, moving across the cake methodically.
– Stop when holes look visibly filled but not overflowing.
– Then spread any remaining ricotta mixture over the top to seal the flavor.
Tool options
– Spoon works well and creates rustic, homemade appeal.
– Piping bag (or zip-top bag with a corner snipped) is ideal if you want more precision and faster filling.
Portion planning
As a rule of thumb, aim for a filling layer thick enough that it’s still noticeable after chilling. If you underfill, the cake can taste like vanilla with a hint of cannoli—if you overfill, it may become messy. Using a thick ricotta mixture solves most “too runny” problems.
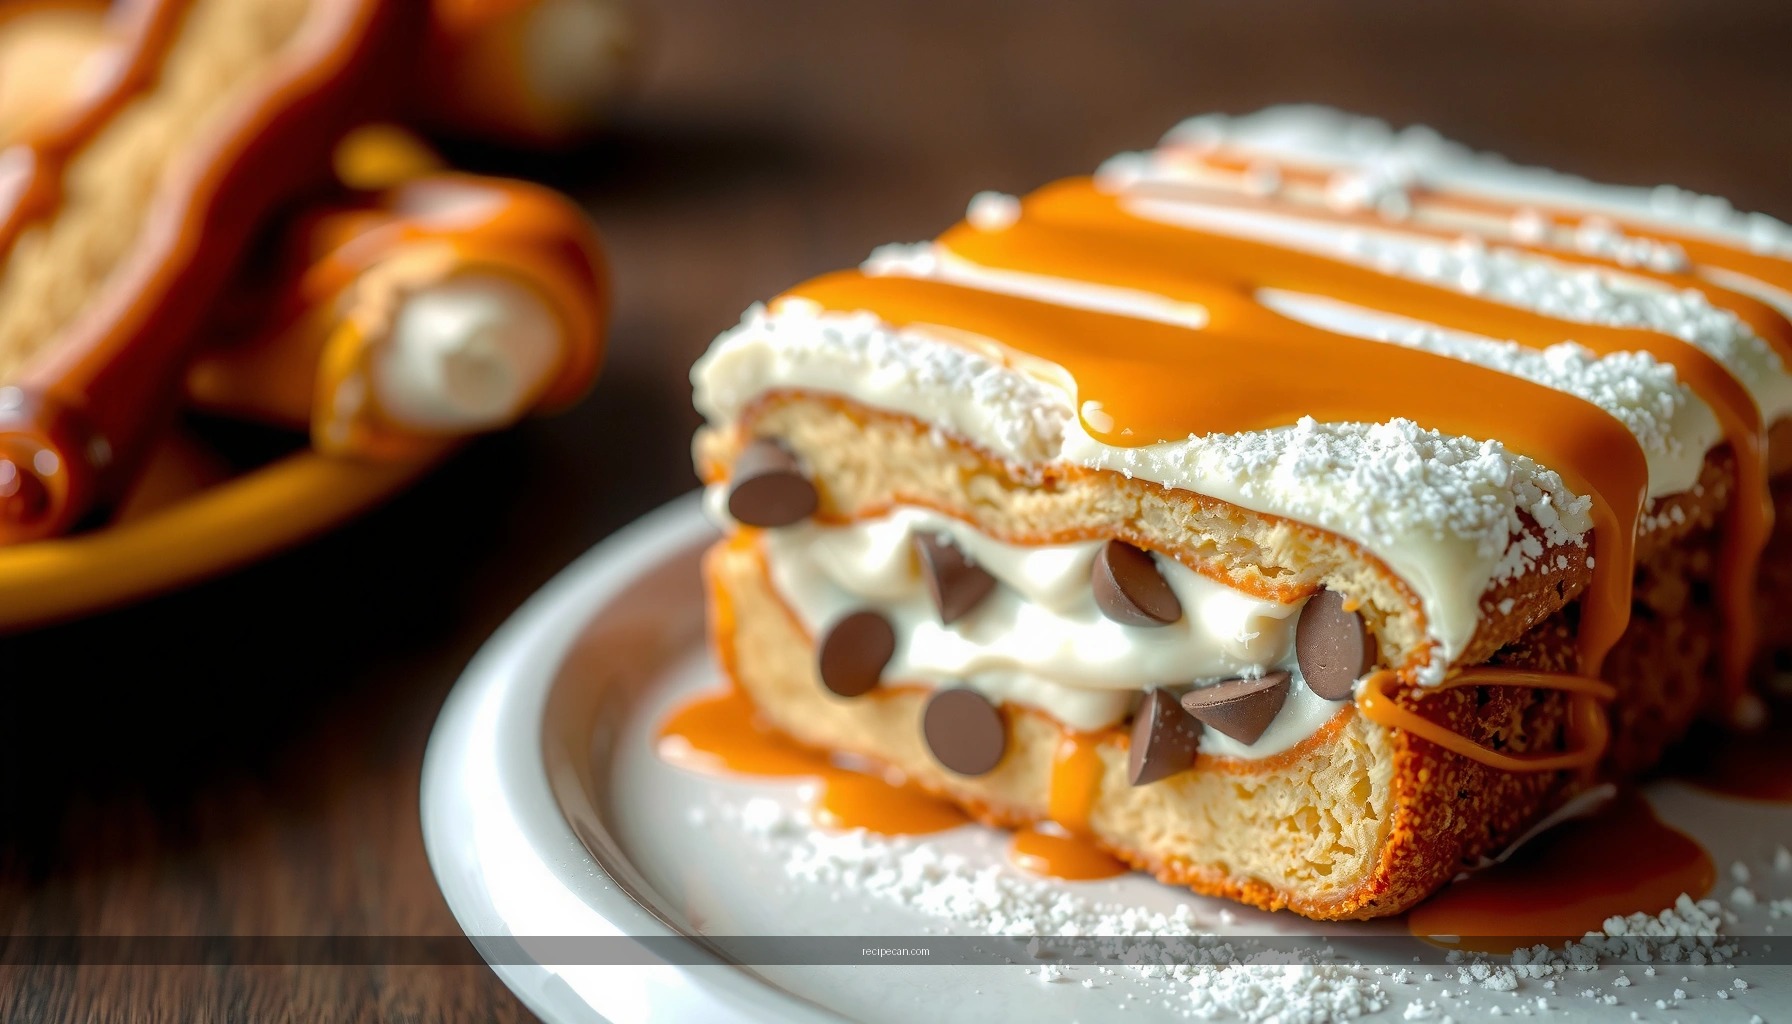
Cannoli-Style Toppings & Finishers
– Top with crushed cannoli shells or crushed cookies
– Add extra chocolate chips and a light dusting of powdered sugar
Toppings provide the final cannoli signature: crunch against cream and a clear chocolate presence.
Crunch options (choose one based on availability)
– Crushed cannoli shells: closest match to classic cannoli
– Crushed pizzelle: crisp, slightly sweet wafer texture
– Crushed vanilla wafers or biscotti: widely available and reliable
How to apply toppings for best bite
1. Sprinkle crushed shells/cookies evenly over the filled top.
2. Add a light scatter of extra mini chocolate chips so chocolate appears in multiple bites.
3. Dust lightly with powdered sugar for a bakery-style finish.
Timing note:
If you’re serving within a few hours, you can top right before serving for maximum crunch. If you’re chilling overnight (recommended), the crumbs will slightly soften. That’s not a drawback—just know the texture will shift from crisp to “soft-crunch,” similar to many layered Italian desserts.
Cannoli Poke Cake Variations: Time, Make-Ahead Fit & Crowd Appeal (Yields: ~10–12 slices)
| # | Variation | Prep + Bake | Chill Needed | Make-Ahead Fit | Flavor Crowd Rating | Chilling Benefit |
|---|---|---|---|---|---|---|
| 1 | Classic Chocolate-Chip Ricotta | 45 min | 4–8 hrs | 9/10 | ★★★★★ | High (sets + thickens) |
| 2 | Lemon-vanilla Ricotta (Bright Cannoli) | 50 min | 4–6 hrs | 8/10 | ★★★★☆ | High (flavors meld) |
| 3 | Almond-Pistachio Cannoli Style | 55 min | 6–10 hrs | 8/10 | ★★★★☆ | High (nut crunch stabilizes) |
| 4 | Espresso-Chocolate Ricotta | 50 min | 5–8 hrs | 9/10 | ★★★★☆ | High (coffee deepens) |
| 5 | Berry-Chip Cannoli (Strawberry or Cherry) | 55 min | 4–6 hrs | 6/10 | ★★★★☆ | Medium (berries can soften) |
| 6 | Cookie-Crumble Cannoli (Extra Crunch) | 45 min | 3–6 hrs | 8/10 | ★★★★★ | High (crunch transfers) |
| 7 | Gluten-Free Vanilla Base + Ricotta | 55 min | 6–10 hrs | 8/10 | ★★★★☆ | High (structure firms up) |
Make-Ahead, Storage, and Serving Tips
– Chill at least a few hours (or overnight) for best flavor and set
– Store covered in the refrigerator and serve cold for the creamiest bite
Cannoli poke cake is one of the rare desserts that benefits from planning. The holes and filling give the cake time to equilibrate, meaning every slice becomes more cohesive and creamy as it rests.
Ideal make-ahead timeline
– Minimum: chill 4 hours so the filling sets and the cake absorbs creaminess.
– Best: chill overnight for the most unified texture and the cleanest slice.
– Toppings strategy: if you want maximum crunch, add a portion of crushed shells/cookies right before serving while keeping the rest on the cake.
Storage
– Keep the cake covered in the refrigerator to prevent drying.
– Expect best texture in the first 3 days. After that, crumbs may soften further, but flavor typically remains strong.
– Freezing is possible, but freezing can slightly change crumb and dairy texture—if you need a long timeline, refrigerating is usually the higher-quality option.
Serving
Serve cold. That temperature helps ricotta fillings hold shape, and it also enhances the flavor contrast between vanilla sweetness and chocolate richness.
Operational tip for events
If you’re transporting the cake, bring toppings separately and add them on-site (or add them with a light hand, then top again). This reduces crunch loss and ensures a fresh, bakery-style presentation.
Serve this cannoli poke cake chilled to enjoy that signature creamy ricotta flavor in every forkful. Gather your ingredients, follow the assembly steps, and chill before serving—then share it at your next gathering or save it for a sweet dessert win all week.
This cannoli poke cake works because it’s engineered for flavor distribution: a vanilla base absorbs creamy ricotta through evenly placed holes, while chocolate chips and crushed cannoli-style crunch create the classic contrast every cannoli lover expects. Bake, cool fully, mix a smooth ricotta filling, assemble with generous but controlled filling, chill for best results, and serve cold for the most consistent texture.
Frequently Asked Questions
What is a cannoli poke cake and how is it different from classic cannoli?
A cannoli poke cake is a vanilla cake baked and then poked with holes so a sweet ricotta-based filling can seep in, creating a cannoli-inspired flavor throughout each slice. Instead of stuffing individual shells like classic cannoli, the cake absorbs the filling and is often finished with chocolate chips, whipped topping, and a dusting of powdered sugar. This makes it an easy cannoli dessert that delivers the same creamy, dessert-shop vibe without the shell work.
How do you make a cannoli poke cake from scratch without a runny filling?
Start by baking the cake and letting it cool completely before you poke it—warm cake can cause the cannoli filling to become watery. Whisk ricotta with powdered sugar and vanilla, then fold in whipped topping (or fold in thickened whipped cream) so the cannoli poke cake filling holds its shape. Use a gentle pour into the holes and chill the cake until set, which helps the cannoli filling firm up and prevents soggy layers.
Why does my cannoli poke cake turn out soggy, and how can I fix it?
Sogginess usually happens when the cake is poked too early, the filling is too thin, or you pour in too much liquid at once. Let the cake cool fully, use a thicker ricotta mixture (often including whipped topping) rather than plain ricotta alone, and add the filling gradually so it absorbs instead of pooling. After assembly, refrigerate for several hours—an essential step for a thick, scoopable cannoli poke cake texture.
Which ingredients make the best cannoli poke cake filling—ricotta or cream cheese?
Traditional cannoli flavor comes from sweetened ricotta, but mixing ricotta with a small amount of cream cheese is a common technique for extra stability and a denser filling. If your ricotta is watery, draining it first helps the cannoli poke cake stay creamy without thinning. For a more authentic taste, season the filling with vanilla and a pinch of salt, then fold in chocolate chips for that classic cannoli crunch.
What’s the best way to decorate a cannoli poke cake for a party-ready finish?
For a classic cannoli-inspired look, pipe or spread whipped topping over the top and sprinkle with mini chocolate chips. You can also add a light dusting of powdered sugar and garnish with chopped pistachios for a pistachio-cannoli vibe. If you’re making it ahead, assemble and chill first, then decorate right before serving so the toppings stay fresh and the cannoli poke cake slices hold their shape.
References
- Google Scholar Google Scholar
https://scholar.google.com/scholar?q=cannoli+poke+cake+recipe - Google Scholar Google Scholar
https://scholar.google.com/scholar?q=poke+cake+technique+inject+filling - Google Scholar Google Scholar
https://scholar.google.com/scholar?q=cannoli+recipe+ricotta+sugar+cannoli+shelf+life - Cannoli
https://en.wikipedia.org/wiki/Cannoli - https://www.britannica.com/topic/cannoli
https://www.britannica.com/topic/cannoli - Poke cake
https://en.wikipedia.org/wiki/Poke_cake - Ricotta
https://en.wikipedia.org/wiki/Ricotta - Mascarpone
https://en.wikipedia.org/wiki/Mascarpone - Cake
https://en.wikipedia.org/wiki/Cake - Dessert
https://en.wikipedia.org/wiki/Dessert


