Want a Nutella milkshake recipe that’s truly creamy and ready in minutes? This simple, no-fuss method delivers a thick chocolate-hazelnut shake with the right balance of sweetness and Nutella flavor using everyday ingredients. If you need a quick crowd-pleaser or a late-night treat, this is the fastest way to get it.
Make a creamy Nutella milkshake by blending Nutella with cold milk (and optionally ice cream) until smooth, then serve right away. With the right ratio and a brief technique adjustment (more ice for body, a touch of salt for depth), you can achieve a thick, chocolate-hazelnut texture that rivals café-style results in minutes.
Ingredients for a Perfect Nutella Milkshake

– Nutella (the star): typically 2–3 heaping tablespoons for a rich, chocolate-hazelnut base
– Cold milk: whole milk is ideal for creaminess, but low-fat milk works too—just expect a slightly lighter mouthfeel
– Ice or ice cream:
– Ice thickens via chilling and dilution control
– Ice cream increases thickness, creaminess, and “milkshake-shop” flavor density
– Optional add-ins like whipped cream or chocolate shavings: for texture contrast and presentation
In a professional kitchen or a home “test-and-tune” approach, the goal is consistency: you want a stable emulsion between the Nutella (fat + cocoa solids) and the milk (water + proteins + sugar). Cold ingredients help because they slow ingredient separation and reduce the risk of a thin, oily top layer. Also, since Nutella is already sweet, you’ll rarely need additional sugar—what you may need is balance (salt and/or vanilla) and the right viscosity (ice vs. milk).
Quick practical reference (recommended ratios by target thickness):
Nutella Milkshake Ratios for 1 Serving (Approx.)
| # | Target Texture | Nutella (tbsp) | Cold Milk (ml) | Ice / Ice Cream | Thickness Rating |
|---|---|---|---|---|---|
| 1 | Classic thick (stirred + spoonable) | 3 | 120 | 3–4 ice cubes | ★★★★☆ |
| 2 | Café-style thick (milkshake-shop feel) | 3 | 100 | 60 g ice cream | ★★★★★ |
| 3 | Thick pour (still drinkable) | 2.5 | 130 | 2–3 ice cubes | ★★★★☆ |
| 4 | Balanced (easy sip) | 2.25 | 150 | 1–2 ice cubes | ★★★☆☆ |
| 5 | Looser (refreshing, less dense) | 2 | 180 | More ice if needed | ★★☆☆☆ |
| 6 | Extra rich (spoon-thick) | 3.5 | 90 | 60–90 g ice cream | ★★★★★ |
| 7 | “No ice cream” option (ice-only) | 3 | 110 | 4–6 ice cubes | ★★★★☆ |
This table gives you a “starting point” you can standardize across servings—useful when you want consistent results for family, guests, or a small office treat.
Step-by-Step Nutella Milkshake Recipe

– Blend Nutella with milk (and ice/ice cream) until fully smooth
– Taste, then adjust sweetness or thickness by adding more milk or ice
Here’s a method that’s fast, repeatable, and designed to minimize graininess (Nutella can be slightly resistant if your blender is weak or if you add ingredients in the wrong order).
1. Chill your ingredients first (if possible). Cold milk and cold Nutella-style spread blend more smoothly and reduce separation.
2. Add liquids first, then Nutella. Pour in your cold milk to help the blender move the Nutella quickly. Add Nutella after.
3. Add your thickener.
– For a pure ice milkshake: add ice cubes
– For a thick, dessert-like result: add ice cream (the texture will be closer to a classic milkshake)
4. Blend in short pulses. Start with 15–20 second blending, pause to scrape down sides, then blend again until fully smooth. (This prevents under-mixed Nutella streaks.)
5. Check viscosity and adjust.
– If it’s too thick: add 1–2 tablespoons milk, blend 5–10 seconds
– If it’s too thin: add a few more ice cubes or a small scoop of ice cream, blend again
6. Serve immediately. Nutella milkshakes thicken less over time as ice melts; fresh blending is the consistency sweet spot.
Time-efficient workflow tip: If you’re serving multiple people, batch your milkshake base (milk + Nutella), blend once, then portion into glasses and top as you go. This keeps texture consistent while still delivering “just blended” quality.
Achieving the Right Thickness and Texture

– Use less milk for a thicker milkshake, more milk for a looser pour
– Chill ingredients beforehand for a colder, creamier result
Thickness is driven by three main variables: fat content, dilution, and temperature.
1) Milk-to-Nutella ratio
Nutella brings sugar, cocoa solids, and fats. When you add more milk, you increase water content and reduce viscosity—resulting in a looser pour. For a thicker mouthfeel, start with slightly less milk than you think you need, then adjust after blending.
2) Ice vs. ice cream (the practical choice)
– Ice mainly adds chilling and small dilution as it melts. It’s great for a thicker shake without needing dairy-heavy additions.
– Ice cream adds fat and air (depending on brand), which boosts creaminess and makes the shake stable. If your goal is “thick and spoonable,” ice cream typically wins.
3) Blender technique and speed
A powerful blender pulverizes ice efficiently and emulsifies the Nutella. If your blender struggles:
– Reduce ice size (use smaller cubes)
– Blend longer in pulses
– Scrape down sides to prevent sticky Nutella from clinging to the container
4) Temperature control
Chilling ingredients helps the emulsion hold together. If the milk is warm, the shake can taste oily or separate faster. Aim for cold milk—directly from the fridge is fine.
Sweetness and Flavor Boost Options

– Add a pinch of salt to enhance the chocolate flavor
– Try vanilla extract or a banana for a richer taste
Nutella already contains sugar and hazelnut notes, so additional sweeteners are usually unnecessary. Instead, focus on flavor enhancement and rounding.
Salt: the “pro” move
A pinch of salt amplifies chocolate and makes the hazelnut flavor feel more pronounced. Use it like you would in dessert baking: small amount, big impact.
Vanilla extract: smoother chocolate aroma
Add ½ teaspoon vanilla extract for a more layered profile—especially if you’re using a looser pour and want to prevent the milk from dominating.
Banana: creaminess + sweetness without extra sugar
Banana thickens naturally (banana starches + mashing effect), and it pairs exceptionally with hazelnut and cocoa. For best results:
– Use ½ small ripe banana per serving
– Blend fully to avoid banana chunks
Optional “barista-style” upgrade
For a more complex dessert flavor:
– Add 1 tablespoon cocoa powder (if you want a deeper chocolate intensity)
– Keep Nutella amount stable to avoid overpowering sweetness
Serving and Topping Ideas
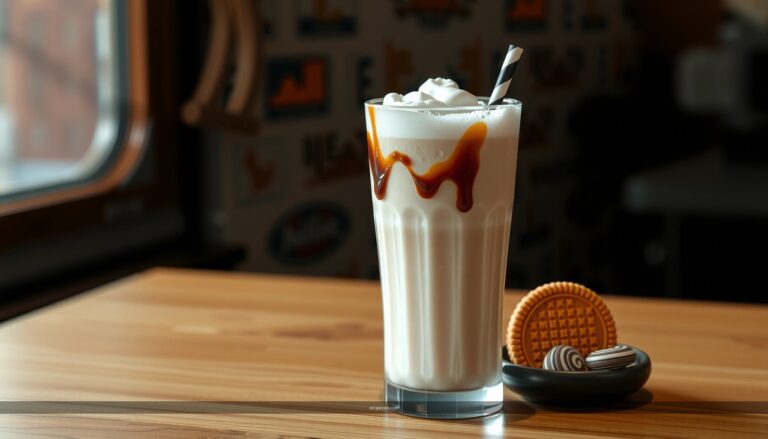
– Pour into a chilled glass and top with whipped cream
– Finish with Nutella drizzle, sprinkles, or crushed hazelnuts
Presentation matters because it signals quality—especially if you’re serving this at home like a café experience.– Chilled glassware: a quick chill in the freezer for 5–10 minutes helps the shake stay colder longer.
– Whipped cream topping: adds lightness and visual height.
– Nutella drizzle: use a spoon to create thin lines; this also adds extra chocolate pockets throughout the drink.
– Texture toppings:
– Chocolate shavings for elegant contrast
– Crushed hazelnuts for nuttiness and crunch
– Chocolate sprinkles for a fun, kid-friendly finish
If you want a consistent look every time, plate a topping “bar” in small bowls—drizzle and finish can be quick even with multiple guests.
Storage and Make-Ahead Tips
– Best served right after blending for the smoothest texture
– If needed, refrigerate briefly and re-stir (or quick blend) before serving
A Nutella milkshake is at its best when served fresh. However, life doesn’t always allow perfect timing—so here’s how to make make-ahead feasible without sacrificing too much texture.
Best practice
– Serve immediately after blending. This keeps the emulsion smooth and the cold temperature consistent.
If you must hold it
1. Refrigerate briefly (up to ~1–2 hours).
2. Stir vigorously or quick-blend before serving. This re-emulsifies the Nutella and restores texture.
Freezing note
Avoid freezing milkshakes if you want a creamy texture. Freezing tends to create icier, grainier results once thawed.
Small-batch strategy
If you’re preparing for more than one person:
– Blend the base first, then finish with ice or ice cream right before serving
– Portion into glasses and top immediately
This approach keeps the shake from “setting” or losing its smooth, thick consistency.
Make your Nutella milkshake smooth, thick, and chocolatey by blending Nutella with cold milk and adjusting with ice or ice cream to your preferred consistency. Follow the steps, choose your favorite toppings, and serve immediately—then try a flavor add-in next time for a fun twist.
Nutella milkshakes are one of the fastest “high satisfaction” desserts you can make at home: blend cold milk with Nutella, control thickness using less milk or more ice/ice cream, and fine-tune flavor with a pinch of salt or a splash of vanilla. With a repeatable ratio and a simple technique (pulse blending and quick serving), you can reliably produce a thick, chocolate-hazelnut shake that stays smooth from the first sip to the last.
References
- Nutella
https://en.wikipedia.org/wiki/Nutella - Milkshake
https://en.wikipedia.org/wiki/Milkshake - Chocolate milk
https://en.wikipedia.org/wiki/Chocolate_milk - Hazelnut
https://en.wikipedia.org/wiki/Hazelnut - Chocolate
https://en.wikipedia.org/wiki/Chocolate - https://www.britannica.com/food/milkshake
https://www.britannica.com/food/milkshake - https://www.britannica.com/food/chocolate
https://www.britannica.com/food/chocolate - Google Scholar Google Scholar
https://scholar.google.com/scholar?q=nutella+milkshake+recipe - Google Scholar Google Scholar
https://scholar.google.com/scholar?q=hazelnut+chocolate+milkshake+recipe - Google Scholar Google Scholar
https://scholar.google.com/scholar?q=milkshake+emulsion+chocolate+sauce+technique