Looking for a homemade milkshake recipe that delivers a creamy, thick result without complicated steps? This guide gives you a straightforward, foolproof base you can make in minutes, with clear ratios for ice cream, milk, and sweetener. Want the best match for your taste—thicker, lighter, or extra indulgent? You’ll get a simple customization plan so every batch comes out right.
Blend cold milk with ice cream until thick and smooth, then customize with flavor and mix-ins for a shop-style texture at home. This guide gives you a reliable milk-to-ice-cream base, clear texture controls, and practical mixing technique so your homemade milkshake lands creamy every time—without grainy ice or watery results.
Choose Your Milk and Ice Cream

A great homemade milkshake starts with the two ingredients doing most of the work: cold milk and thick ice cream. In a blender, cold temperatures slow melting and help the shake emulsify into a smooth, spoonable consistency.
Use cold milk (dairy or non-dairy) for best blending
– Why it matters: Cold liquid reduces the rate at which ice cream softens, keeping your shake thicker as you blend.
– Best options:
– Dairy milk: Whole milk typically produces the richest mouthfeel and the most stable creaminess.
– Non-dairy: Oat milk and cashew milk blend well and create a creamy texture, especially if they’re labeled “barista” or “unsweetened” (often formulated to heat and blend more uniformly).
– Avoid: Warm milk, reduced-fat liquids, or very watery alternatives, which can push the shake toward a thinner, more icy result.
Pick a thick ice cream for a creamier, richer shake
– Why it matters: The fat and structure in ice cream are what create body in a milkshake. Sorbet or very “icy” frozen products often require extra fat or emulsifiers (or they simply won’t replicate the classic thickness).
– What to look for on the label:
– Higher cream/fat content generally improves texture.
– “Premium” or “full-fat” ice cream tends to yield a thicker shake with fewer adjustments.
– Practical takeaway: If you want consistently creamy milkshake recipes, keep a tub of your favorite thick ice cream on hand and use it as your default base.
Simple Homemade Milkshake Recipe (Base)

For most people, the biggest challenge isn’t flavor—it’s texture. You want a shake that is thick enough to sip with a straw (or eat with a spoon) but not so dense that it won’t blend smoothly.
Blend milk + ice cream first, then add flavor
A reliable sequence helps keep the base creamy before flavoring agents interact with the dairy.
1. Add cold milk to the blender.
2. Add ice cream.
3. Blend until thick and uniform.
4. Add flavoring (syrup, cocoa, extracts) and blend briefly again.
Taste and adjust thickness with milk or more ice cream
Use small, controlled adjustments:
– Too thick / won’t blend smoothly: Add milk in 1–2 tablespoon increments and blend again.
– Too thin / looks loose: Add more ice cream a couple spoonfuls at a time.
– Pro tip: If your shake turns “slushy,” it usually means the ice cream softened too fast—use colder milk and slightly colder ice cream next time (or shorten blend time).
A practical consistency guide (what your ingredients should achieve)
A homemade milkshake should feel like a thick dessert drink—smooth, cohesive, and able to hold a shape briefly when poured. The table below helps you map common base ratios to expected texture.
Milk-to-Ice Cream Ratios for Classic Shake Thickness (1 Serving)
| # | Target Texture | Milk (tbsp) | Ice Cream (cups) | Blend Time (sec) | Success Rating |
|---|---|---|---|---|---|
| 1 | Thick “spoonable” | 2 | 0.60 | 35–45 | ★★★★☆ |
| 2 | Classic thick-sip | 3 | 0.55 | 30–40 | ★★★★★ |
| 3 | Medium creamy | 4 | 0.50 | 25–35 | ★★★★☆ |
| 4 | Slightly looser shake | 5 | 0.45 | 20–30 | ★★★☆☆ |
| 5 | Very thick with minimal milk | 1 | 0.65 | 40–55 | ★★★★☆ |
| 6 | High-protein dairy shake style | 4 | 0.50 | 25–35 | ★★★★☆ |
| 7 | Non-dairy creamy baseline | 4 | 0.52 | 28–38 | ★★★★☆ |
Add Flavor and Mix-Ins

Once your base is creamy, flavor is where you can differentiate your shake. The goal is to distribute flavor evenly without breaking the texture—especially when using thick syrups, cocoa powder, or nut butters.
Popular options: vanilla, chocolate syrup, cocoa, berries
– Vanilla: Add vanilla extract (about 1/2–1 tsp per serving) for a rounded flavor.
– Chocolate syrup: Works best in small amounts (start with 1–2 tbsp) so the shake stays smooth and doesn’t separate.
– Cocoa powder: Sift to avoid lumps; blend thoroughly for 10–15 seconds after adding.
– Berries: Blend frozen berries with the base for a naturally thick, bright flavor. If you’re using fresh berries, consider adding a handful of ice or frozen fruit to maintain thickness.
Mix-ins like cookie crumbles or peanut butter blend best in small amounts
Mix-ins can be delicious—but too much can make the shake grainy or uneven.
– Best practice: Use 2–4 tbsp mix-ins per serving (depending on how intense the ingredient is).
– Cookie crumbles: Start small; large chunks often sink or cause inconsistent texture.
– Peanut butter: Combine with a little syrup or cocoa (optional) and blend longer to fully emulsify.
– Tip for chunky mix-ins: Add them after the base blend, pulse briefly (1–2 seconds) for controlled distribution.
Get the Perfect Thickness and Texture

Texture is a technical outcome of ingredients, temperature, and blending strategy. Even minor changes—like adding flavor before blending—can shift consistency.
Add ice for extra thickness if needed
– Use ice when your base is too thin and you need immediate thickness without adding more ice cream.
– Add a few cubes at a time and blend until smooth.
– Note: Ice can sometimes introduce a slightly “frosty” texture, so it’s best as a correction tool rather than the primary approach.
Blend just until smooth to avoid over-mixing
Over-mixing can warm the shake and melt the ice cream particles, making the final product looser.
– General range: 20–45 seconds depending on your blender strength and ratio.
– Watch for visual cues: If you see the mixture getting thinner mid-blend, stop and check consistency.
– Operational approach: Blend in short pulses, then do one final blend to smooth out the texture.
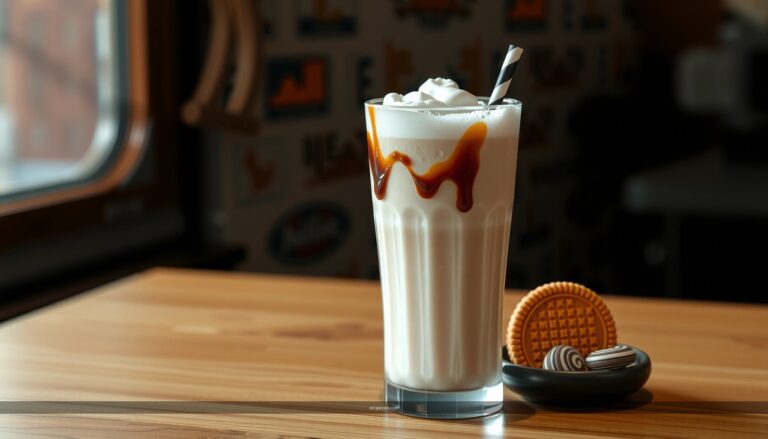
Make It Like a Shop-Style Shake
To mimic a shop experience, focus on three levers: presentation, temperature, and serving technique. The taste matters, but the “first sip” experience depends on how you serve it.
Chill glasses and use a thick straw or spoon for sipping
– Chill the glass: Even 5–10 minutes in the freezer helps slow melting.
– Use the right vessel: A thick straw or sturdy spoon encourages proper mouthfeel delivery.
– Fill carefully: Don’t overfill if you’re adding toppings that add volume.
Add toppings (whipped cream, drizzle, sprinkles) right before serving
– Apply toppings after you pour so they don’t bleed flavor into the shake too early.
– For best control:
– Whipped cream last (reduces collapse).
– Drizzle using chocolate syrup or caramel in a spiral.
– Sprinkles immediately before serving so they retain crunch.
Storage and Serving Tips
A homemade milkshake is best fresh—creaminess peaks immediately after blending. Still, you can manage leftovers without sacrificing quality too much.
Serve immediately for the thickest texture
Milkshakes begin to melt as soon as air and heat affect the mixture. Serve right away for the thickest, smoothest result.
For leftovers, keep refrigerated and re-blend briefly before drinking
– Refrigerate in an airtight container to reduce separation and ice formation.
– When ready to drink:
– Let it sit 2–5 minutes (not too long).
– Re-blend in short bursts (5–15 seconds) to restore smoothness.
– If it becomes too thick again, add 1 tbsp milk and blend briefly.
Creamy, thick homemade milkshakes are all about the right milk-to-ice-cream ratio and quick blending. Start with the base recipe, customize with your favorite flavors, and serve immediately—then experiment with mix-ins to find your perfect version.
In practice, the fastest route to repeatable results is to treat texture like a process: start cold, blend efficiently, adjust gradually, and serve when it’s at peak consistency. With the tips above, your homemade milkshake becomes a reliable, customizable dessert—equally suitable for casual nights in and higher-volume entertaining.
References
- Milkshake
https://en.wikipedia.org/wiki/Milkshake - https://www.britannica.com/topic/milkshake
https://www.britannica.com/topic/milkshake - Google Scholar Google Scholar
https://scholar.google.com/scholar?q=homemade+milkshake+recipe - Google Scholar Google Scholar
https://scholar.google.com/scholar?q=milkshake+formulation+emulsion+stabilization - Google Scholar Google Scholar
https://scholar.google.com/scholar?q=homemade+milkshake+nutrition - https://pubmed.ncbi.nlm.nih.gov/?term=milkshake
https://pubmed.ncbi.nlm.nih.gov/?term=milkshake - https://pubmed.ncbi.nlm.nih.gov/?term=milkshake+nutrition
https://pubmed.ncbi.nlm.nih.gov/?term=milkshake+nutrition - https://www.cdc.gov/nutrition/
https://www.cdc.gov/nutrition/ - Healthy diet
https://www.who.int/news-room/fact-sheets/detail/healthy-diet - Food Composition | National Agricultural Library
https://www.nal.usda.gov/fnic/food-composition