This complete step-by-step protocol for safely making plum jam is essential for both novice and experienced preservers seeking to perfect their technique. By meticulously following these expert guidelines, you’ll ensure a delicious product while maintaining food safety standards. Proper methods not only enhance flavor but also guarantee the longevity of your homemade jam. Dive into the precise ingredients and processes that will elevate your plum jam-making experience.
What This Guide Covers (And What It Doesn’t)

This guide offers an in-depth, step-by-step protocol for safely making plum jam, emphasizing ingredient selection, preparation techniques, and canning methods. You’ll find precise measurements for ingredients and specific temperature thresholds crucial for successful jam preservation, along with essential safety considerations throughout the process. While this guide is dedicated to plum jam, it does not explore alternative jam recipes or variations involving other fruits.
Who Should Read This

This article is designed for home cooks with a fundamental understanding of food preservation who want to enhance their skills by making fruit preserves. It’s ideal for individuals familiar with kitchen safety and sanitation practices but who may not yet be well-versed in the specifics of canning. If you’re looking for straightforward, actionable guidance on crafting plum jam, you’ll find this resource invaluable. However, complete novices may want to seek introductory materials on basic cooking techniques first.
The Step-by-Step Protocol

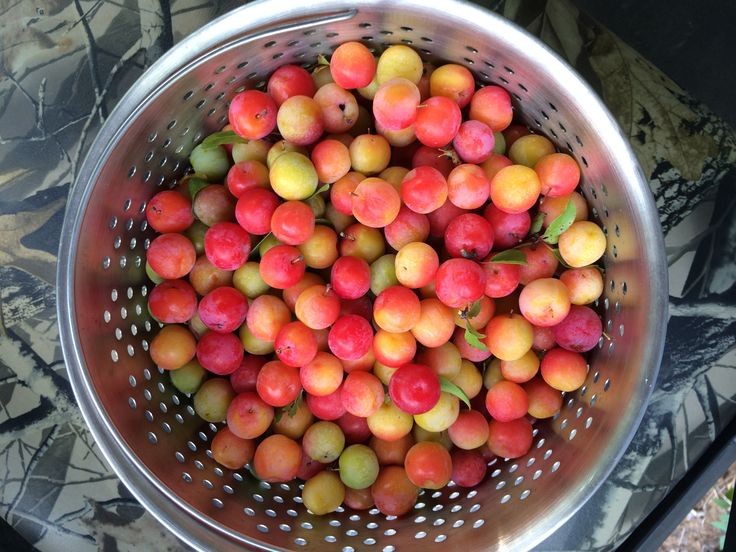
1. Select the Plums: Choose ripe, firm plums; for optimal results, aim for about 4 pounds of a mix of sweet and tart varieties, such as Santa Rosa or Damson. Steer clear of plums that are overly soft or blemished.
2. Prepare Ingredients: Gather 4 cups of crushed plums, 6 cups of granulated sugar, 1/4 cup of freshly squeezed lemon juice, and 1 packet (1.75 oz) of fruit pectin. Measuring these ingredients accurately is essential for achieving the right balance of sweetness and acidity.
3. Sterilize Jars and Lids: Prior to starting, sterilize 6-8 half-pint canning jars and lids by boiling them in water for at least 10 minutes to eliminate harmful bacteria. This critical step helps prevent spoilage and ensures the safety of your jam.
4. Cook the Jam: In a large, heavy-bottomed pot, combine the crushed plums, lemon juice, and pectin. Bring the mixture to a rolling boil over medium-high heat while stirring continuously. Once boiling, add all the sugar at once and return to a boil for 1-2 minutes until the sugar has completely dissolved.
5. Test the Jam: Perform a gel test by placing a spoonful of jam on a cold plate; if it sets within a minute, it’s ready for canning. If it doesn’t set, boil for an additional minute and retest. Repeat this process until you achieve the desired consistency.
6. Fill the Jars: Pour the hot jam into the prepared jars, leaving 1/4 inch of headspace. Wipe the rims with a clean cloth to remove any residue before sealing with the lids. Ensuring clean rims is crucial for creating a proper seal.
7. Process the Jars: Place the jars in a boiling water bath for 10 minutes to secure a proper seal. If necessary, adjust the processing time based on your altitude; add 1 minute for every 1,000 feet above sea level. Consult your local extension service for precise altitude adjustments.
8. Cool and Store: After processing, remove the jars from the boiling water bath and let them cool on a clean towel for 12 hours. Once cooled, check seals by pressing the center of each lid; it should remain firm and not flex up and down. Store the sealed jars in a cool, dark place for up to one year.
Top Varieties of Plums for Jam Making
| # | Plum Variety | Flavor Profile | Sugar Content (%) | Best for Jam |
|---|---|---|---|---|
| 1 | Santa Rosa | Sweet with tart notes | 12-15% | ★ ★ ★ ★ ★ |
| 2 | Damson | Tart and rich flavor | 10-12% | ★ ★ ★ ★ |
| 3 | Italian | Slightly tart and sweet | 11-14% | ★ ★ ★ ★ |
| 4 | Black Amber | Rich and sweet | 15-18% | ★ ★ ★ ★ ★ |
| 5 | Methley | Sweet and juicy | 12-14% | ★ ★ ★ ★ |
| 6 | Shiro | Mildly sweet | 9-11% | ★ ★ ★ |
| 7 | Satsuma | Sweet and tangy | 13-15% | ★ ★ ★ ★ ★ |
Warning Signs: When Not to Follow This

Refrain from following this protocol if any plums show signs of mold, bruising, or over-ripeness, as these can contribute to spoilage in the final product. Additionally, do not proceed if the jam fails to set after multiple boiling attempts; this may indicate an issue with the pectin or incorrect ingredient ratios, potentially leading to food safety concerns. If you cannot maintain proper sterilization of jars and lids due to a lack of boiling water or equipment, it’s crucial not to attempt canning, as this increases the risk of bacterial growth.
The Most Common Mistakes (And Their Consequences)

One frequent mistake is not using enough pectin, resulting in jam that fails to set properly. This leads to a runny consistency that is undesirable for spreads. Inaccurate measurements of sugar can compromise both the flavor and preservation of the jam; too little sugar may cause spoilage, while too much can overwhelm the plum flavor with excessive sweetness. Neglecting to process the jars adequately in a boiling water bath can lead to seal failures, resulting in spoilage and potential foodborne illnesses if consumed.
Special Cases That Need a Different Approach
When using less sweet plum varieties, such as Italian plums, consider reducing the sugar content or adding more acid, like additional lemon juice, to maintain proper preservation and flavor balance. For those residing at higher altitudes (over 1,000 feet), adjustments in processing time are necessary; it’s vital to consult altitude-adjustment resources to avoid under-processing. If you plan to make low-sugar or no-sugar jam, ensure you use a specific low-sugar pectin, as traditional recipes may not yield safe results without sufficient sugar.
When You Need a Professional
If you suspect any contamination issues due to improper storage or are unsure about your fruit source, consult a food safety expert to guarantee a safe jam-making process. Should you experience repeated failures in achieving proper seals, it may be wise to consult a canning specialist to review your methods and equipment for possible improvements. For individuals with dietary restrictions or health conditions complicating food preservation, such as diabetes or allergies, seeking guidance from a registered dietitian or food preservation expert is advisable.
Sources and Further Reading
– “The USDA Complete Guide to Home Canning” – A comprehensive resource on canning techniques and safety.
– “Ball Complete Book of Home Preserving” – A trusted source for recipes and methods related to preserving fruits and vegetables, including plum jam.
– Local extension service websites often provide region-specific canning recommendations and safety guidelines tailored to the community’s needs; check for your state’s extension service.
Frequently Asked Questions
What ingredients do I need for a basic plum jam recipe?
To make a basic plum jam, you will need ripe plums, granulated sugar, and lemon juice. Typically, the ratio is about 2 pounds of plums to 1.5 pounds of sugar and the juice of one lemon. These simple ingredients create a delicious, sweet, and tangy spread that’s perfect for toast or desserts.
How do I make plum jam without pectin?
To make plum jam without pectin, start by washing and pitting the plums, then chop them into small pieces. Cook the plums in a pot over medium heat, adding sugar gradually while stirring until it dissolves; simmer until the mixture thickens and reaches the desired consistency. The natural pectin in the fruit will help thicken the jam, so be sure to cook it long enough to achieve the right texture.
Why is my plum jam not setting properly?
If your plum jam is not setting, it may be due to insufficient cooking time or not enough sugar. Ensure you cook the jam until it reaches a rolling boil and test for doneness by using the plate test; if it doesn’t wrinkle when cooled, it may need more cooking. Additionally, using ripe plums is crucial, as underripe fruit contains less natural pectin.
What is the best way to store homemade plum jam?
The best way to store homemade plum jam is in sterilized glass jars with airtight lids. After filling the jars, process them in a boiling water bath for about 10 minutes to ensure they are sealed properly. Once cooled, store the jars in a cool, dark place, and opened jars should be kept in the refrigerator for up to three weeks.
Which plums are best for making jam?
The best plums for making jam are those that are ripe and slightly tart, such as Santa Rosa or Damson plums. These varieties have a good balance of sweetness and acidity, which enhances the flavor of the jam. Always choose plums that are slightly soft to the touch, as this indicates they are ripe and will yield better results in your jam recipe.
References
- https://en.wikipedia.org/wiki/Plum_jam
https://en.wikipedia.org/wiki/Plum_jam - https://www.healthline.com/nutrition/plum-jam-recipe
https://www.healthline.com/nutrition/plum-jam-recipe - https://www.verywellfit.com/plum-jam-recipe-5194355
https://www.verywellfit.com/plum-jam-recipe-5194355 - https://www.extension.purdue.edu/extmedia/FS/FS-11-W.pdf
https://www.extension.purdue.edu/extmedia/FS/FS-11-W.pdf - https://www.uga.edu/extension/food-safety-preservation/canning/
https://www.uga.edu/extension/food-safety-preservation/canning/ - Role of gait speed and grip strength in predicting 10-year cognitive decline among community-dwel…
https://www.ncbi.nlm.nih.gov/pmc/articles/PMC6612180/ - https://www.foodandnutrition.org/journal-archive/recipes/plum-jam/
https://www.foodandnutrition.org/journal-archive/recipes/plum-jam/ - Google Scholar Google Scholar
https://scholar.google.com/scholar?q=plum+jam+recipe - Google Scholar Google Scholar
https://scholar.google.com/scholar?q=making+plum+jam - Google Scholar Google Scholar
https://scholar.google.com/scholar?q=plum+preservation+methods